银河战士like开发日志
终于把毕设忙完了,开始填坑了,首先就是这个银河战士like的游戏,说实话我已经很长时间没做过Gameplay开发了,上来就做这种高难度的动作射击,感觉有些蠢。不过多亏了Mix and Jam开源了一个教程,少走不少弯路。为了自我监督,把开发日志记录在案。说实话我GP水平很差,这个日志应该会踩不少坑
Unity 2021.3.22 URP Windows11,使用内置的Plastic SCM做版本管理(Unity对Plastic SCM支持较好,尽管我更喜欢Git和P4V)
1. 添加角色模型
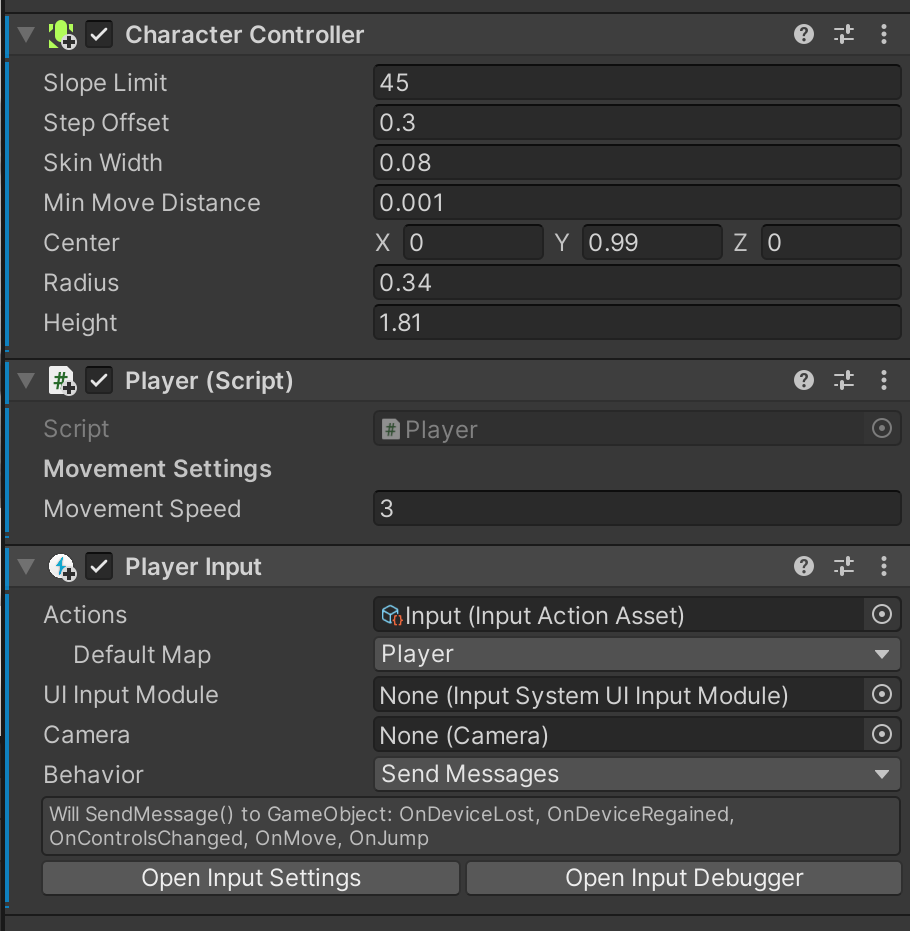
使用Package Manager添加插件Input System,Player Input组件和Input Action文件均属于该插件
从Mixamo找一个人物模型,放入场景中
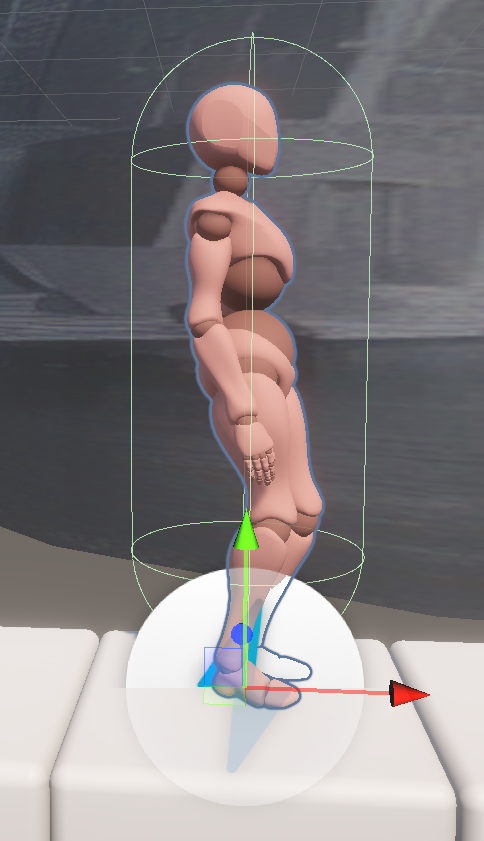
添加组件Character Controller(该组件会自带一个胶囊碰撞体,可以调整尺寸以适配角色)
添加组件Player Input
添加一个脚本PlayerController.cs
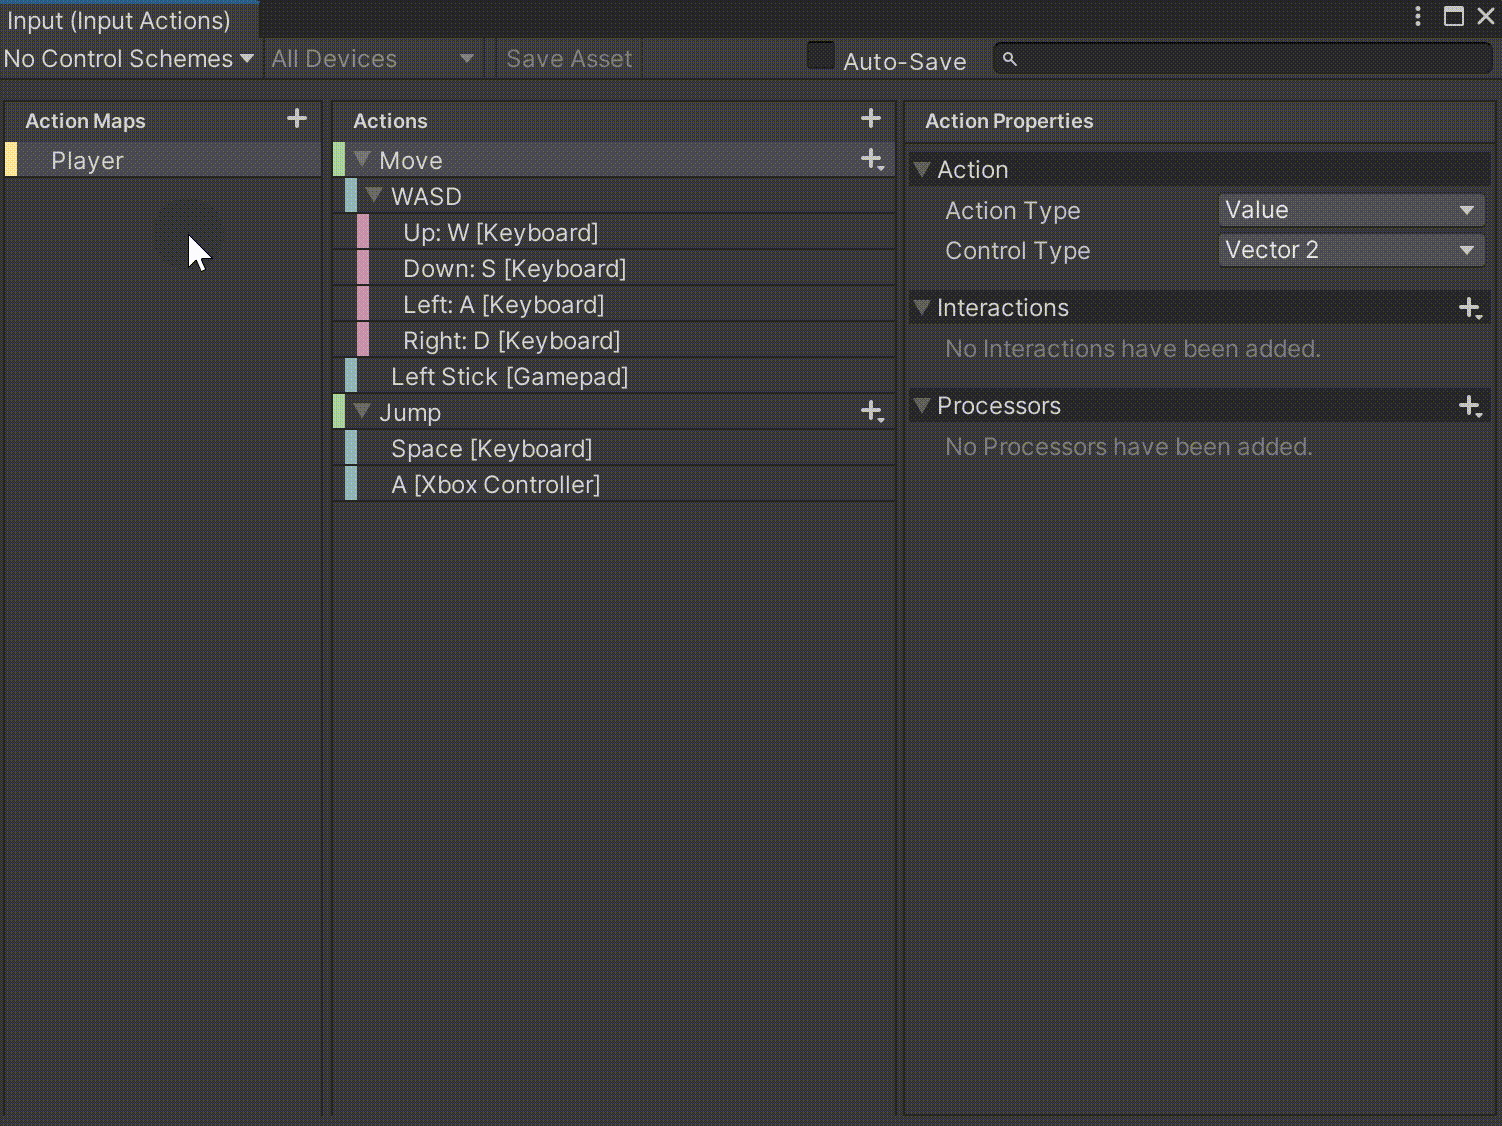
创建一个Input Action,添加一个Vector2类型的移动,一个跳跃按钮
将该文件拖入Player Input组件的Actions上
3. 编写移动脚本
public class Player : MonoBehaviour
{
private PlayerInput input;
private CharacterController controller;
[Header("Movement Settings")]
[SerializeField, Tooltip("水平移动速度")]
private float movementSpeed = 6f;
private Vector2 moveInput;
private void Start()
{
input = GetComponent<PlayerInput>();
controller = GetComponent<CharacterController>();
}
private void Update()
{
moveInput = input.actions["Move"].ReadValue<Vector2>();
bool isMoving = Mathf.Abs(moveInput.normalized.x) > 0.01f;
if (isMoving)
{
float hDir = moveInput.x > 0 ? 1 : -1;
controller.Move(Vector3.right * hDir * Mathf.Abs(moveInput.normalized.x * movementSpeed) * Time.deltaTime);
}
}
}
|
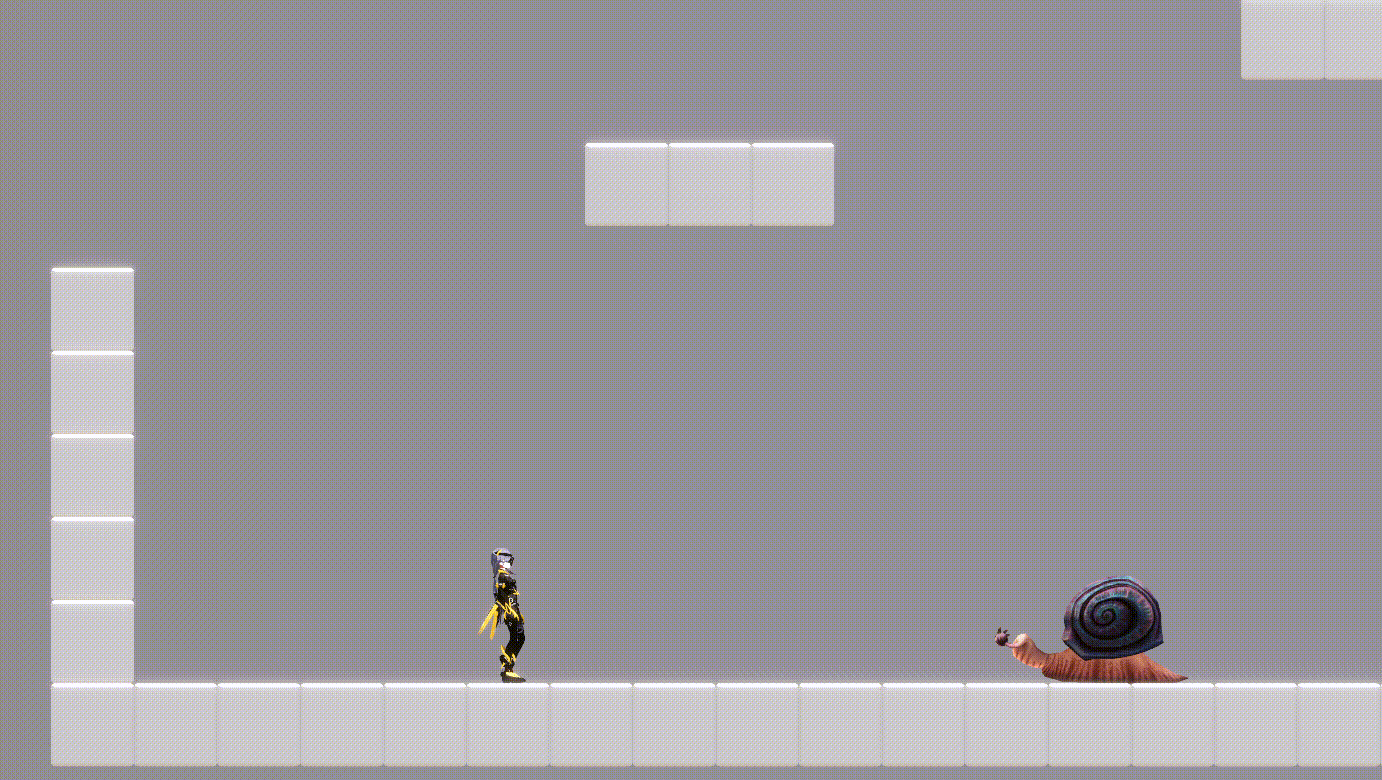
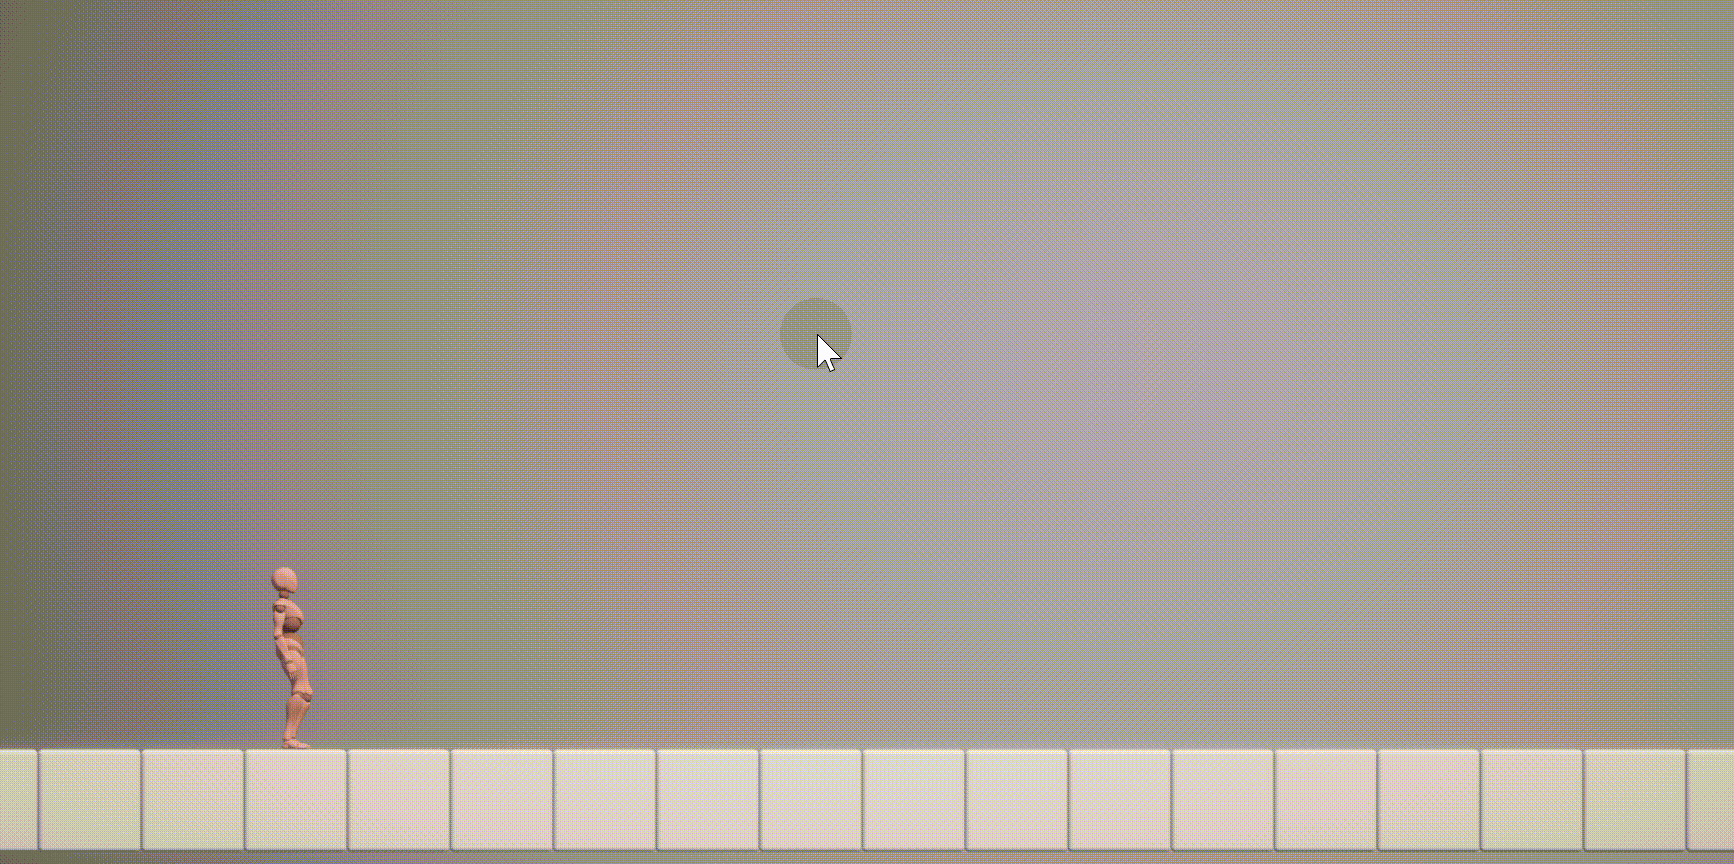
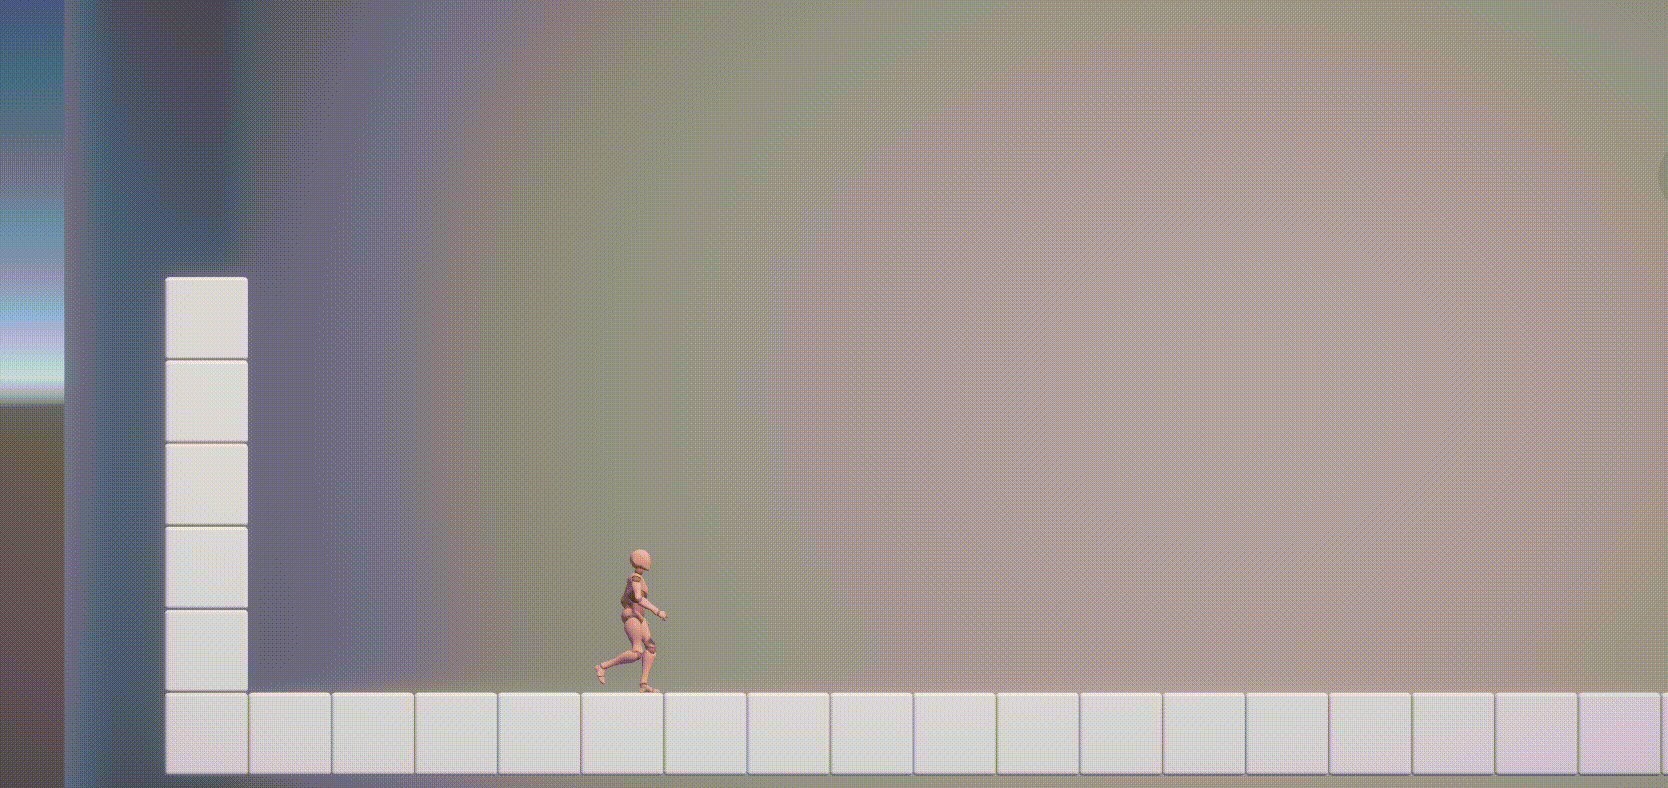
进入游戏后按AD键可以实现左右移动(注意坐标系,Unity的2D游戏通常会以x轴正方向为右,y轴正方向为上)
4. 移动动画
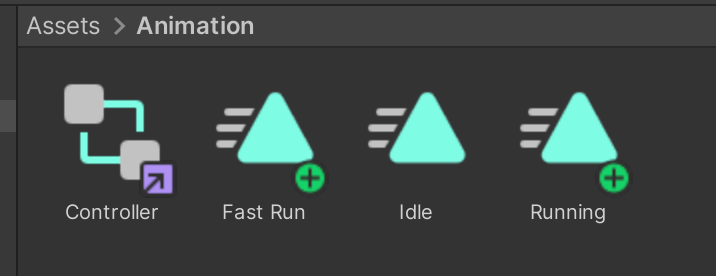
去mixamo找几段动画(动画存放在fbx文件中,将fbx导入unity后可以将动画片段抽离、切分),并创建一个Animation Controller
双击打开Animation Controller后,右键创建一个BlendTree,将该BlendTree与Entry相连,并修改BlendTree的参数名为MoveInput
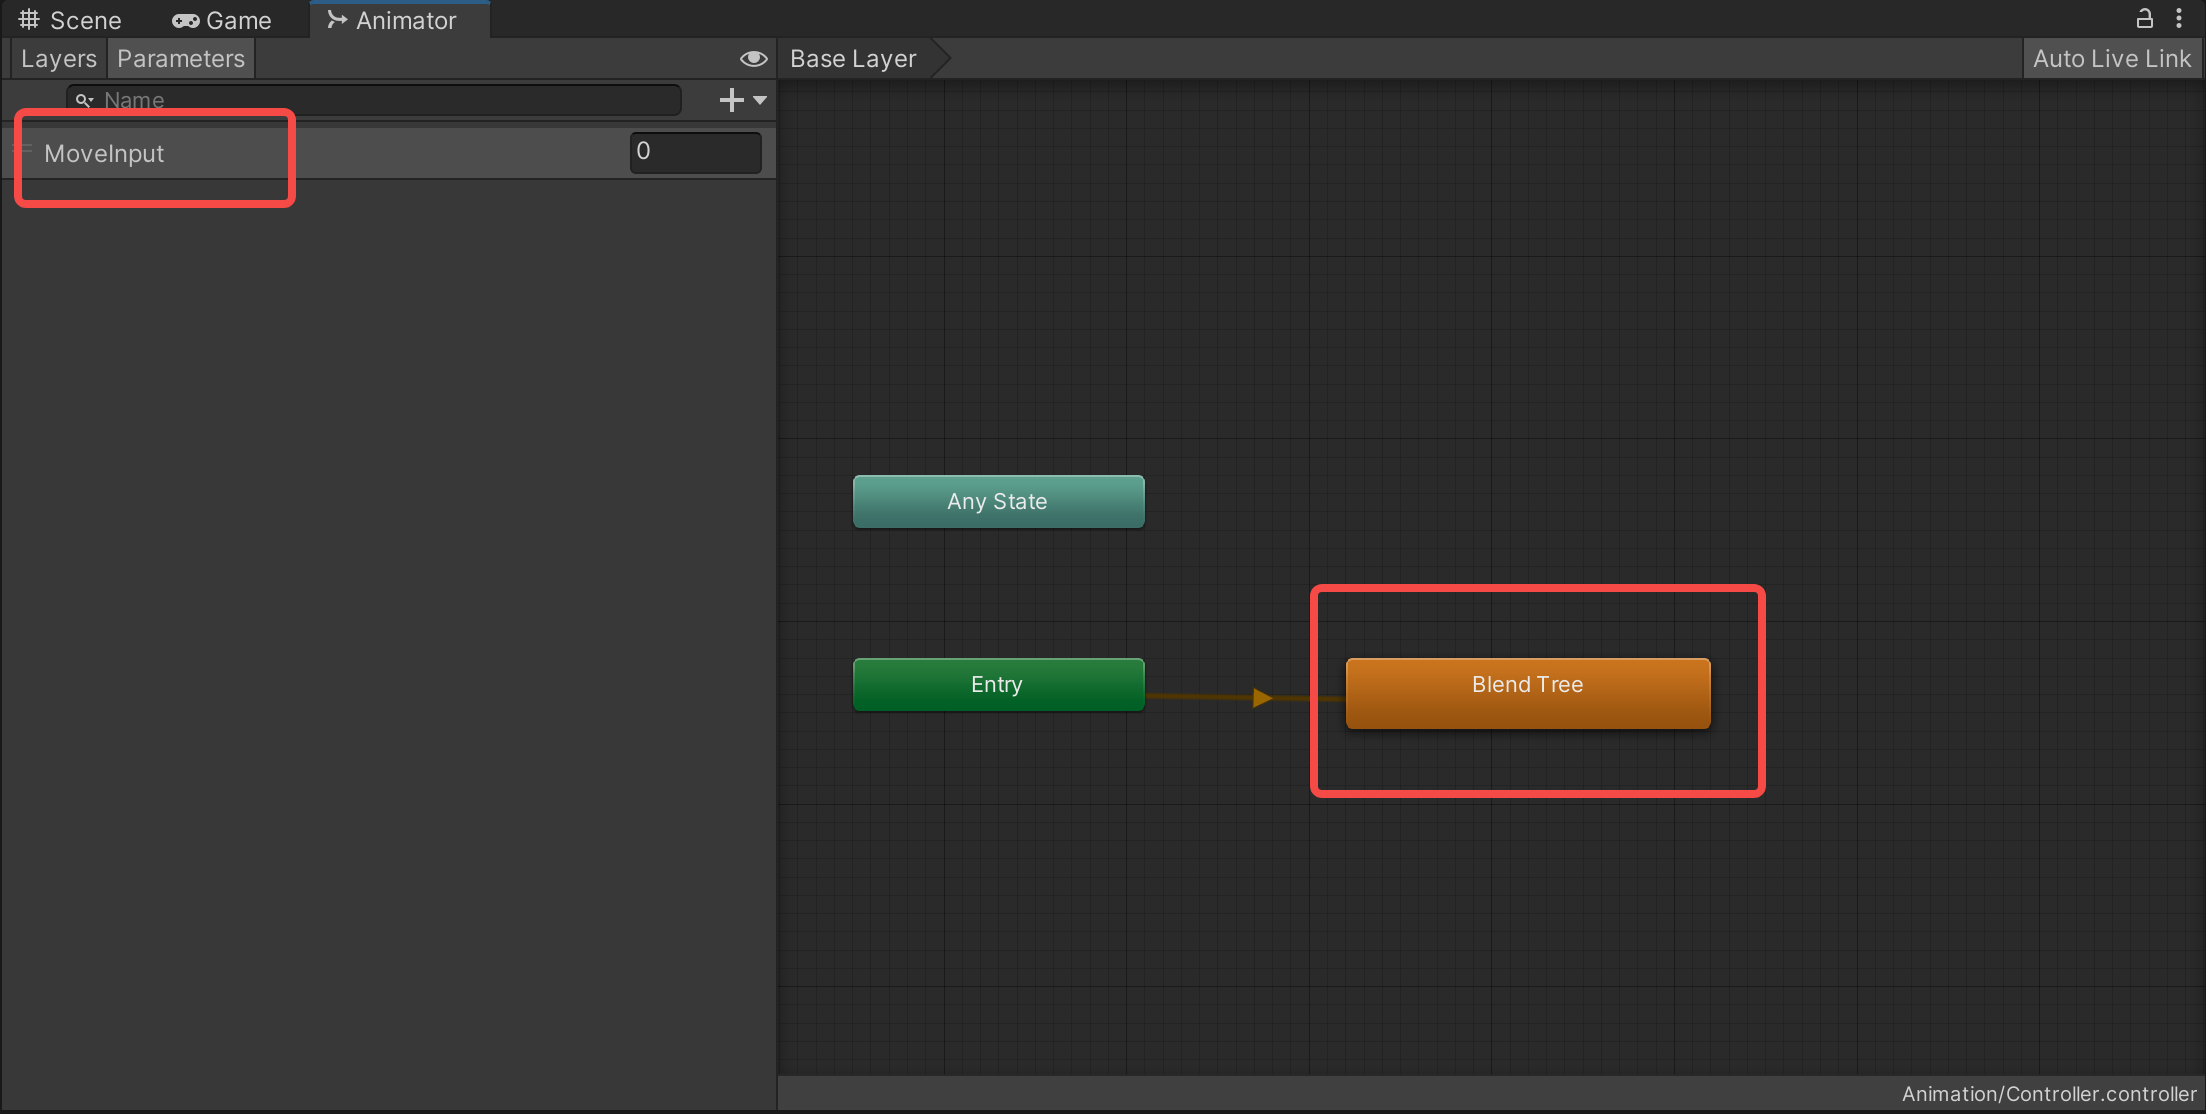
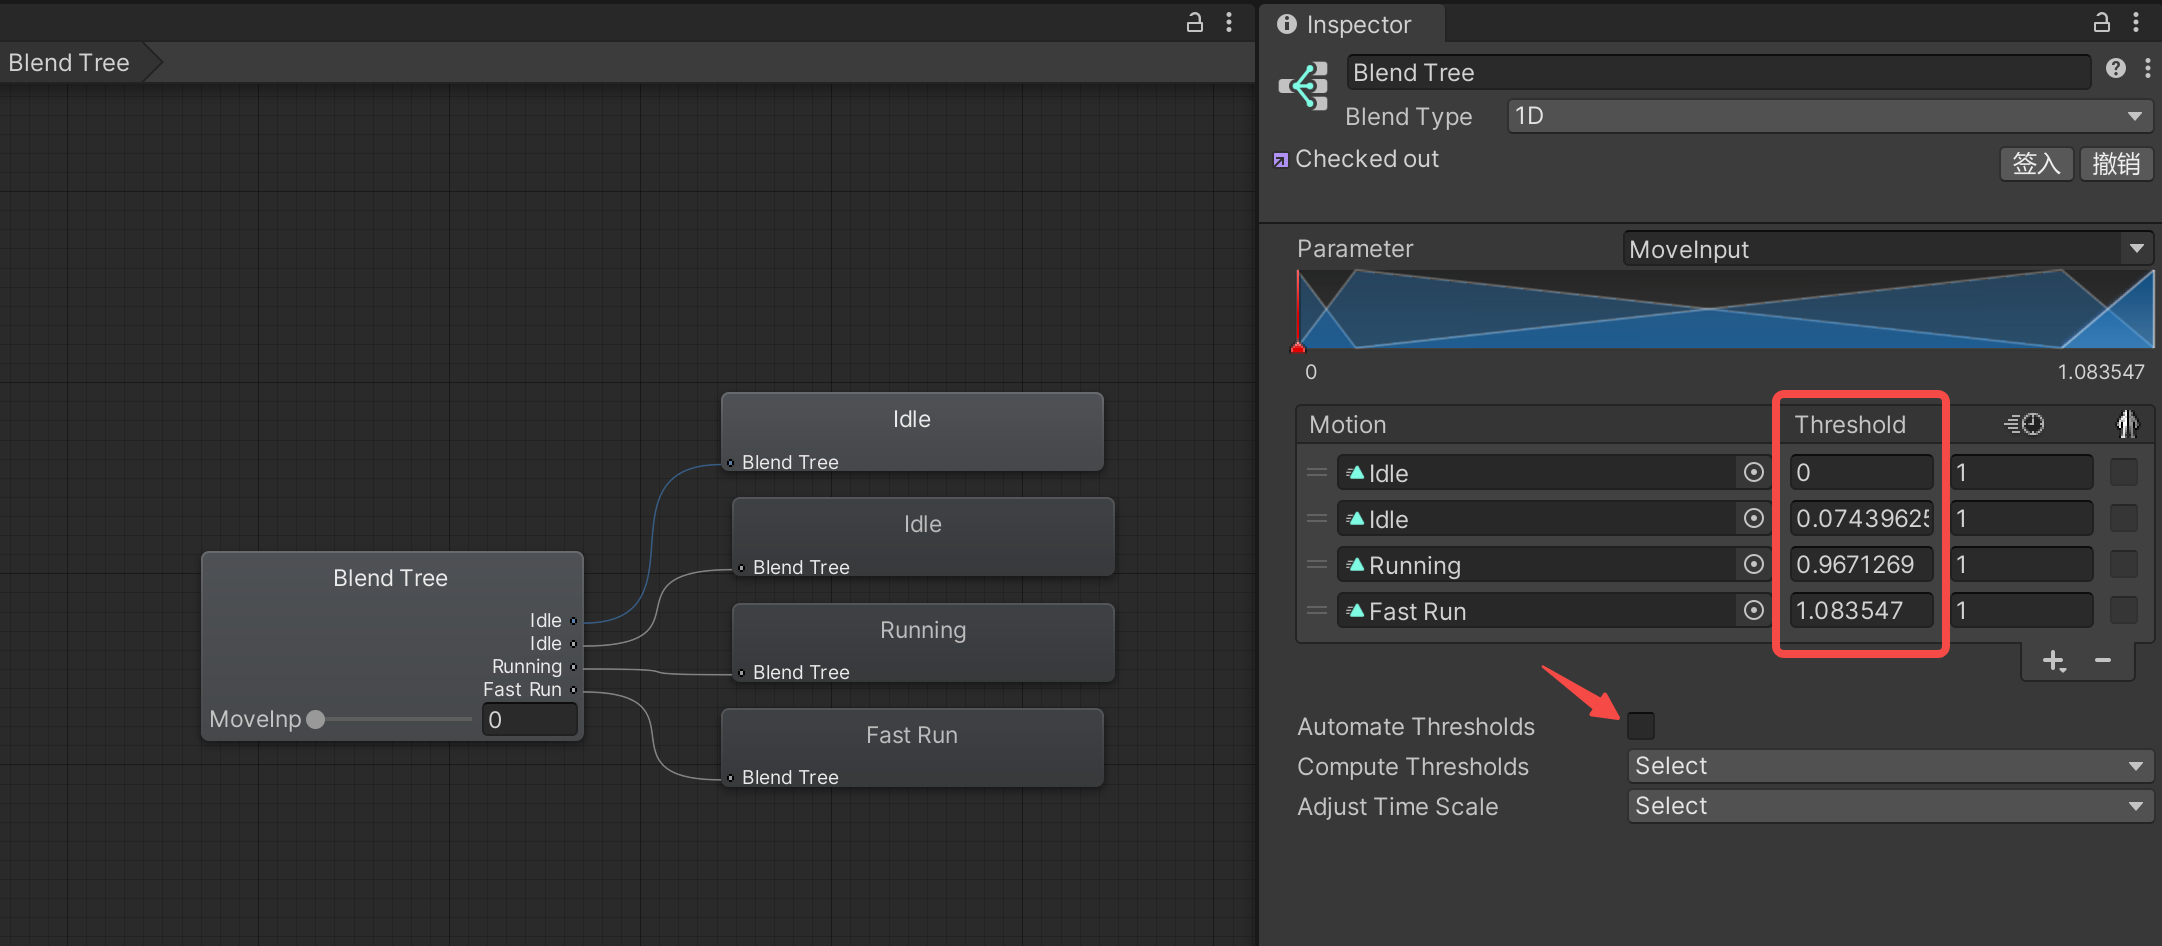
双击进入BlendTree,按右键添加多个Motion,并调整他们的Threshold信息
在角色上添加Animator组件,并将上面创建的Animation Controller拖到上面
修改PlayerController.cs脚本,根据输入设置动画参数,并处理转向
private PlayerInput input;
private CharacterController controller;
+private Animator animator;

private void Start()
{
    input = GetComponent<PlayerInput>();
    controller = GetComponent<CharacterController>();
+    animator = GetComponent<Animator>();
}

private void Update()
{
    moveInput = input.actions["Move"].ReadValue<Vector2>();

    bool isMoving = Mathf.Abs(moveInput.normalized.x) > 0.01f;
    if (isMoving)
    {
        float hDir = moveInput.x > 0 ? 1 : -1;
        controller.Move(Vector3.right * hDir * Mathf.Abs(moveInput.normalized.x * movementSpeed) * Time.deltaTime);
+        transform.rotation = Quaternion.Slerp(transform.rotation, Quaternion.LookRotation(moveInput.x != 0 ? Vector3.right * moveInput.normalized.x : Vector3.right * hDir), 0.1f);

    }

+    animator.SetFloat("MoveInput", Mathf.Abs(moveInput.normalized.x * movementSpeed), 0.2f, Time.deltaTime);

}
|
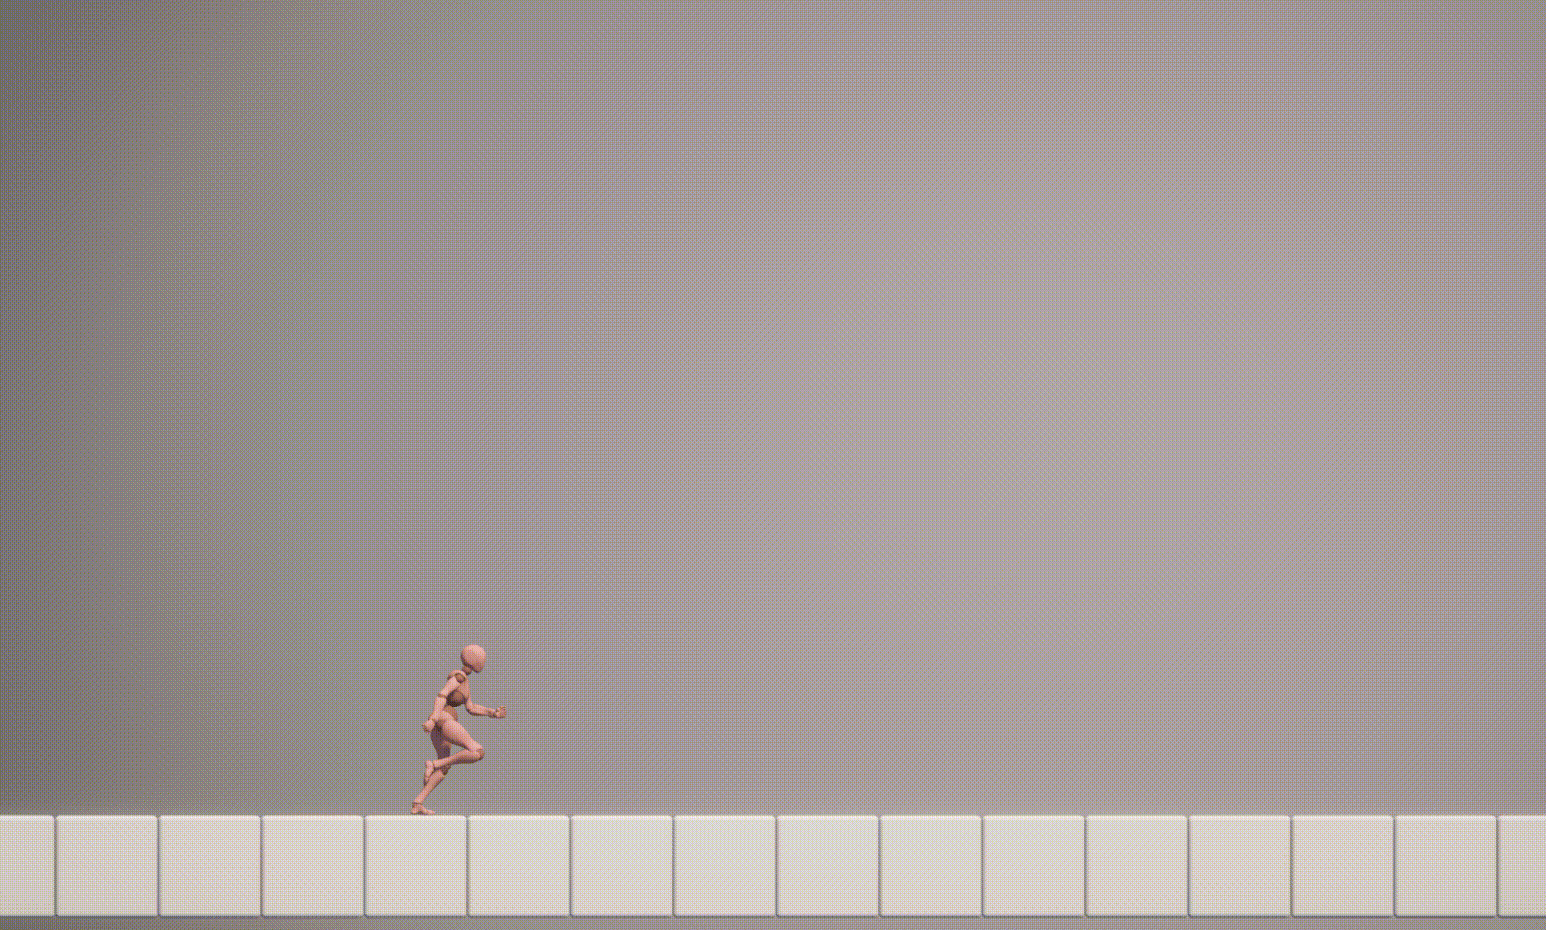
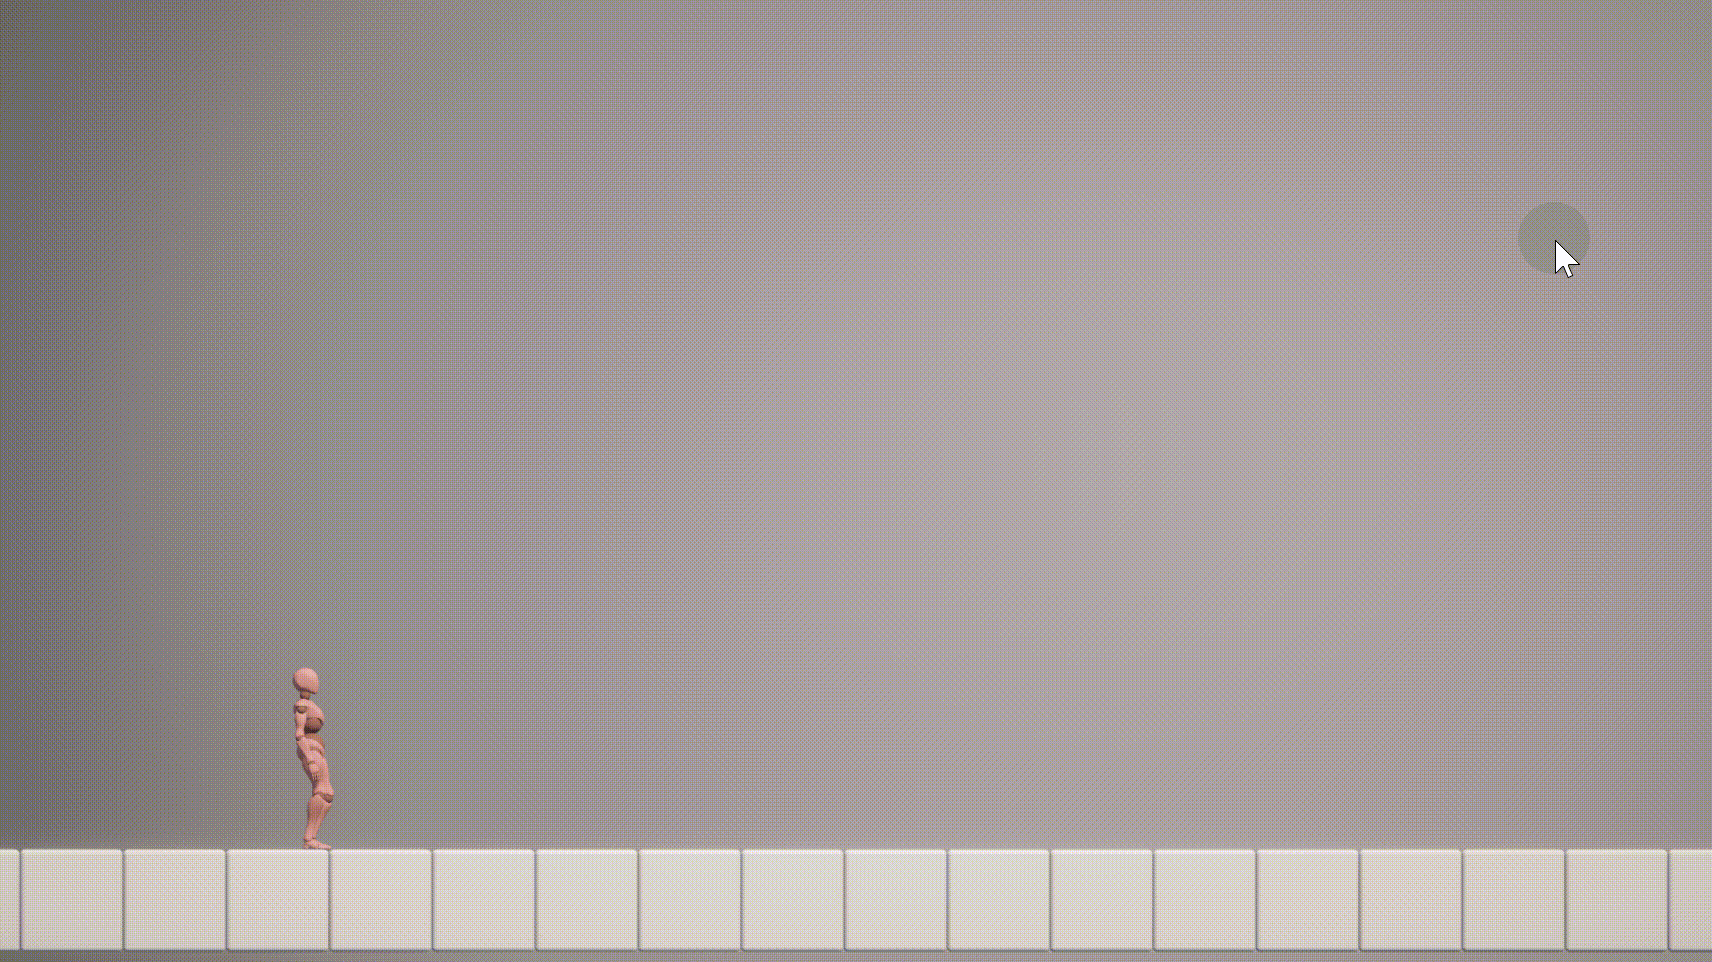
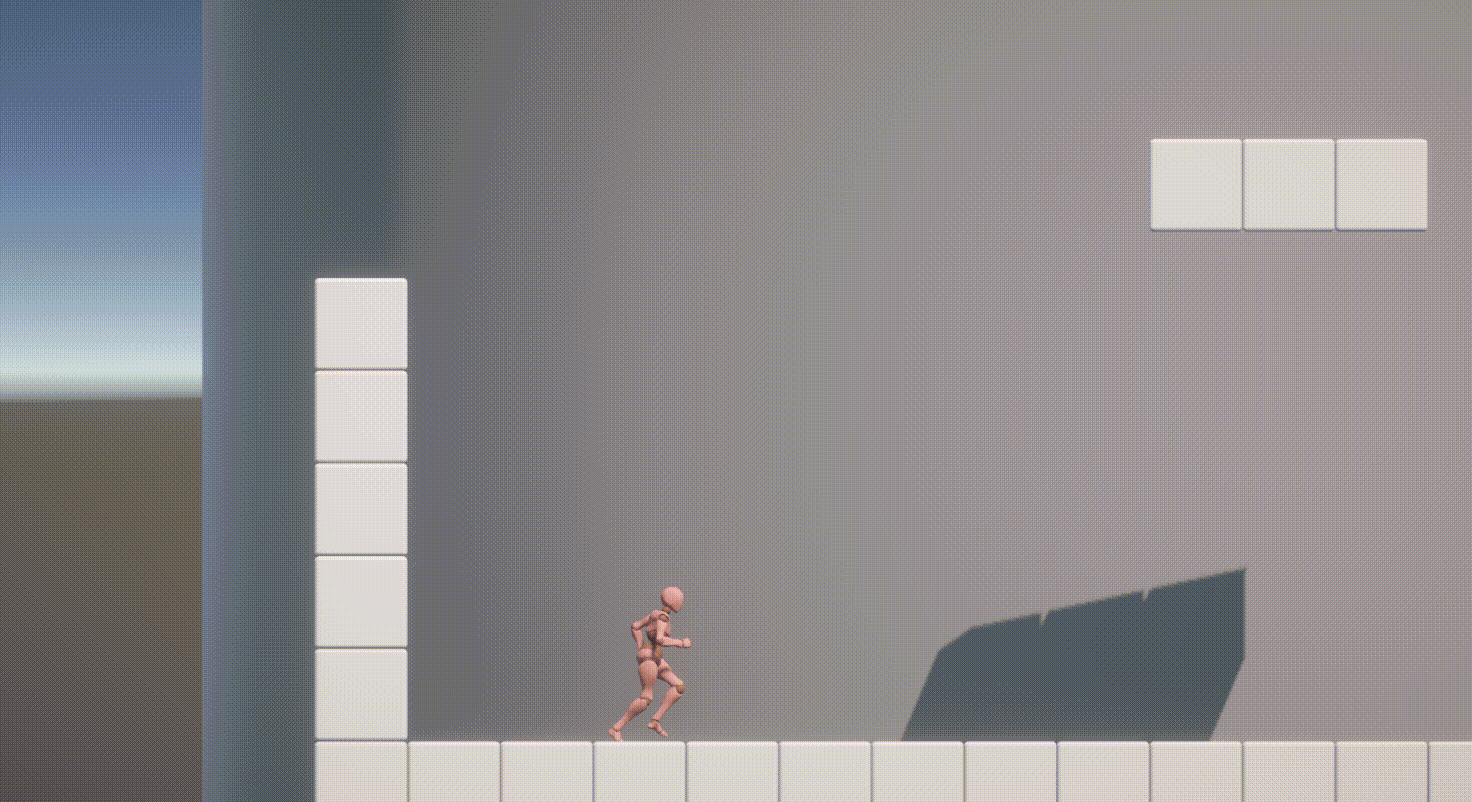
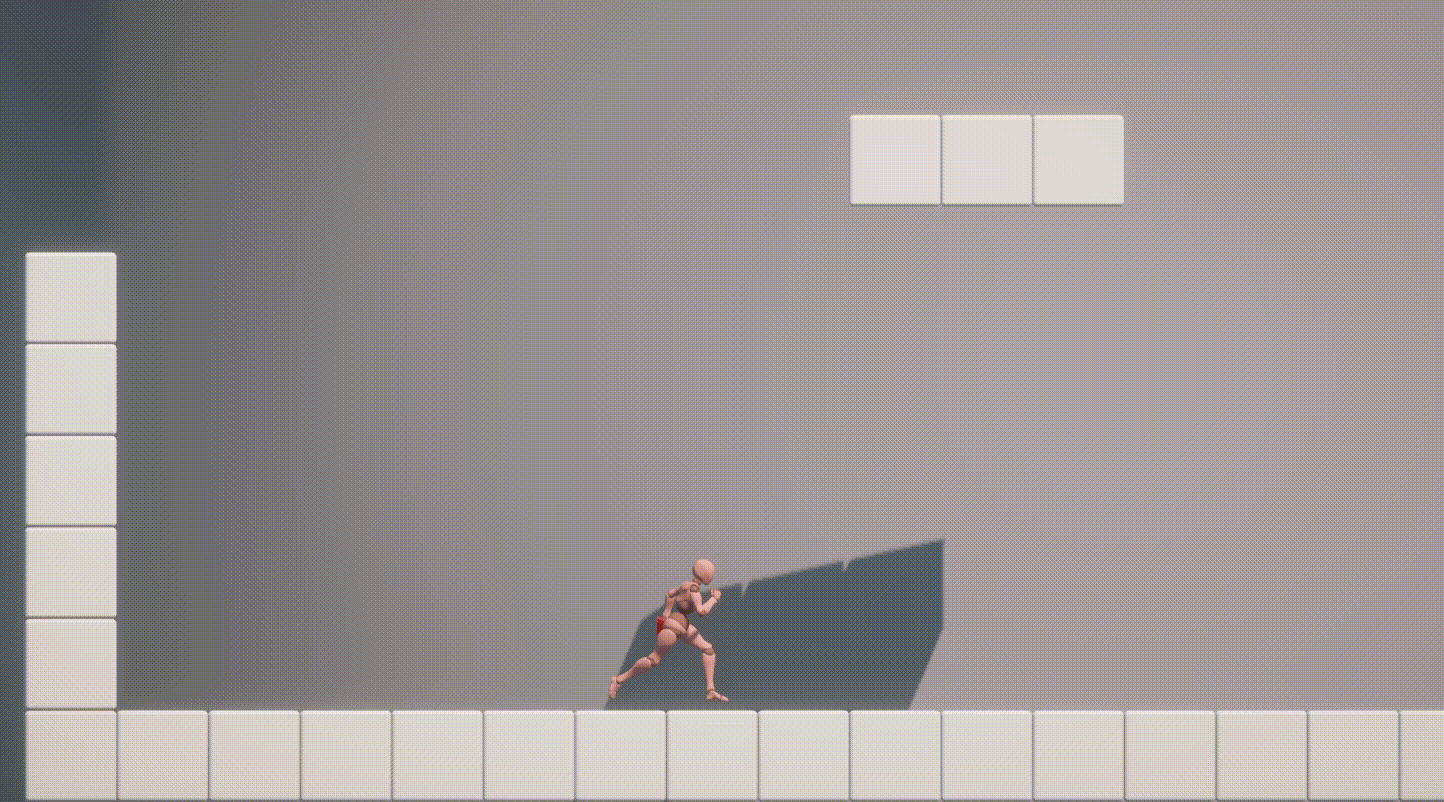
效果如下,感觉运动停止时有点粘滞感,还需要细调
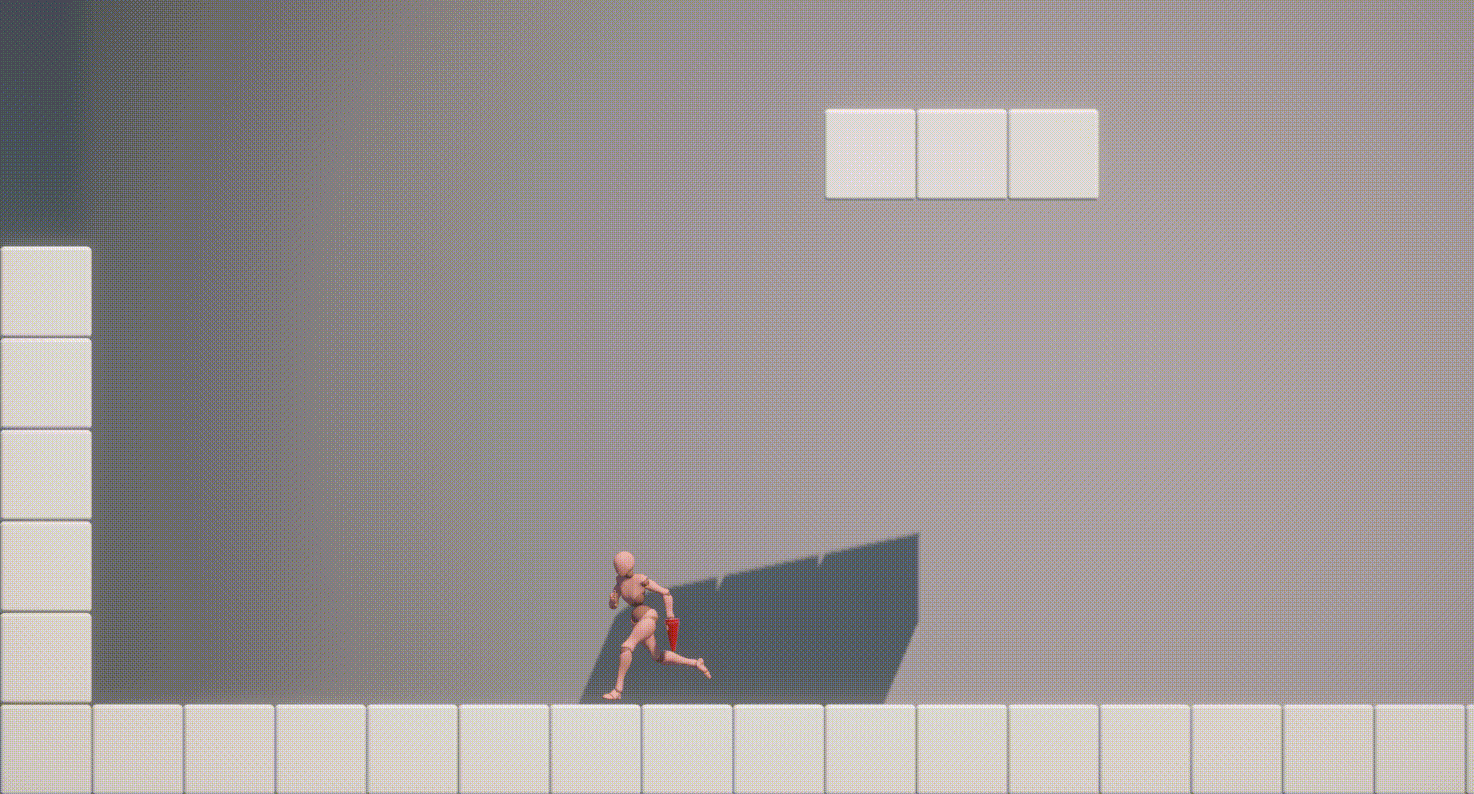
5. 跳跃
跳跃是该游戏的核心,这只是我估摸着做的第一版,有一说一,手感稀烂
碰撞状态检测
创建脚本CollisionState.cs,并绑定到角色身上。该脚本用于判断角色和场景的关系,目前只做了和水平地表的检测
nearGround的作用是为了连跳
public class CollisionState : MonoBehaviour
{
    [SerializeField, Tooltip("地表的碰撞层")] private LayerMask groundLayer;
    [SerializeField, Tooltip("在地表上的检测距离")] private float testDistance = 0f;
    [SerializeField, Tooltip("靠近地表的检测距离")] private float nearDistance = 0.2f;

    public bool onGround;
    public bool nearGround;

    private float offset = 0.05f;

    private void Update()
    {
        onGround = Physics.Raycast(transform.position + Vector3.up * offset, Vector3.down, testDistance + offset, groundLayer);
        nearGround = Physics.Raycast(transform.position + Vector3.up * offset, Vector3.down, nearDistance + offset, groundLayer);
    }
}
|
环境设置
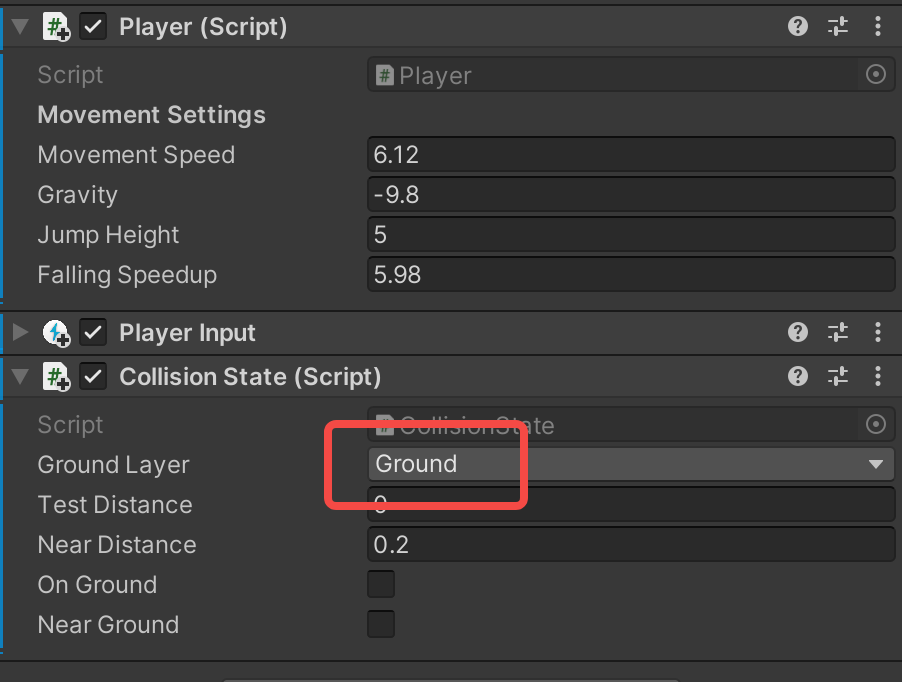
添加Ground碰撞层,并将场景物体设置为Ground(场景物体要有碰撞体)
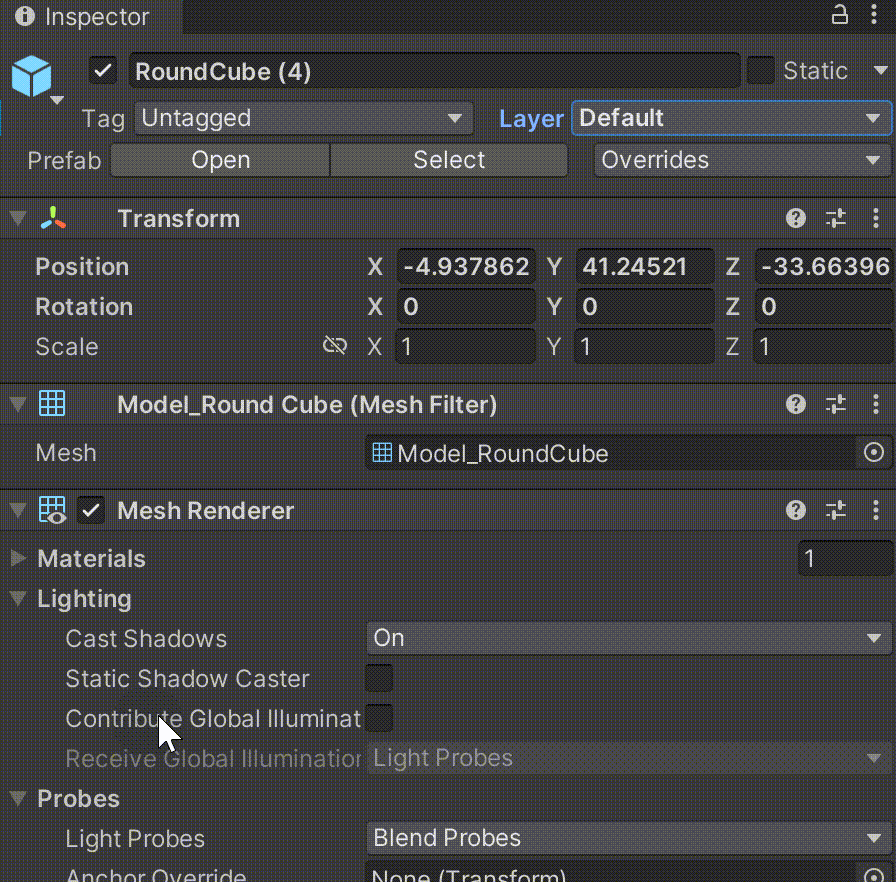
注意设置角色身上的Ground Layer类型
角色跳跃
下面修改PlayerController.cs,添加跳跃逻辑
首先获取CollisionState脚本,以判断是否能进行跳跃
...
private Animator animator;
+private CollisionState collisionState;

...
private void Start()
{
	...
    animator = GetComponent<Animator>();
+    collisionState = GetComponent<CollisionState>();
}
|
添加一些跳跃要用到的参数
[Header("Movement Settings")]
[SerializeField, Tooltip("水平移动速度")]
private float movementSpeed = 6f;
+[SerializeField, Tooltip("重力")]
+private float gravity = -9.8f;
+[SerializeField, Tooltip("大跳的跳跃高度")]
+private float jumpHeight = 5f;
+[SerializeField, Tooltip("开始加速下落时的速度")]
+private float fallingSpeedup = 10f;

private Vector2 moveInput;
+private bool jumpPressed = false;
+private bool jumpPressDown = false;
+private float verticalVelocity;
+private bool moveAfterJump  = false;    // 移动中跳跃,还是跳跃后移动
+private float herizontalDirection = 1f;
+private bool keepJump = false;  // 保持滞空
|
跳跃,包含起跳、滞空、落地三个过程。
private void Update()
{
    moveInput = input.actions["Move"].ReadValue<Vector2>();
+    jumpPressDown = input.actions["Jump"].WasPressedThisFrame();
+    jumpPressed = input.actions["Jump"].IsPressed();

+    #region 跳跃

+    // 起跳
+    if (jumpPressDown && collisionState.nearGround)
+    {
+        verticalVelocity = Mathf.Sqrt(2 * Mathf.Abs(gravity) * jumpHeight);
+        moveAfterJump = Mathf.Abs(moveInput.normalized.x) < 0.3f;   // 判断起跳时移动速度
+        keepJump = true;
+    }

+    // 滞空
+    if (keepJump && verticalVelocity > -fallingSpeedup)
+    {
+        verticalVelocity += gravity * Time.deltaTime;
+    }
+    else if(!collisionState.onGround)
+    {
+        verticalVelocity += 3 * gravity * Time.deltaTime;
+    }

+    if (!jumpPressed)
+    {
+        keepJump = false;	// 松开后不能重新滞空
+    }

+    // 落地
+    if (verticalVelocity < 0 && collisionState.onGround)
+    {
+        verticalVelocity = 0;
+        moveAfterJump = false;
+        keepJump = false;
+    }

+    // 运动
+    controller.Move(Vector3.up * verticalVelocity * Time.deltaTime);


+    #endregion
...
}
|
为了更真实,我希望角色原地起跳时更难左右移动,于是在这种情况下水平移动速度减半
+    #region 水平移动

    bool isMoving = Mathf.Abs(moveInput.normalized.x) > 0.01f;
    if (isMoving)
    {
+        float herizontalSpeed = Mathf.Abs(moveInput.normalized.x * movementSpeed);

        float hDir = moveInput.x > 0 ? 1 : -1;
+        if (moveAfterJump)
+        {
+            herizontalSpeed /= 2;   // 原地起跳,在空中动能很少,按理说应该走不动
+        }
+        controller.Move(Vector3.right * hDir * herizontalSpeed * Time.deltaTime);
        transform.rotation = Quaternion.Slerp(transform.rotation, Quaternion.LookRotation(moveInput.x != 0 ? Vector3.right * moveInput.normalized.x : Vector3.right * hDir), 0.1f);

    }
	animator.SetFloat("MoveInput", Mathf.Abs(moveInput.normalized.x * movementSpeed), 0.2f, Time.deltaTime);
+    #endregion
|
6. 跳跃动画
动画状态机比我想象中要麻烦好多。。。我也不知道我这样做对不对。。。
由于没找到合适的动画资源,这一节不少动画是我自己做的,花了相当长时间,结果效果也不太行
按下图所示在Any State后连接跳跃状态,并添加Jump、FallLand、FastJump、FastFallLand四个动画Trigger
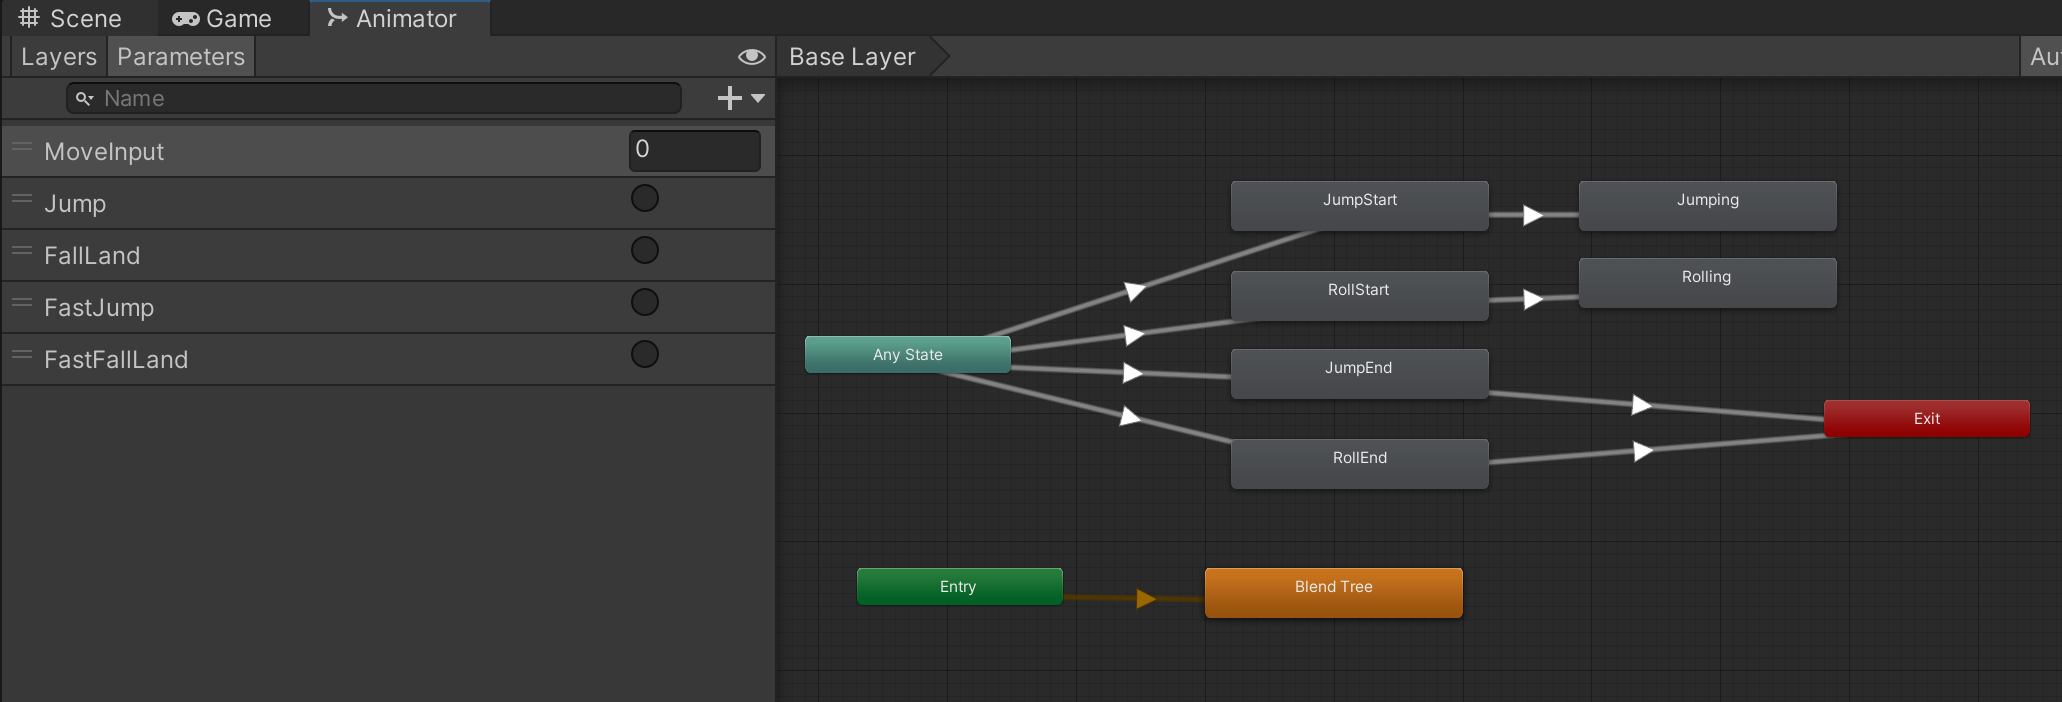
当开始跳跃时会进入JumpStart/RollStart(仅播放一次),播放完后进入滞空动画Jumping/Rolling(这段动画会循环播放),当落地时会进入JumpEnd/RollEnd动画
// 起跳
if (jumpPressDown && collisionState.nearGround)
{
    verticalVelocity = Mathf.Sqrt(2 * Mathf.Abs(gravity) * jumpHeight);
    moveAfterJump = Mathf.Abs(moveInput.normalized.x) < 0.3f;   // 判断起跳时移动速度
    keepJump = true;
    herizontalDirection = moveInput.x > 0 ? 1 : -1;
+    if (moveAfterJump)
+    {
+        animator.SetTrigger("Jump");
+    }
+    else
+    {
+        animator.SetTrigger("FastJump");
+    }

}
...
// 落地
if (verticalVelocity < 0 && collisionState.onGround)
{
+    if (moveAfterJump)
+    {
+        animator.SetTrigger("FallLand");
+    }
+    else
+    {
+        animator.SetTrigger("FastFallLand");
+    }
    verticalVelocity = 0;
    moveAfterJump = false;
    keepJump = false;
}
|
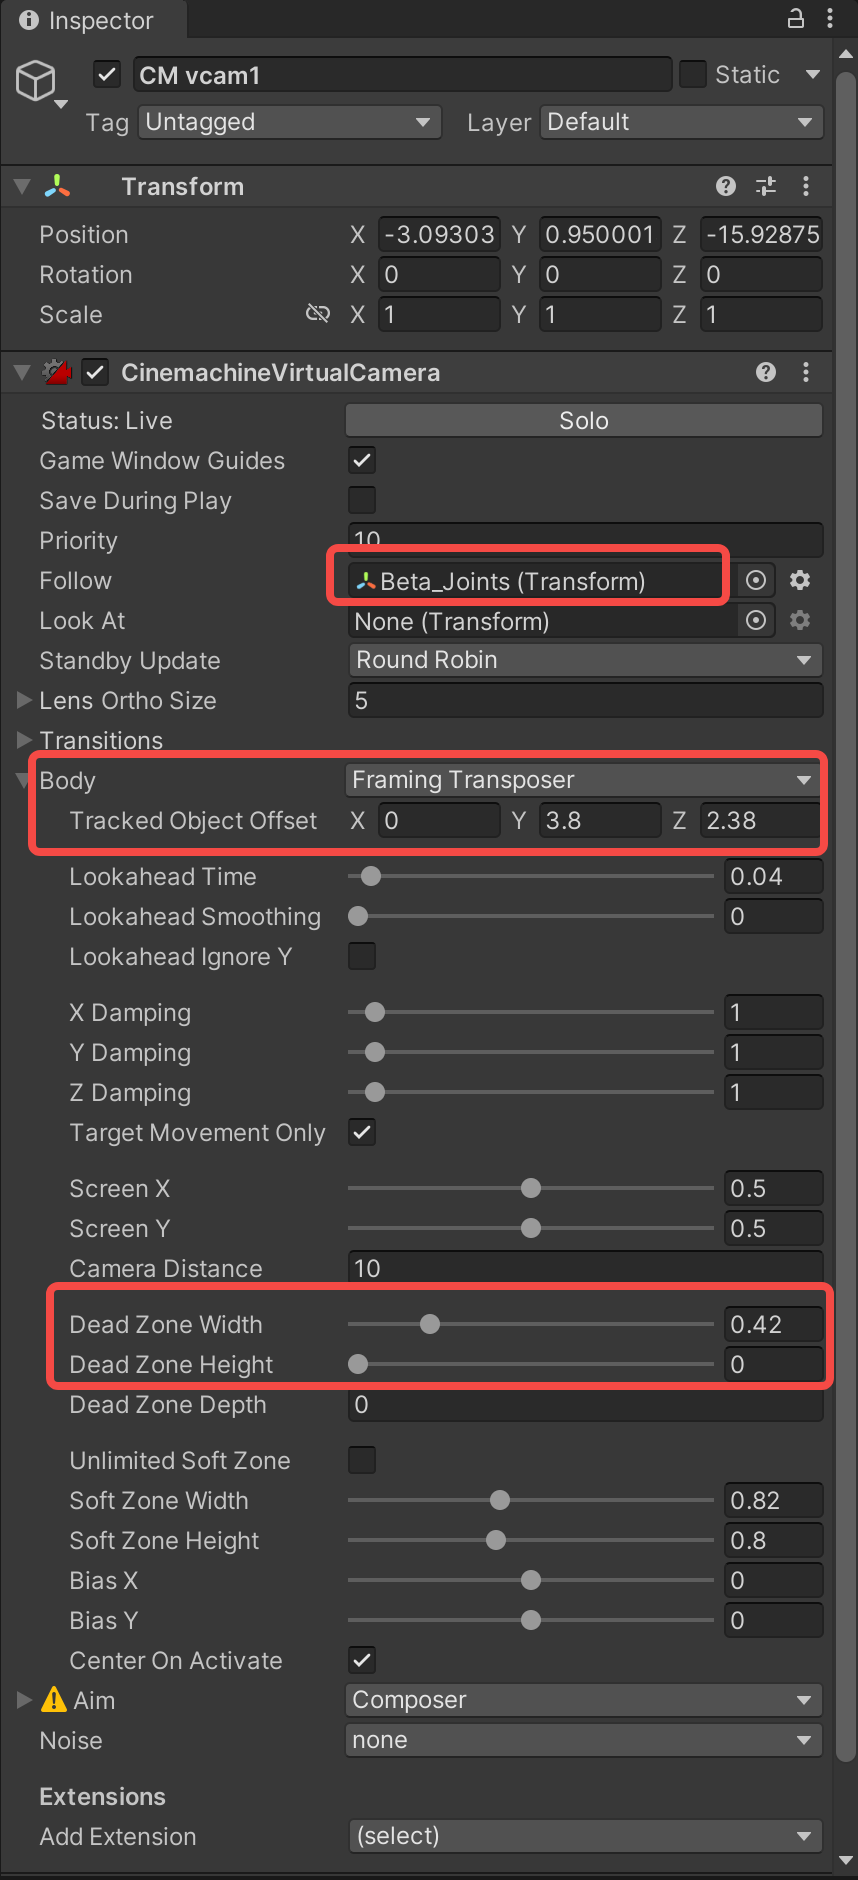
7. 相机
使用插件Cinemachine,现在只做一个简易的版本
在Hierarchy面板按右键——Cinemachine——Virtual Camera
设置虚拟相机,让其Follow角色,并设置死区
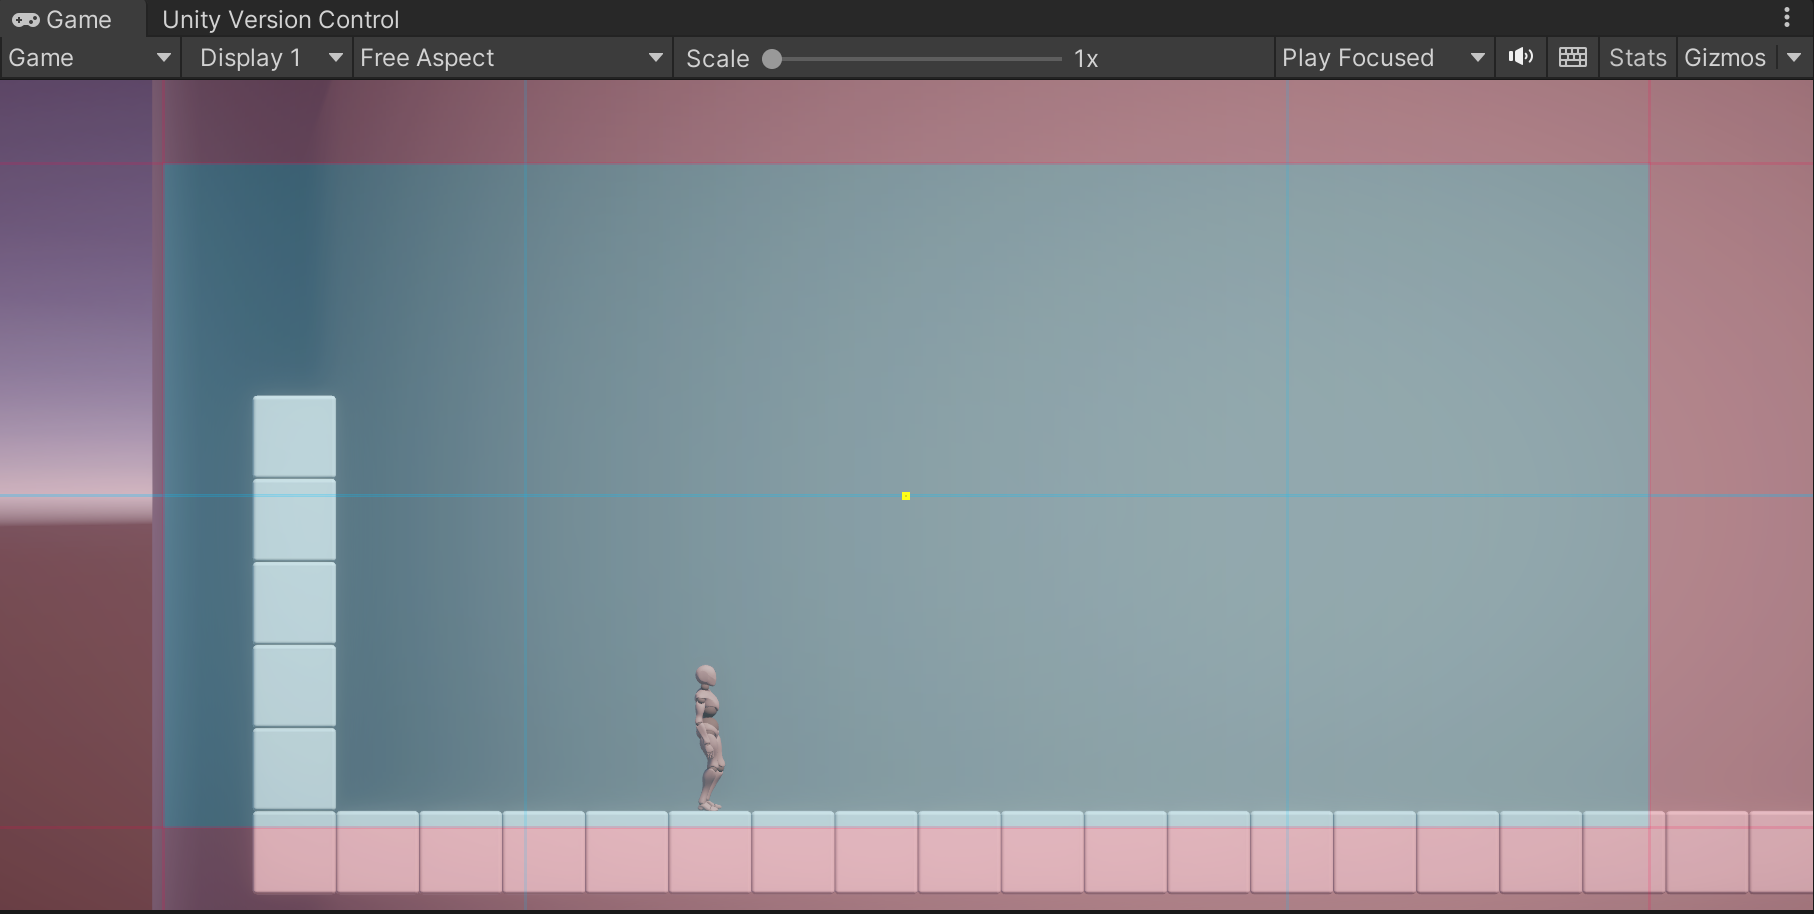
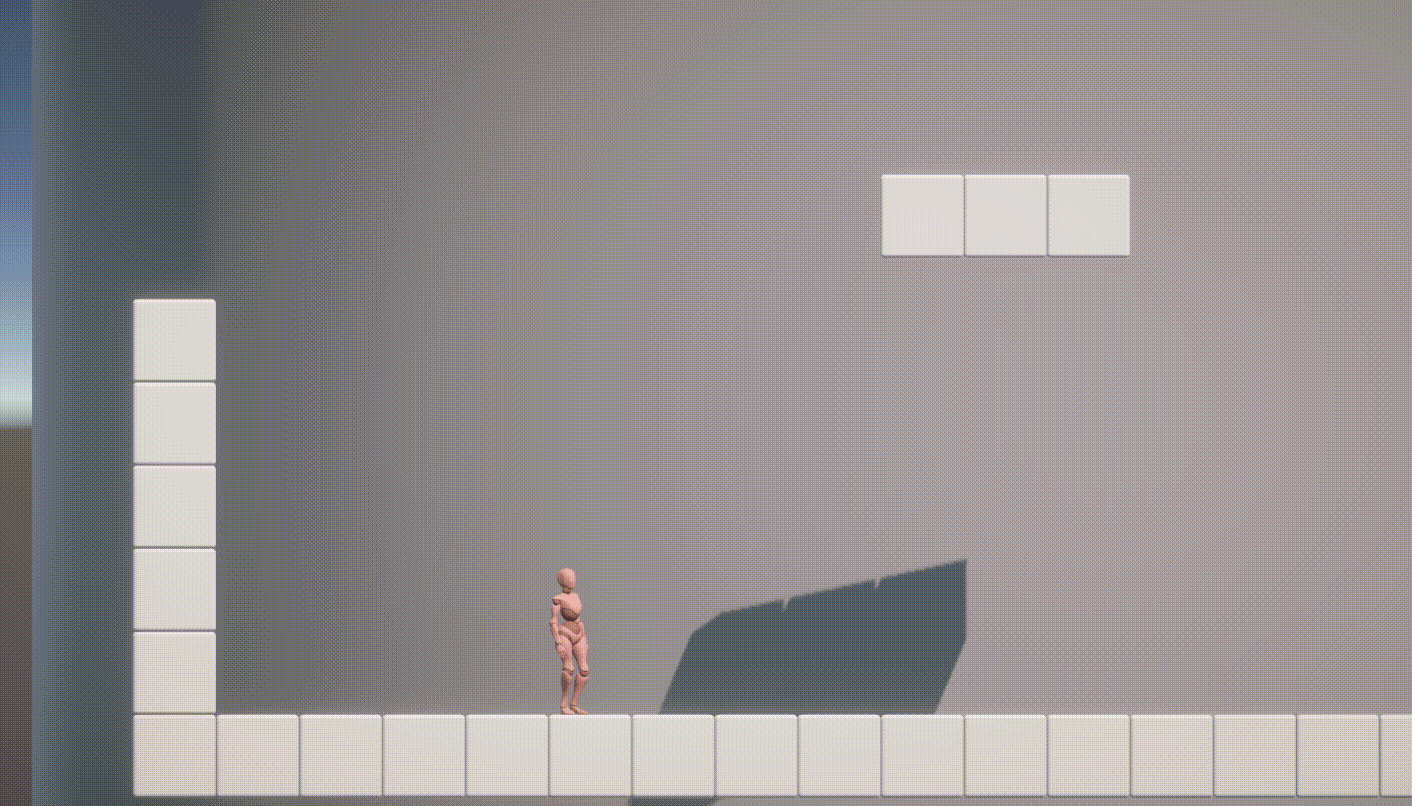
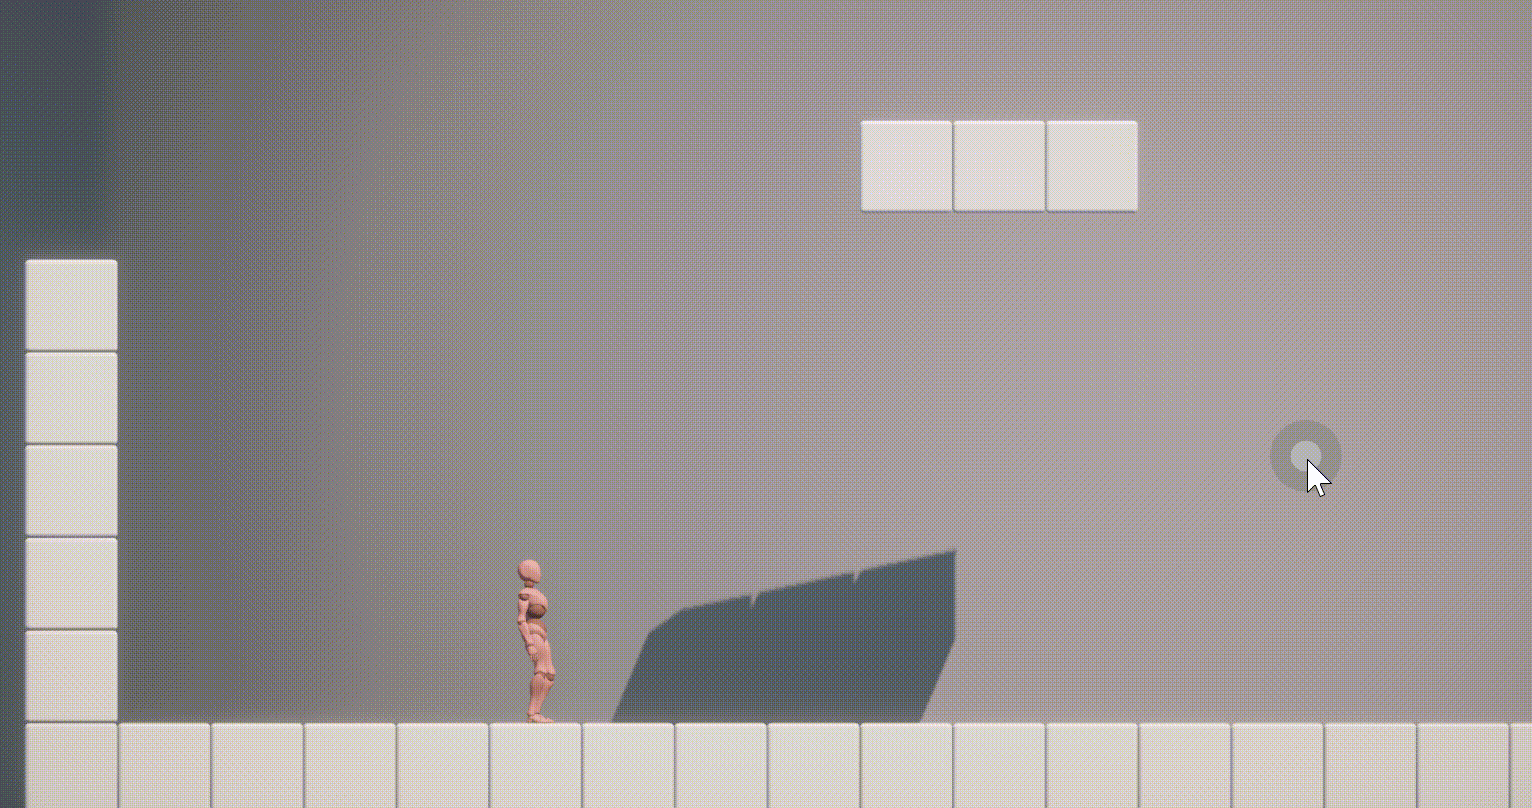
效果如下(额,这跳跃的边缘检测还是有问题)
8. 爬墙
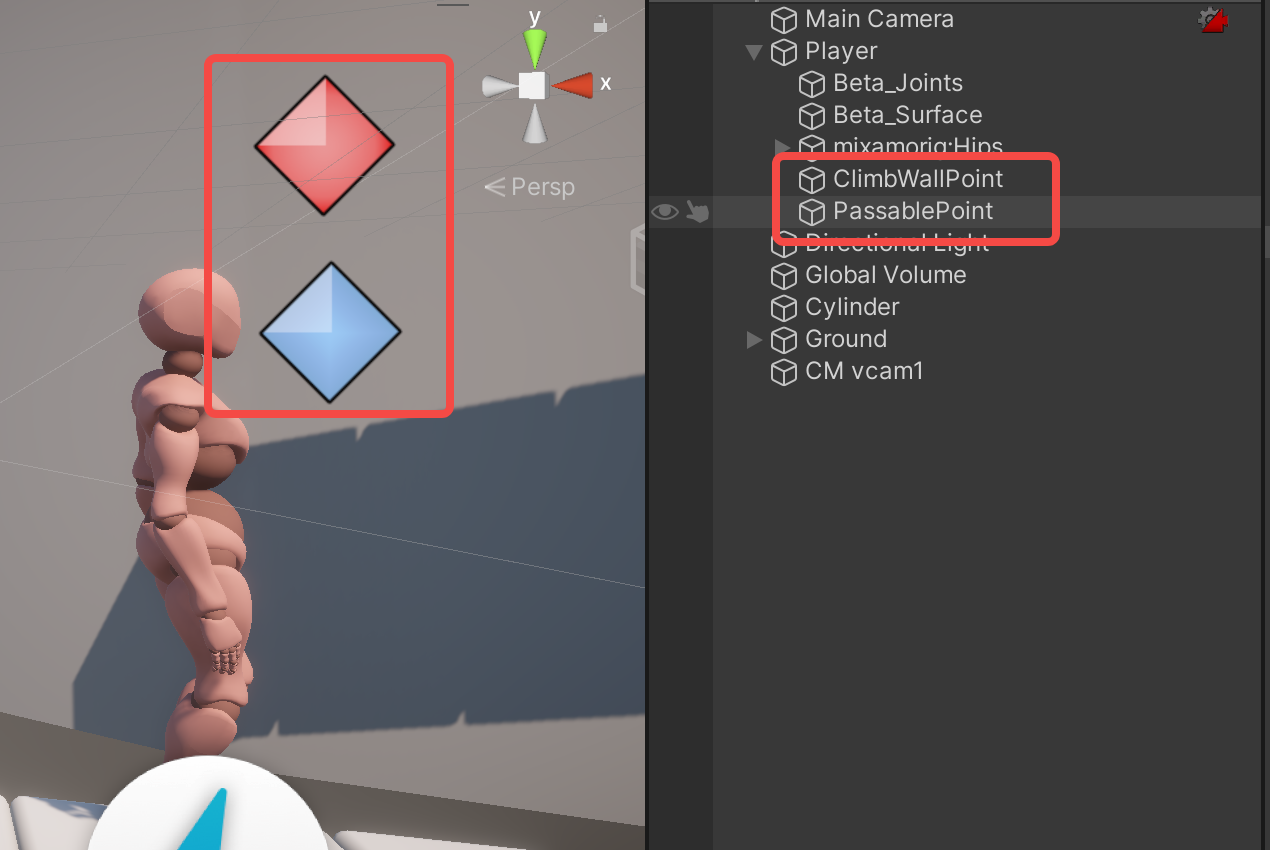
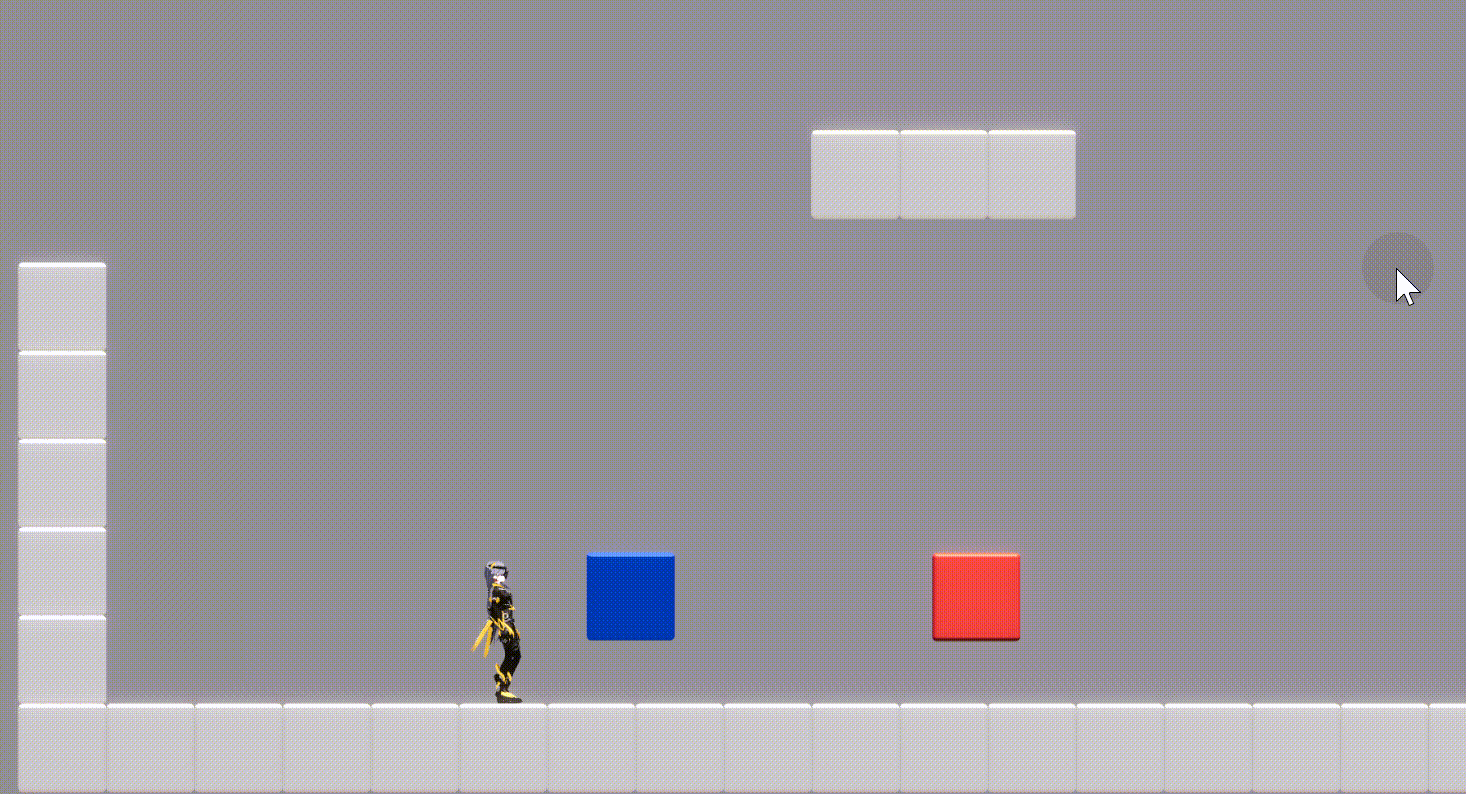
有的平台我们差一点点就能跳上去,我希望在这个边缘向左右拉动摇杆,可以实现爬墙的功能,暂时吸附在墙体上
在角色前添加一个空对象ClimbWallPoint(图中蓝色),在前上添加一个空对象PassablePoint(图中红色),这两个点将用于发射碰撞检测射线
修改CollisionState.cs脚本,添加爬墙检测逻辑
[SerializeField, Tooltip("靠近地表的检测距离")] private float nearDistance = 0.2f;
+[SerializeField, Tooltip("爬墙检测点")] private Transform climbWallPoint;
+[SerializeField, Tooltip("爬墙检测距离")] private float climbTestDistance = 0.2f;
+[SerializeField, Tooltip("可通行检测点")] private Transform passablePoint;
+[SerializeField, Tooltip("通行检测距离")] private float passableTestDistance = 1f;

private float offset = 0.05f;
+private float lookRight;

private void Update()
{
    onGround = Physics.Raycast(transform.position + Vector3.up * offset, Vector3.down, testDistance + offset, groundLayer);
    nearGround = Physics.Raycast(transform.position + Vector3.up * offset, Vector3.down, nearDistance + offset, groundLayer);
+    lookRight = (climbWallPoint.position.x - transform.position.x) > 0 ? 1 : -1;
+    climbWall = Physics.Raycast(climbWallPoint.position, Vector3.right * lookRight, climbTestDistance, groundLayer);
}

+public bool GetPassable()
+{
+    bool passable = !Physics.Raycast(passablePoint.position, Vector3.right * lookRight, passableTestDistance, groundLayer);
+    return passable;
+}
|
修改PlayerController.cs脚本,感觉角色状态越来越复杂,有些难以管理了,之后要做一个角色状态机
private bool keepJump = false;  // 保持滞空
+private bool jumping = false;   // 处于跳跃状态
+private bool climbing = false;  // TODO: 角色状态机

private void Update(){
	...
	// 起跳
    if (jumpPressDown && collisionState.nearGround)
    {
		...
        keepJump = true;
+        jumping = true;
        ...
    }
	...
	if (!jumpPressed)
    {
        keepJump = false;   // 松开后不能重新滞空
    }

+    // 爬墙
+    if (jumping && collisionState.climbWall && collisionState.GetPassable() && Mathf.Abs(moveInput.normalized.x) > 0.7)
+    {
+        climbing = true;
+        verticalVelocity = 0;
+    }
+    else
+    {
+        climbing = false;
+    }

    // 落地
    if (verticalVelocity < 0 && collisionState.onGround)
    {
        ...
        keepJump = false;
+        jumping = false;
    }

    bool isMoving = Mathf.Abs(moveInput.normalized.x) > 0.01f;
+    if (isMoving && !climbing)
    {
    	float herizontalSpeed = Mathf.Abs(moveInput.normalized.x * movementSpeed);
    	...
    }
}
|
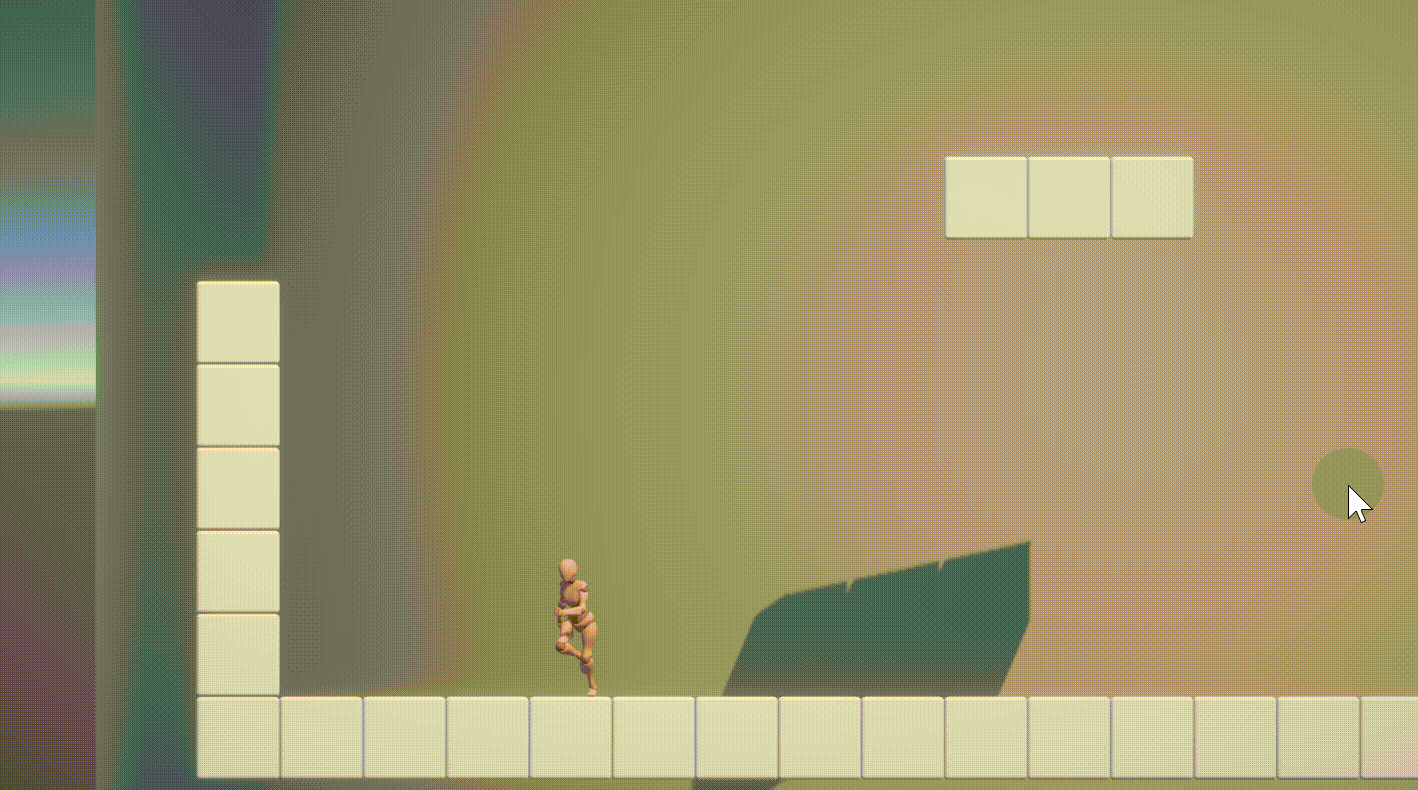
效果如下(论动画的重要性)
9. 抓墙动画
我继续沿用老办法做抓墙动画,结果却发现手很难抓住墙壁,于是我改用Animation Rigging的方式实现
骨骼的本质是矩阵树,运行时变化矩阵从根节点开始正向改变网格顶点(蒙皮),变化矩阵包含位移旋转缩放信息,Animation Rigging可以让部分骨骼不受动画影响,而是被反向动力学等方式驱动
安装插件
首先通过包管理器安装Animation Rigging,我们发现窗口上方出现了Animation Rigging栏
配置Rig
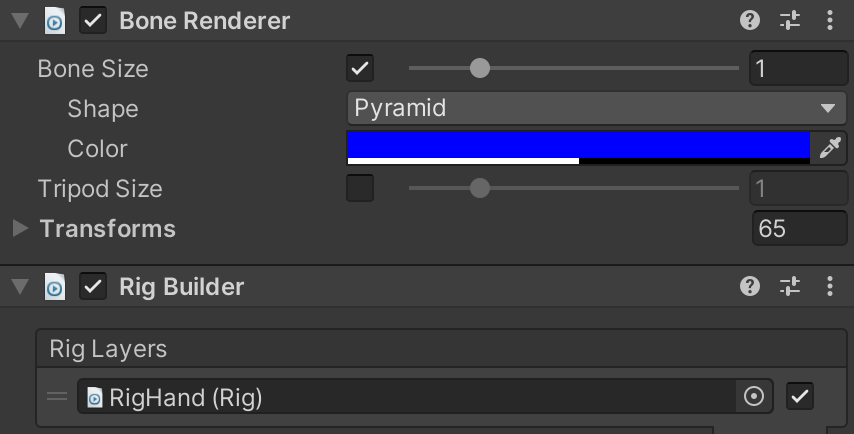
找到并选中角色后,点击Animation Rigging——Bone Renderer Setup,我们发现角色身上多了一个Bone Renderer组件,骨骼也被绘制出来
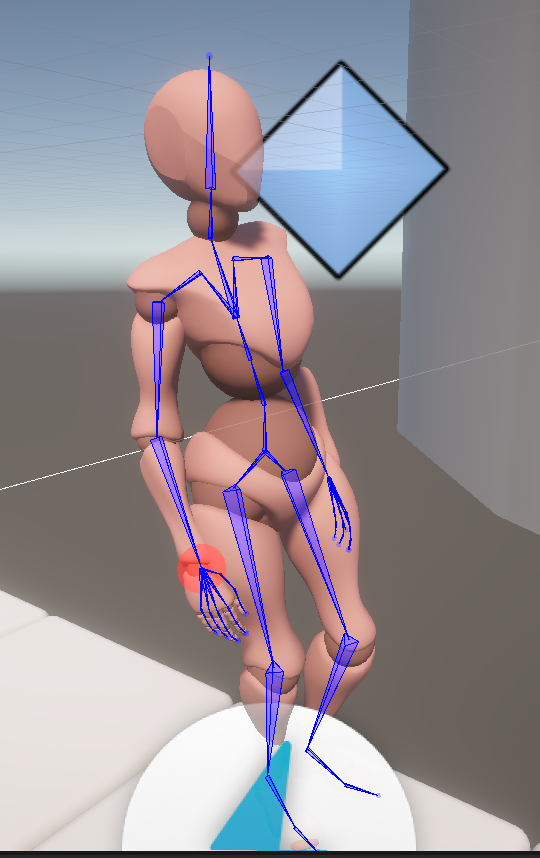
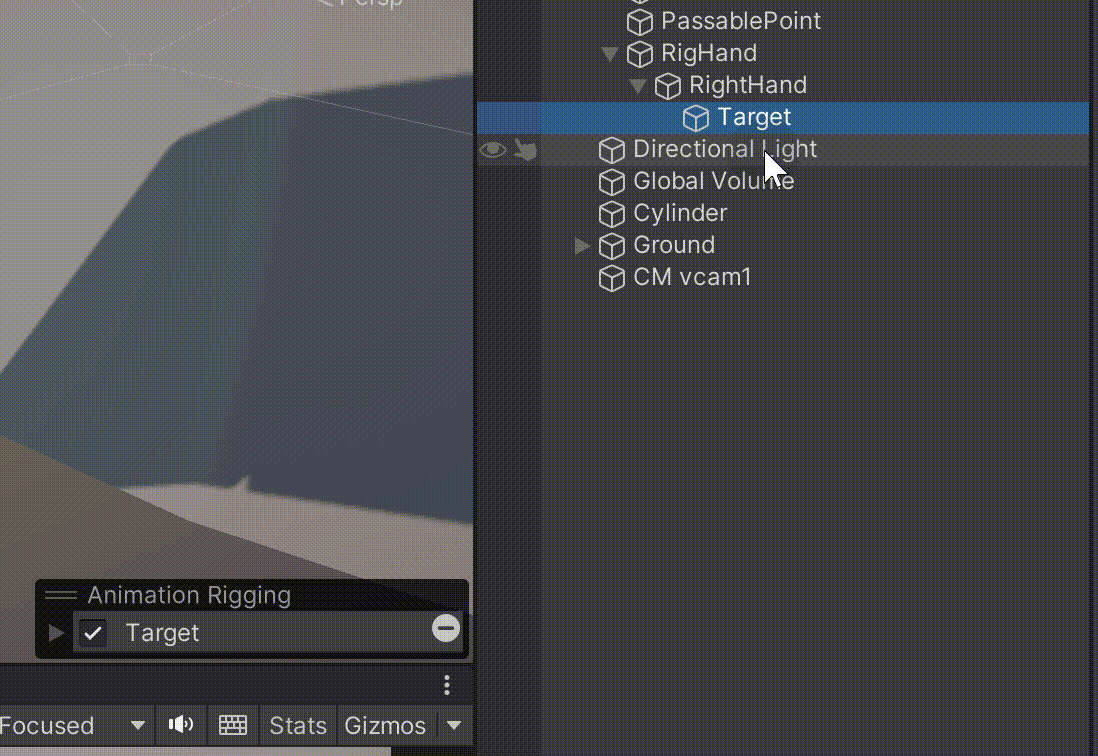
选中角色后点击Animation Rigging——Rig Setup,发现角色出现了一个子物体:Rig1
将Rig重命名为RigHand,并创建子节点RightHand,为RightHand添加组件Two Bone IK Constraint
再RightHand下面创建空的子节点,名叫Target,为了容易观察,让其拥有球形Shape
找到骨骼树中想要被反向驱动的三根骨骼,拖至Two Bone IK Constraint组件上,并将Target也拖到该组件上。现在播放动画,我们发现右手不会被动画驱动,而是被Target反向驱动

通常状态不需要Rig,于是我们将Rig的权重设为0
脚本设置手部落地
修改脚本CollisionState.cs,添加手与墙壁的相交位置
public bool GetPassable()
{
    bool passable = !Physics.Raycast(passablePoint.position, Vector3.right * lookRight, passableTestDistance, groundLayer);
    return passable;
}

+public Vector3 GetClimbTouchPosition()
+{
+    Ray ray = new Ray(climbWallPoint.position, Vector3.right * lookRight);
+    Physics.Raycast(ray, out RaycastHit hit);
+    return hit.point;
+}
|
修改脚本PlayerController.cs,实现贴墙时修改Target的位置和Rig权重
[SerializeField, Tooltip("开始加速下落时的速度")]
private float fallingSpeedup = 10f;

+[SerializeField] private Transform rightHandPosition;
+[SerializeField] private Rig rightHandRig;

private Vector2 moveInput;
...
private void Update()
{
	...
	// 爬墙
    if (jumping && collisionState.climbWall && collisionState.GetPassable() && Mathf.Abs(moveInput.normalized.x) > 0.7)
    {
        climbing = true;
        verticalVelocity = 0;
+        rightHandPosition.position = collisionState.GetClimbTouchPosition();
+        rightHandPosition.rotation = Quaternion.LookRotation(moveInput.x > 0 ? Vector3.right : Vector3.left);
+        rightHandRig.weight = 1;
    }
    else
    {
        climbing = false;
+        rightHandRig.weight = 0;
    }
    ...
}
|
尽管还存在臂力惊人单手悬空的问题,但相比上一版已经好了不少
10. 上平台
抓墙的目的自然是为了上平台,修改PlayerController.cs脚本
[SerializeField, Tooltip("开始加速下落时的速度")]
private float fallingSpeedup = 10f;
+[SerializeField, Tooltip("爬墙时向上跳的初速度")]
+private float climbingJumpSpeed = 10f;
...
private bool climbing = false;  // TODO: 角色状态机
+private bool climbingJump = false;  // 抓墙时跳跃
private void Update()
{
    ...
    // 起跳
    if (jumpPressDown && collisionState.nearGround)
    {
		...
        jumping = true;
+        climbingJump = false;
        if (moveAfterJump)
        {
            animator.SetTrigger("Jump");
        }
		...
    }
    // 爬墙
+    if (jumping && collisionState.climbWall && collisionState.GetPassable() && Mathf.Abs(moveInput.normalized.x) > 0.7 && !climbingJump)
    {
        climbing = true;
        verticalVelocity = 0;
        rightHandPosition.position = collisionState.GetClimbTouchPosition();
        rightHandPosition.rotation = Quaternion.LookRotation(moveInput.x > 0 ? Vector3.right : Vector3.left);
        rightHandRig.weight = 1;
+        animator.SetBool("Climbing", climbing);
+        if (jumpPressDown)
+        {
+            rightHandRig.weight = 0;
+            verticalVelocity = climbingJumpSpeed;
+            animator.SetTrigger("ClimbingUp");
+            climbingJump = true;
+            climbing = false;
+        }
    }
    else
    {
        climbing = false;
        rightHandRig.weight = 0;
+        animator.SetBool("Climbing", climbing);
    }
    // 落地
    if (verticalVelocity < 0 && collisionState.onGround)
    {
		...
        jumping = false;
+        climbingJump = false;
    }
    ...
|
感觉状态已经麻烦到难以管理了,是时候重构状态机了
11. 瞄准射击
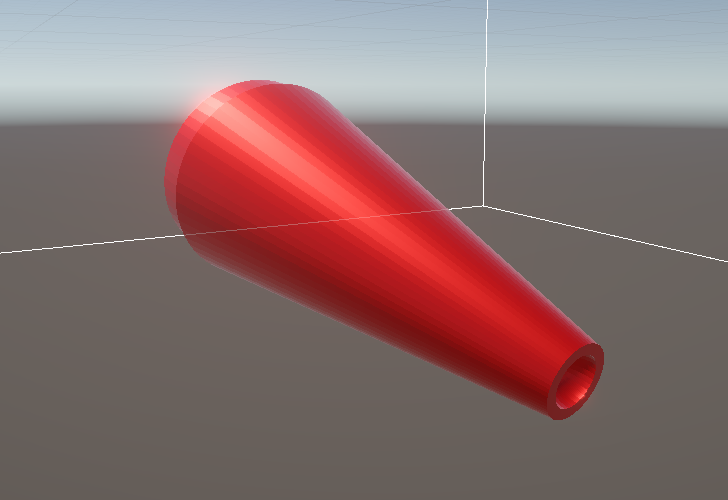
建模
首先打开blender
- 创建一个圆柱1,按tab进入编辑模式,选中上表面,按s将上表面进行缩放,变成一个类似“圆锥”的东西
- 在圆锥上侧创建一个球,下侧创建一个圆柱2
- 使用布尔操作,球布尔Difference,圆柱2布尔Union(注意操作后隐藏球和圆柱)
于是得到了枪的建模(相当粗糙)
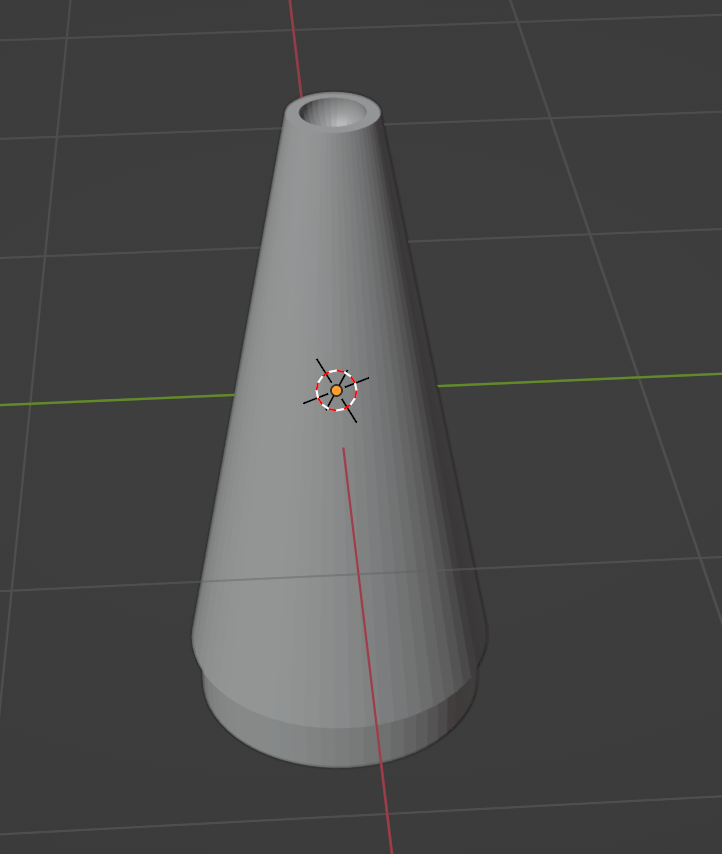
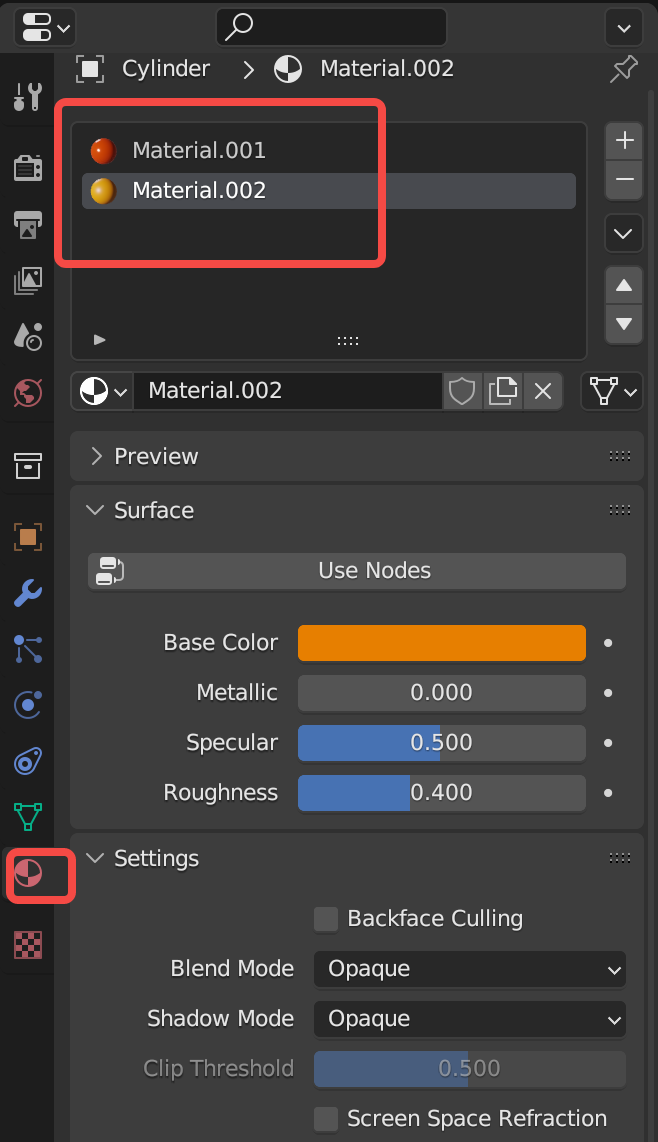
你可以为模型添加材质
将模型导出至Unity后
持枪
将枪放在左臂骨骼处,于是实现了左手和枪的绑死,播放动画时枪也跟着动,不过做的有些穿模
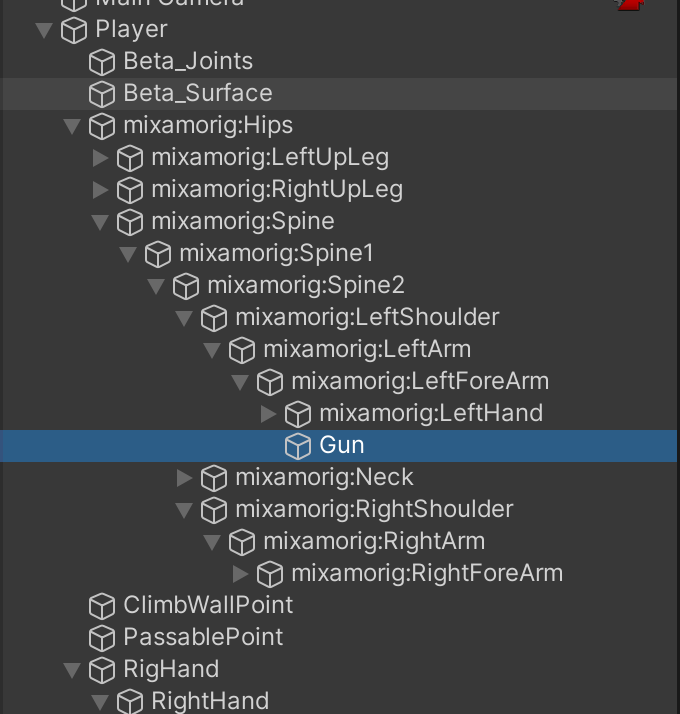
枪能随着手部正常运动
瞄准
- 动画状态机添加瞄准动画
- Input System绑定左肩键为Aiming
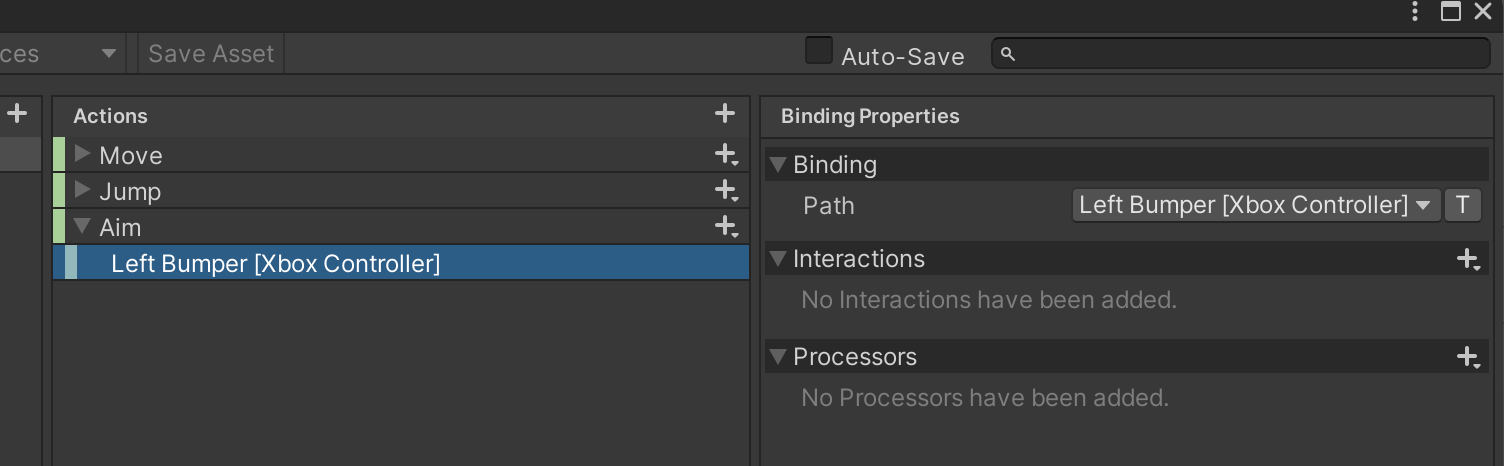
- 为持枪的手臂添加Rig
- 修改脚本
PlayerController.cs,按下左肩键后手臂水平前举,根据左摇杆输入以角色左肩膀为圆心画圆,此外我希望瞄准时角色不要移动
+[SerializeField] private Transform gunHandPosition;
+[SerializeField] private Rig gunHandRig;
+[SerializeField] private Transform gunAimCenter;
+[SerializeField, Tooltip("枪距离角色肩膀的距离")] private float gunToShoulderDistance = 2f;

...
private bool jumpPressDown = false;
+private bool aiming = false;
...
private void Update()
{
	...
    jumpPressed = input.actions["Jump"].IsPressed();
+    aiming = input.actions["Aim"].IsPressed();
	...
	#region 水平移动

    bool isMoving = Mathf.Abs(moveInput.normalized.x) > 0.01f;
    if (isMoving && !climbing)
    {
        float herizontalSpeed = Mathf.Abs(moveInput.normalized.x * movementSpeed);

        float hDir = moveInput.x > 0 ? 1 : -1;
        if (moveAfterJump)
        {
            herizontalSpeed /= 2;   // 原地起跳,在空中动能很少,按理说应该走不动
        }
+        if (!aiming)
+        {
            controller.Move(Vector3.right * hDir * herizontalSpeed * Time.deltaTime);
+        }
        transform.rotation = Quaternion.Slerp(transform.rotation, Quaternion.LookRotation(moveInput.x != 0 ? Vector3.right * moveInput.normalized.x : Vector3.right * hDir), 0.1f);

    }
    animator.SetFloat("MoveInput", Mathf.Abs(moveInput.normalized.x * movementSpeed), 0.2f, Time.deltaTime);
    #endregion

+    #region 瞄准射击

+    if (aiming)
+    {
+       Vector3 targetPos;
+        if (moveInput.magnitude < 0.1f)
+        {
+            float hDir = controller.transform.forward.x > 0 ? 1 : -1;
+            targetPos = new Vector3(gunAimCenter.position.x + gunToShoulderDistance * hDir, gunAimCenter.position.y, gunAimCenter.position.z);
+            gunHandPosition.position = targetPos;
+            gunHandPosition.rotation = Quaternion.LookRotation(new Vector3(1,-1,0));
+        }
+        else
+        {
+            float hDir = controller.transform.forward.x > 0 ? 1 : -1;
+            targetPos = new Vector3(gunAimCenter.position.x + gunToShoulderDistance * moveInput.normalized.x, gunAimCenter.position.y + gunToShoulderDistance * moveInput.normalized.y, gunAimCenter.position.z);
+            gunHandPosition.position = targetPos;
+            gunHandPosition.rotation = Quaternion.LookRotation(targetPos - gunAimCenter.position);
+            gunHandPosition.Rotate(90f, 0f, 0f);
+			 animator.SetBool("Aiming", true);
+        }
+    }
+    else
+    {
+        gunHandRig.weight = 0;
+		 animator.SetBool("Aiming", false);
+    }

+    #endregion
}
|
稍微有些生硬,不过另一只手之后要拿近战武器,所以还好。
瞄准辅助线
在角色身上添加LineRenderer组件,设置组件的线Width、材质
修改脚本PlayerController.cs
private CollisionState collisionState;
+private LineRenderer lineRenderer;
...
private void Start()
{
	...
    collisionState = GetComponent<CollisionState>();
+    lineRenderer = GetComponent<LineRenderer>();
}
private void Update()
{
	if (aiming)
    {
        Vector3 targetPos;
+        Vector3 deltaPos;
        if (moveInput.magnitude < 0.1f)
        {
            float hDir = controller.transform.forward.x > 0 ? 1 : -1;
+            deltaPos = new Vector3(gunToShoulderDistance * hDir, 0, 0);
+            targetPos = gunAimCenter.position + deltaPos;
            gunHandPosition.position = targetPos;
            gunHandPosition.rotation = Quaternion.LookRotation(new Vector3(1,-1,0));
        }
        else
        {
            float hDir = controller.transform.forward.x > 0 ? 1 : -1;
+            deltaPos = new Vector3(gunToShoulderDistance * moveInput.normalized.x, gunToShoulderDistance * moveInput.normalized.y, 0);
+            targetPos = gunAimCenter.position + deltaPos;
            gunHandPosition.position = targetPos;
            gunHandPosition.rotation = Quaternion.LookRotation(targetPos - gunAimCenter.position);
            gunHandPosition.Rotate(90f, 0f, 0f);
        }
+        lineRenderer.SetPositions(new []{targetPos, targetPos + deltaPos * 12});
+        lineRenderer.enabled = true;
        animator.SetBool("Aiming", true);
        gunHandRig.weight = 1;
    }
    else
    {
+        lineRenderer.enabled = false;
        gunHandRig.weight = 0;
        animator.SetBool("Aiming", false);
    }
}
|
发射子弹
-
Input System将手柄X键绑定为Fire开火键
-
使用Sphere创建子弹预制体,注意关闭阴影、重力,材质我选用了一个自发光的半透明材质,并为子弹添加了一个碰撞层Bullet,同时设置其Tag为Bullet,碰撞体采用Trigger
-
编写子弹脚本Bullet.cs,子弹在碰撞到物体时会被销毁,超过一段时间后也会被销毁(具体的碰撞逻辑之后再写)
public class Bullet : MonoBehaviour
{
    [SerializeField, Tooltip("子弹销毁时间")] private float lifeTime = 5f;

    private float remainingTime;
    void Start()
    {
        remainingTime = lifeTime;
    }

    void Update()
    {
        remainingTime -= Time.deltaTime;
        if (remainingTime <= 0)
        {
            Destroy(gameObject);
        }
    }

	private void OnTriggerEnter(Collider other)
    {
        Destroy(gameObject);
    }
}
|
- 编写子弹发射脚本
FireManager.cs
public class FireManager : MonoBehaviour
{
    [SerializeField, Tooltip("子弹速度")] private float bulletSpeed = 10f;
    [SerializeField, Tooltip("普通子弹")] private GameObject commonBullet;

    public void FireCommonBullet(Vector3 initPosition, Quaternion initRotation)
    {
        GameObject bullet = Instantiate(commonBullet, initPosition, initRotation);
        bullet.GetComponent<Rigidbody>().AddForce(bullet.transform.forward * bulletSpeed);
    }
}
|
- 修改
PlayerController.cs
private LineRenderer lineRenderer;
+private FireManager fireManager;
...
private bool aiming = false;
+private bool firePressDown = false;
...
private void Start()
{
	...
    lineRenderer = GetComponent<LineRenderer>();
+    fireManager = GetComponent<FireManager>();
}

private void Update()
{
	...
	aiming = input.actions["Aim"].IsPressed();
+    firePressDown = input.actions["Fire"].WasPressedThisFrame();
	if (aiming)
    {
        #region 瞄准动作

        Vector3 targetPos;
        Vector3 deltaPos;
        if (moveInput.magnitude < 0.1f)
        {
            ...
        }
        else
        {
            ...
        }
        ...

        #endregion

+        #region 射击
+        if (firePressDown)
+        {
+            fireManager.FireCommonBullet(targetPos, Quaternion.LookRotation(targetPos - gunAimCenter.position));
+        }
+        #endregion

    }
    else{
    	...
    }
    ...
}
|
GIF的帧率太低了。。。
注意,现在角色跳跃是也能射击,爬墙时也能射击,但是抓墙时不能自由射击,因为反向后角色会掉下来。我在考虑是否在跳跃时射击添加时停,抓墙时添加按左肩键可以自由射击,不会掉下来。
银河战士抓墙后不需要一直按左摇杆,可以自由射击,但银河战士是可以变成一格高的球的,有些狭小的管道正常姿势无法射击,于是设计了抓墙射击。而我不打算做变成球,我所有的通道都至少两格宽,很纠结
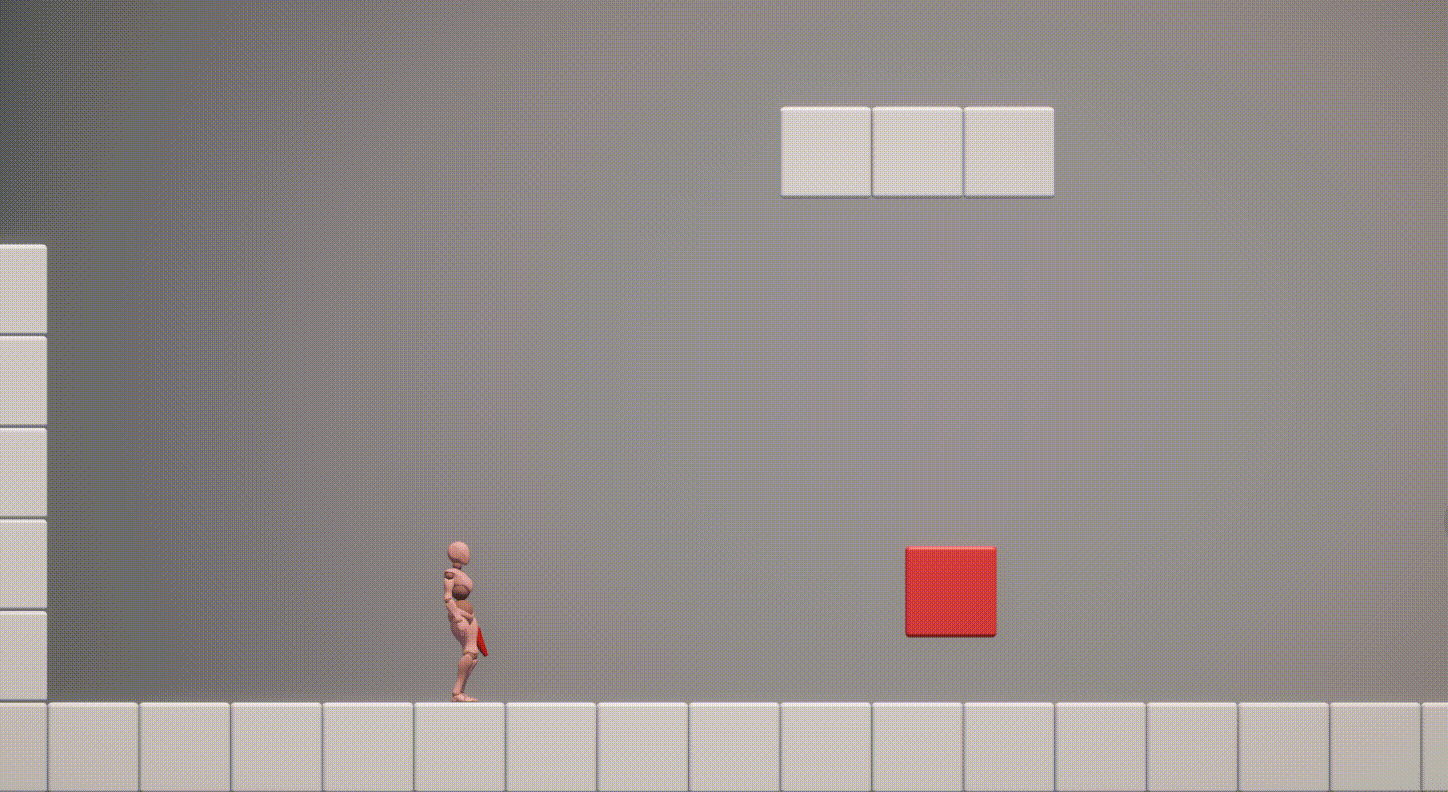
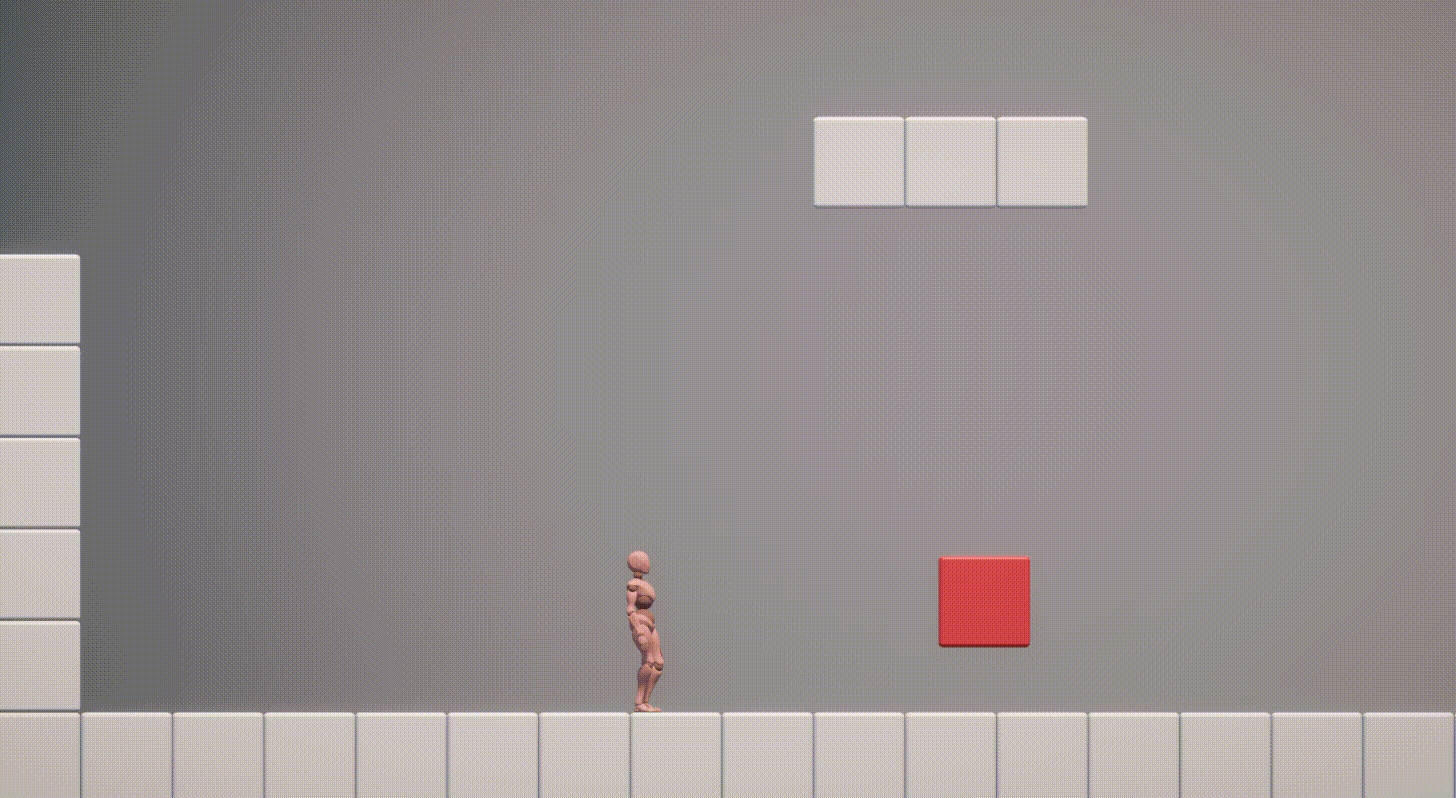
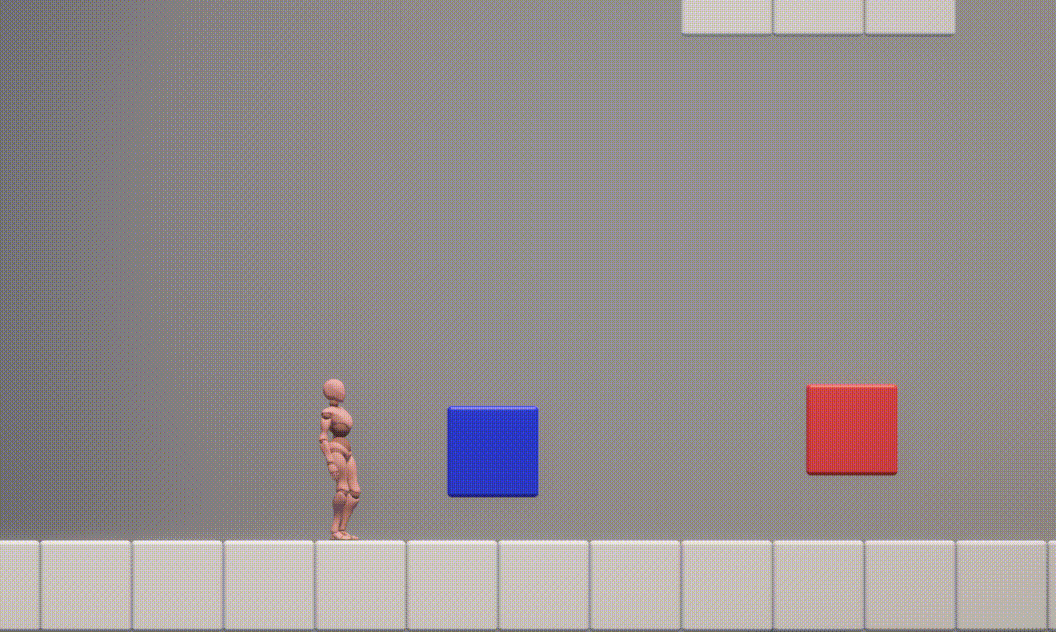
12. 可被射击破环的方块
方块预制体
首先创建可被射击的方块预制体,拥有碰撞盒、VFX和一个脚本
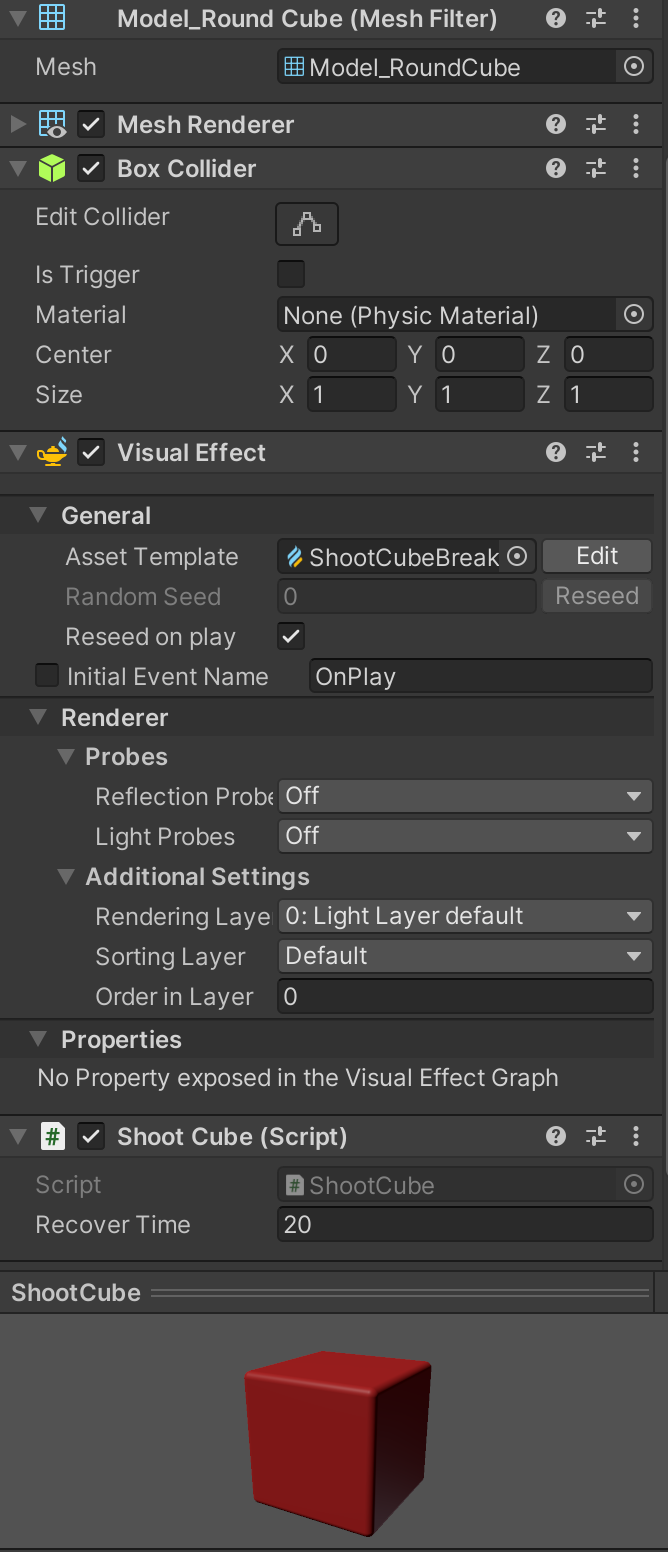
创建脚本InteractiveCube.cs,我希望当方块被子弹击中时会隐藏渲染和碰撞,并播放粒子效果,一段时间后再复原
public class InteractiveCube : MonoBehaviour
{
    [SerializeField] private float recoverTime = 20f;

    private MeshRenderer meshRenderer;
    private Collider boxcollider;
    private VisualEffect visualEffect;

    private float currentDeadTime;

    private void Start()
    {
        meshRenderer = GetComponent<MeshRenderer>();
        boxcollider = GetComponent<Collider>();
        visualEffect = GetComponent<VisualEffect>();
        visualEffect.Stop();
    }

    private void OnTriggerEnter(Collision other)
    {
        if (other.gameObject.CompareTag("Bullet"))
        {
            meshRenderer.enabled = false;
            boxcollider.enabled = false;
            visualEffect.Play();
            currentDeadTime = recoverTime;
        }
    }

    private void Update()
    {
        if (currentDeadTime >= 0)
        {
            currentDeadTime -= Time.deltaTime;
            if (currentDeadTime <= 0)
            {
                meshRenderer.enabled = true;
                boxcollider.enabled = true;
            }
        }
    }
}
|
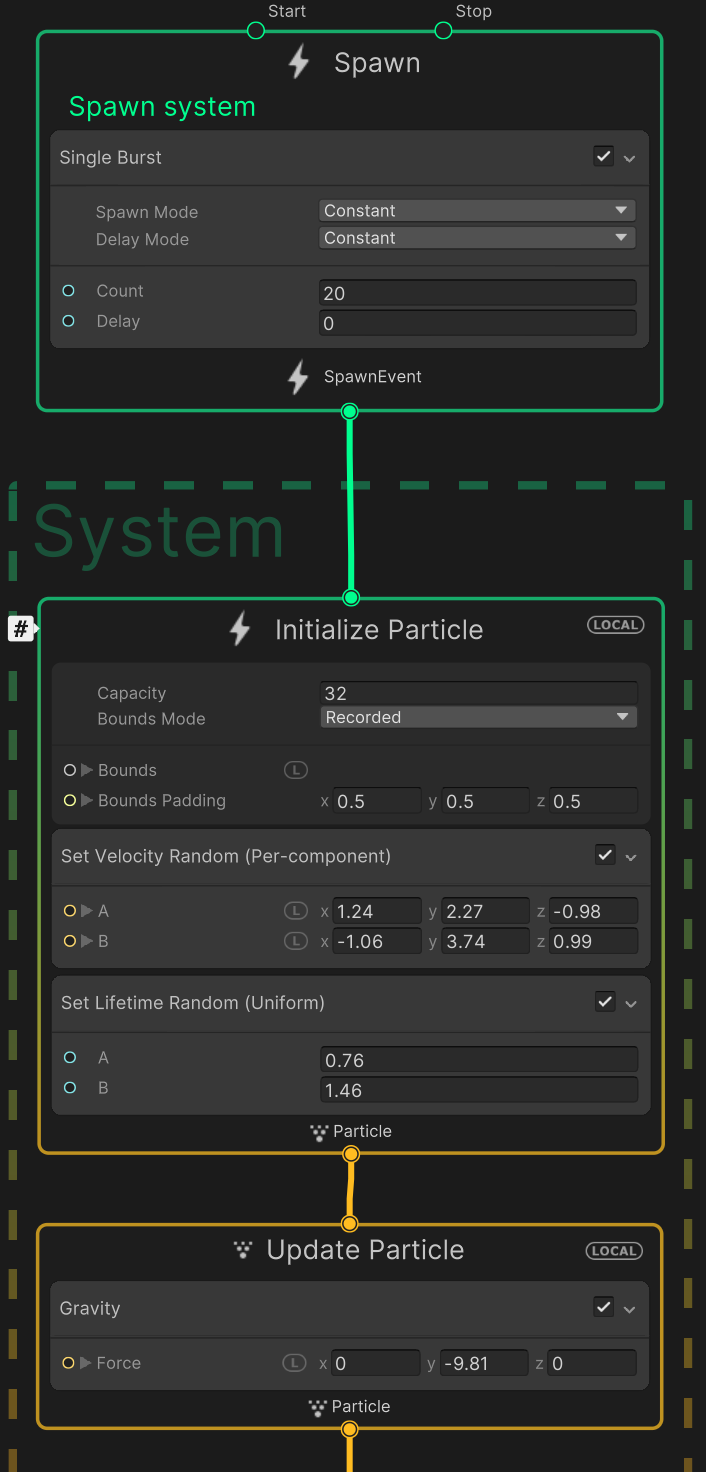
特效
现在的特效是随便做的,之后要重写,我希望方块被射击会有破碎效果,复原时会有溶解效果
破碎效果使用Unity VFX插件
首先去Package Manager安装Visual Effect Graph
右键Visual Effect——Visual Effect Graph,创建一个特效,双击后进入面板,配置为单次发射(Single Burst)、设置发射方向、粒子生命周期、添加重力
有点绷不住了
13. 近战攻击
近战攻击相当复杂,我问了几个动作策划,给了我好几种方法:
- 在武器上绑定胶囊体碰撞盒
- 在武器附近射线检测
- 在打击区域绘制方形碰撞盒
- 逐帧修改判定区域
- 怪物读玩家指令
在银河战士里,近战多用于反击远程单位(我的游戏也是这样设计的),感觉做成读指令会更方便。但我又想
Timeline
Timeline是Unity的时间线工具,常用于制作过场动画、相机蒙太奇,我们这里用来制作打击动作
打开Timeline面板
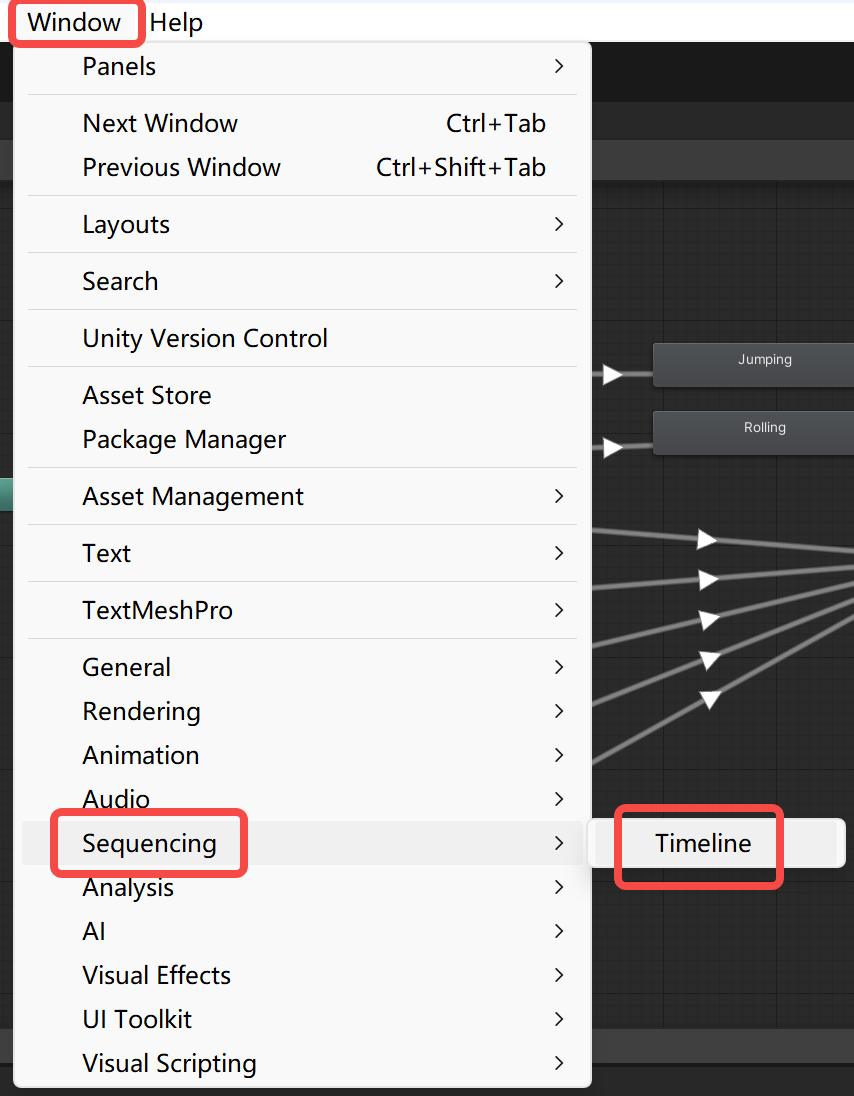
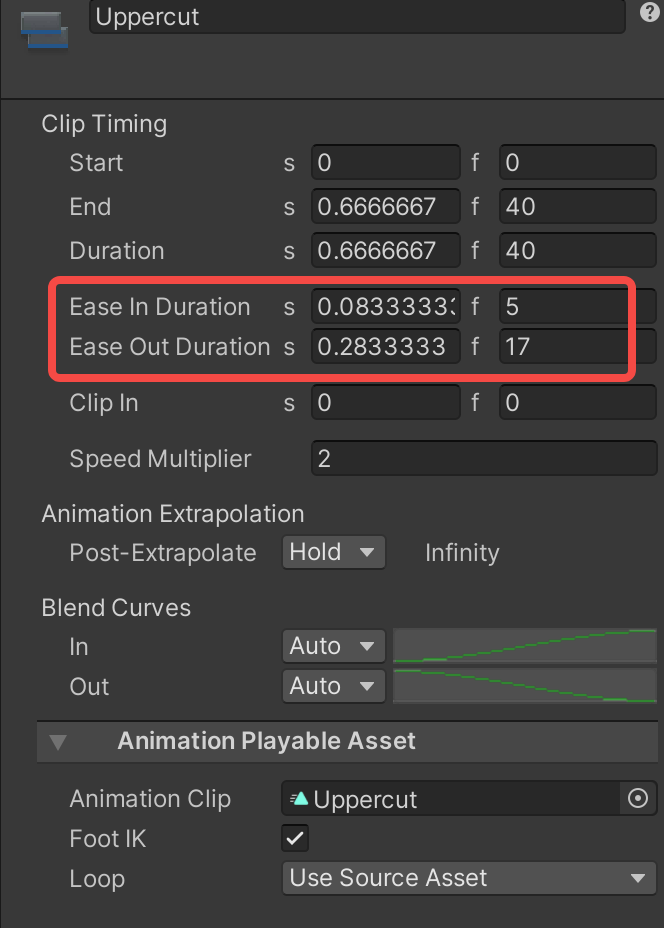
为角色创建Timeline(此时角色身上会添加PlayableDirector组件),将近战动画clip拖入时间线中,并设置动画的Ease In/Out,这样可以使得Timeline动画和动画状态机的动画混合
注意要关掉Timeline的Play On Awake
我们在角色面前创建一个方形碰撞区域(有着Box Collider和锁死旋转和位移的Rigidbody),添加Tag为Hit,并默认设为unactive。
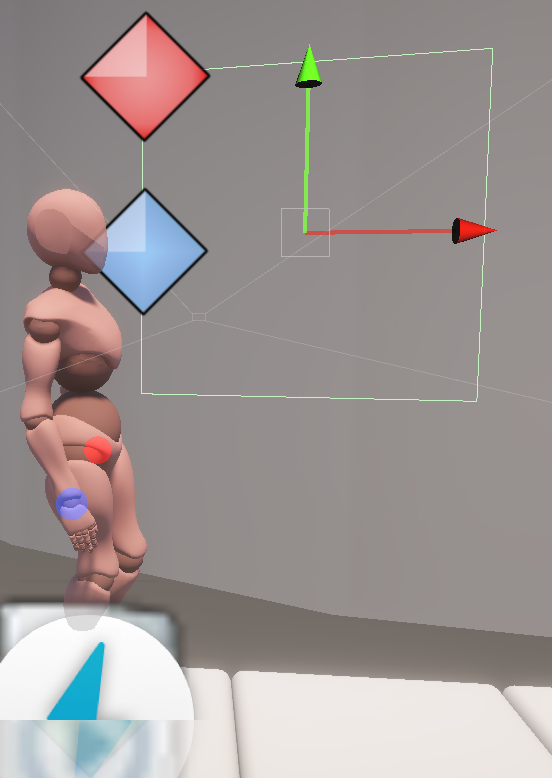
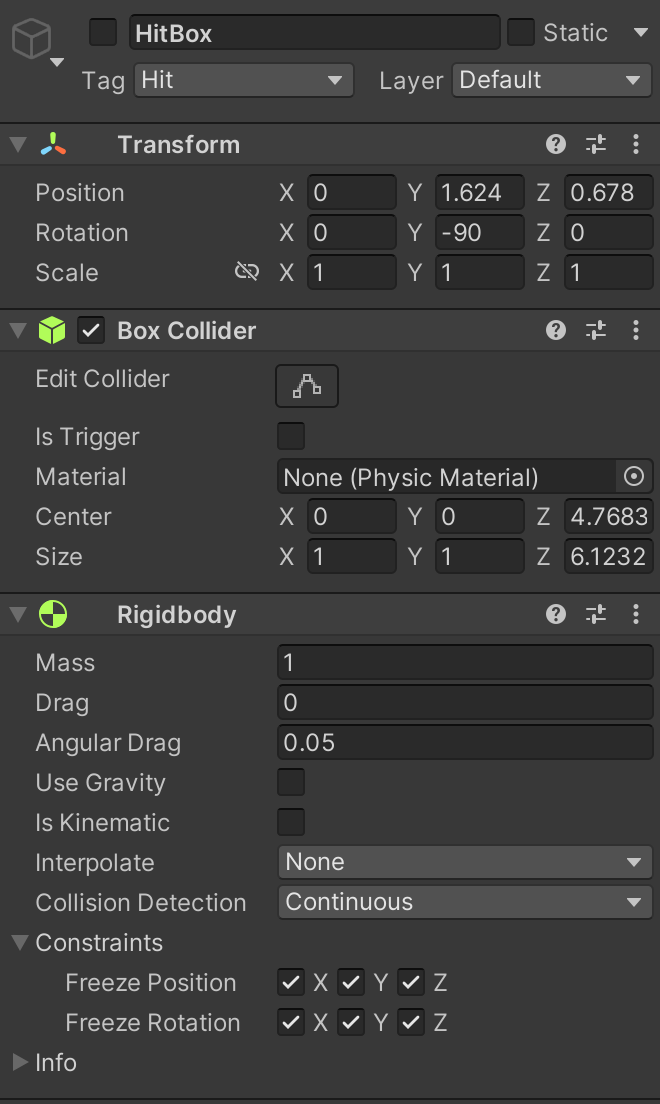
在Timeline中创建Control Track,在片段期间该物体将设为活跃,结束后恢复隐藏

点击播放键可以预览效果
控制
修改脚本PlayerController.cs
private FireManager fireManager;
+private PlayableDirector director;
...
private bool firePressDown = false;
+private bool hitPressDown = false;
private void Start()
{
	...
+    director = GetComponent<PlayableDirector>();
}
private void Update()
{
	...
+	hitPressDown = input.actions["Hit"].WasPressedThisFrame();
	...
+	if (hitPressDown && collisionState.onGround)
+    {
+        director.Play();
+    }
}
|
14. 可被近战破坏的方块
修改脚本InteractiveCube.cs
+public enum CubeType
+{
+    Shoot,
+    Hit
+}
public class InteractibleCube : MonoBehaviour
{
    [SerializeField] private float recoverTime = 20f;
+    [SerializeField] private CubeType cubeType;
    ...
+    private string TagName
+    {
+        get
+        {
+            if(cubeType == CubeType.Shoot)
+                return "Bullet";
+            else
+                return "Hit";
+        }
+    }
	...
    private void OnTriggerEnter(Collision other)
    {
+        if (other.gameObject.CompareTag(TagName))
        {
			...
        }
    }
	...
}
|
15. 零美术成本更换角色模型
适合完全不会绑骨刷权重K帧的非美术,mmd的模型骨骼一般都十分复杂,并且和mixamo不一致
去模之屋等网站获取mmd模型,导入blender中(详情可见blender mmd tools),个人建议选择短发角色
将角色姿态设为T Pose(你可以进入姿态模式,用手掰,可以放一个水平盒子当辅助线),T Pose很重要!
导出仅含网格的fbx模型
打开mixamo,选择小红人,点击UPLOAD CHARACTOR(导入模型),按步骤完成
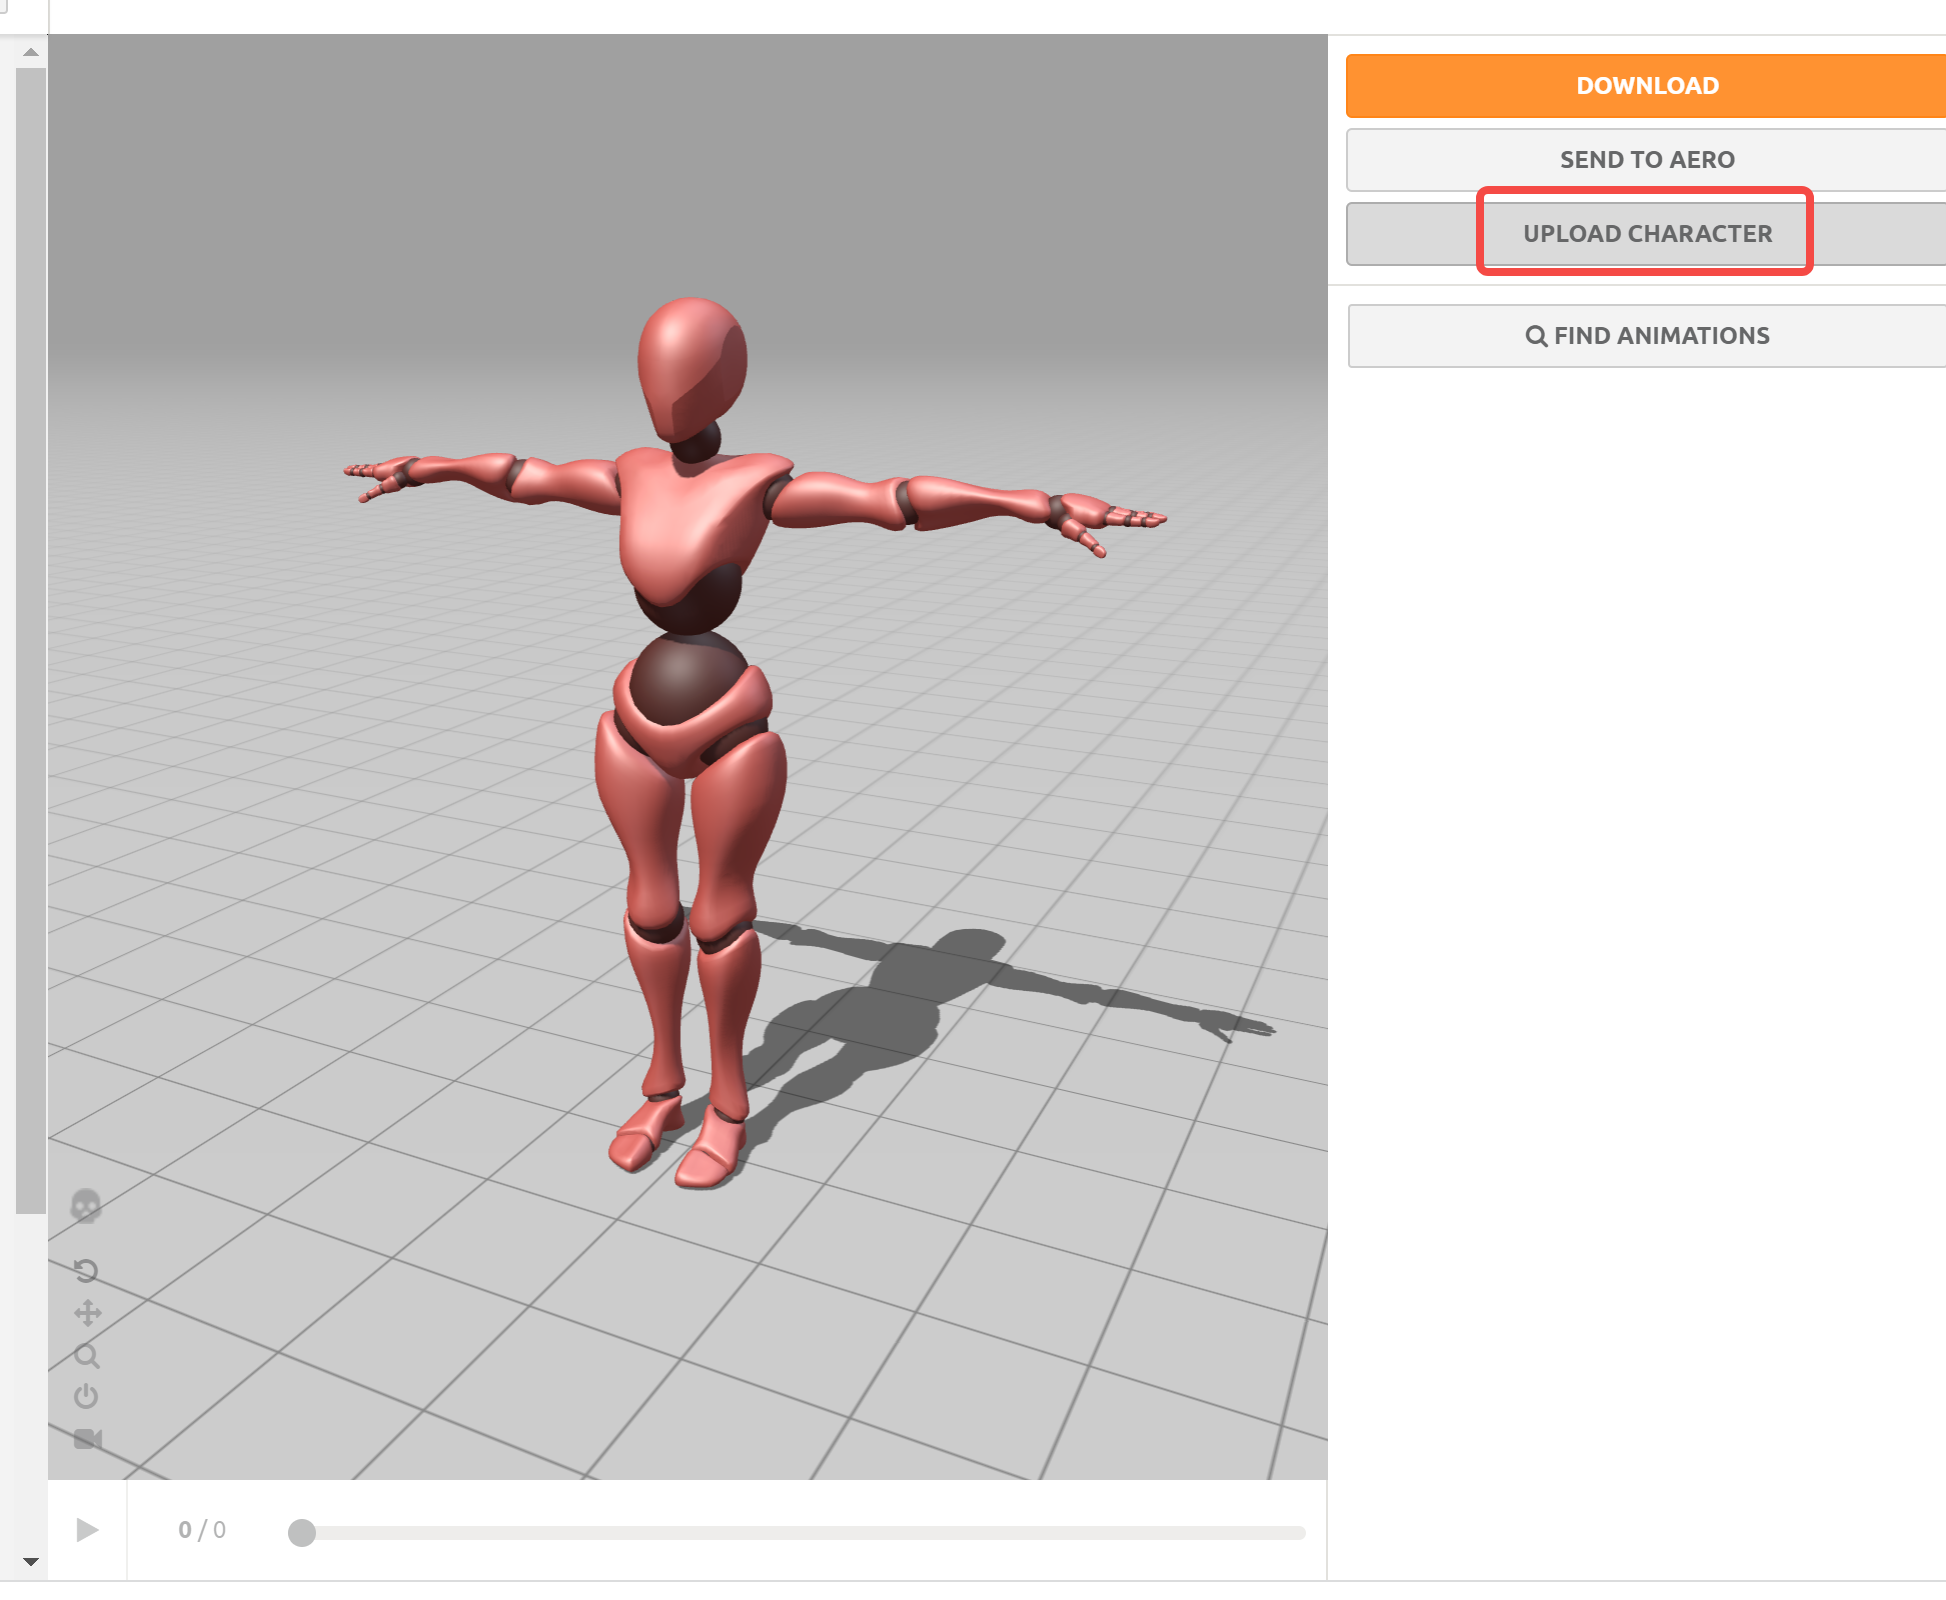
即可得到自动绑骨刷权重的角色模型,并能够完美使用mixamo的动画
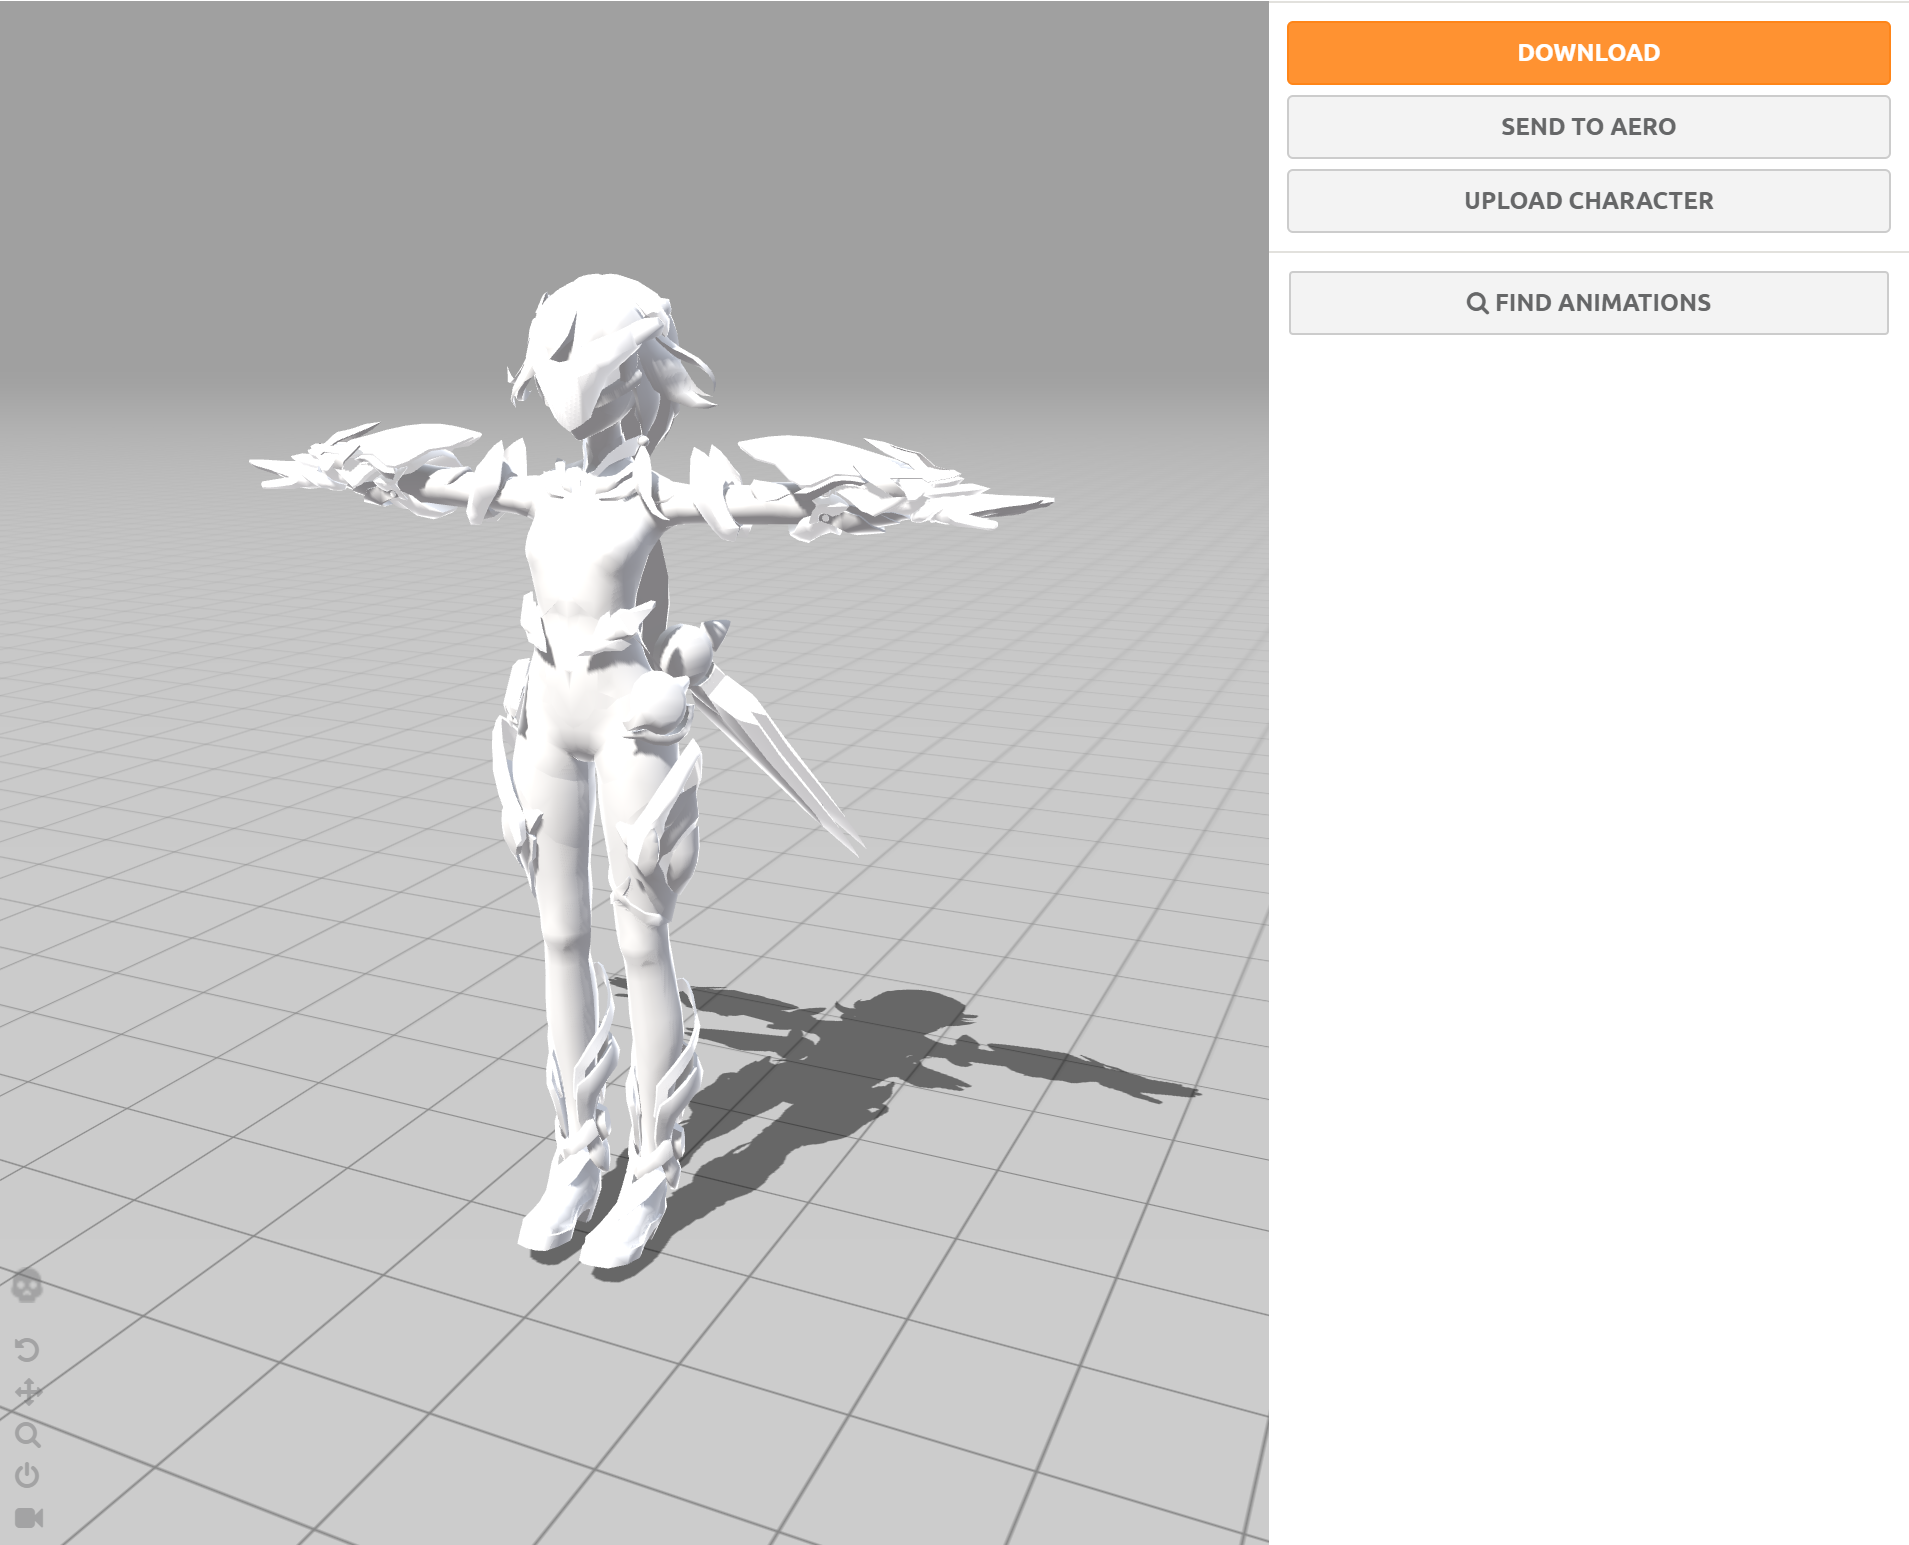
我这里除了更换角色模型外,还使用了卡渲Shader和后效,网上关于卡渲的项目和教程相当多,这里就按下不表了
16. 地面敌人AI
使用插件Behavior Trees,Asset Store 45刀,参考空洞骑士BOSS战
敌人移动混用了DoTween插件和Charactor Controller
感觉这一节用文字讲好乏力。。。
创建角色单例
创建脚本PlayerInfo.cs,并将其绑定到Player上,该脚本控制了角色血量和是否处于无敌状态
public class PlayerInfo : MonoBehaviour
{
#region 单例
private static PlayerInfo instance;
private PlayerInfo(){}
public float Health { get; private set; } = 100f;
#endregion
#region Prop
[SerializeField, Tooltip("处于无敌状态")]
private bool invincible = false;
[SerializeField, Tooltip("无敌时间")]
private float invincibleTime = 2f;
[SerializeField, Tooltip("无敌时闪烁间隔时间")]
private float blinkTime = 0.1f;
[SerializeField, Tooltip("角色渲染")]
private SkinnedMeshRenderer playerRenderer;
#endregion
#region Member
private float currentInvincibleTime = 0f;
private float currentBlinkTime = 0.1f;
private bool blinkVisible = true;
#endregion
public static PlayerInfo Instance
{
get
{
if (instance == null)
{
instance = FindObjectOfType<PlayerInfo>();
}
return instance;
}
}
public Vector3 PlayerPosition
{
get
{
return transform.position;
}
}
public void HitPlayer(float damage, Vector3 enemyPosition)
{
if (invincible)
{
return;
}
Vector3 moveDirection = new Vector3(0, 1, 0);
if(enemyPosition.x > transform.position.x)
{
moveDirection.x = -1;
}
else
{
moveDirection.x = 1;
}
gameObject.GetComponent<CharacterController>().Move(moveDirection);
Health -= damage;
currentInvincibleTime = invincibleTime;
currentBlinkTime = blinkTime;
}
private void Update()
{
if(currentInvincibleTime > 0)
{
invincible = true;
currentInvincibleTime -= Time.deltaTime;
currentBlinkTime -= Time.deltaTime;
if(currentBlinkTime <= 0)
{
currentBlinkTime = blinkTime;
blinkVisible = !blinkVisible;
playerRenderer.enabled = blinkVisible;
}
}
else
{
invincible = false;
playerRenderer.enabled = true;
}
}
}
|
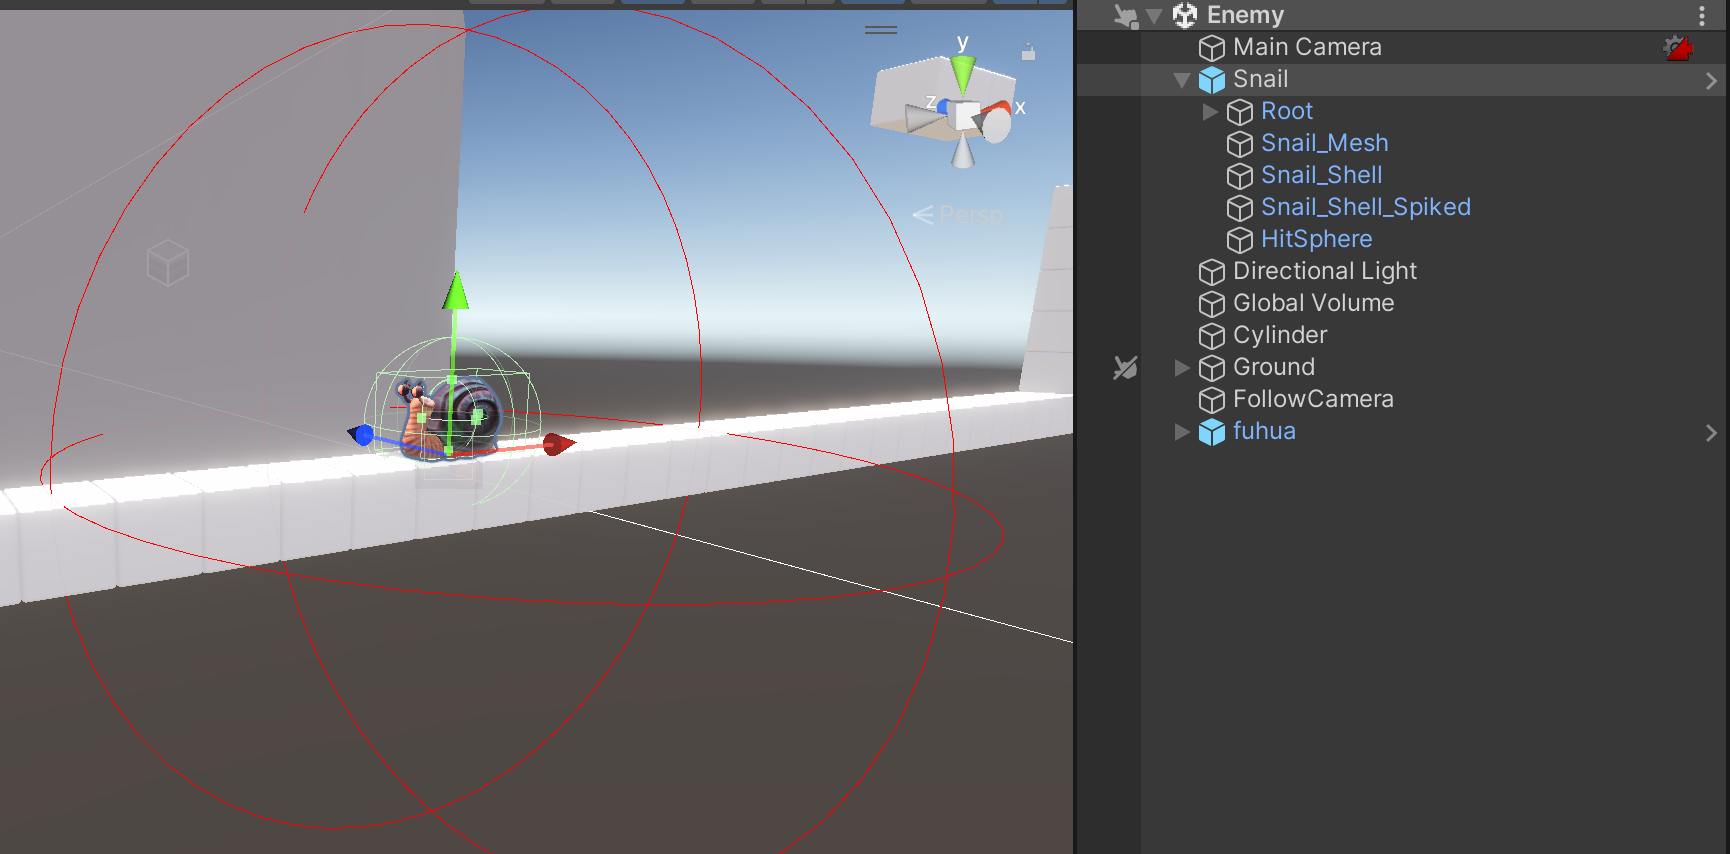
创建敌人
创建脚本EnemyInfo.cs,并挂到敌人身上,此外敌人身上同时挂在Character Controller、Animator、Behaviour(这个稍后再讲)、BoxCollider(这个碰撞盒是用于被攻击的)
添加碰撞层Enemy,并将敌人设为Enemy(在项目设置中,设置Enemy和玩家不发生碰撞)
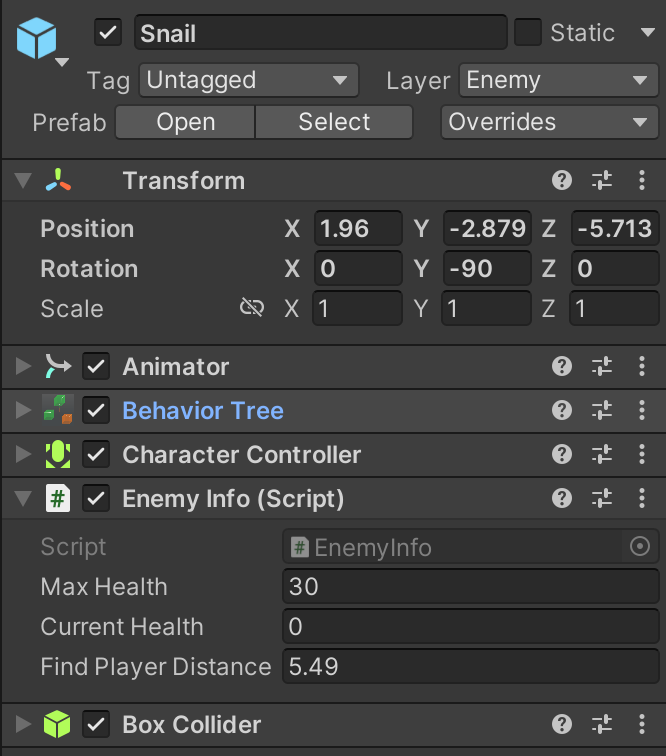
public class EnemyInfo : MonoBehaviour
{
    public float maxHealth = 30.0f;
    public float currentHealth;
    public float findPlayerDistance = 10.0f;

    private void Start()
    {
        currentHealth = maxHealth;
    }

    private void OnDrawGizmos()
    {
        Gizmos.color = Color.red;
        Gizmos.DrawWireSphere(transform.position, findPlayerDistance);
    }

    private void OnTriggerEnter(Collider other)
    {
        if (other.tag == "Bullet")
        {
            currentHealth -= other.GetComponent<Bullet>().damage;
        }
    }
}
|
创建敌人攻击碰撞球
我们将敌人受攻击(Box)、敌人和场景的碰撞(CC)、敌人攻击玩家的碰撞(Sphere)分开了
为敌人创建一个子物体叫HitSphere,拥有一个球形碰撞盒和一个碰撞处理脚本,该碰撞球用于攻击玩家
添加碰撞层EnemyHit,该碰撞层仅和玩家碰撞
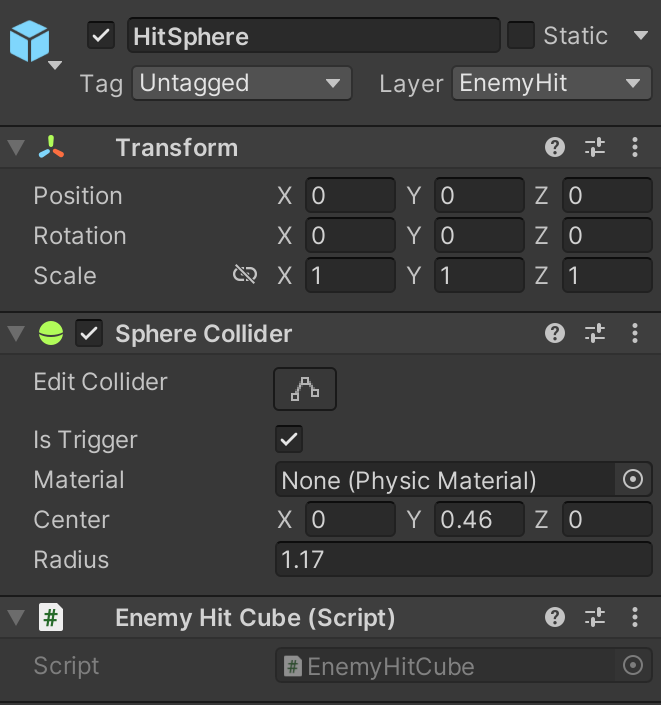
创建脚本EnemyHitCube.cs
public class EnemyHitCube : MonoBehaviour
{
    private void OnTriggerEnter(Collider other)
    {
        var playerInfo = other.GetComponent<PlayerInfo>();
        if (playerInfo != null)
        {
            playerInfo.HitPlayer(10, transform.position);
        }
    }
}
|
创建行为树
寻找敌人后打开Behaviour Designer面板,添加任意行为后敌人身上会出现一个Behaviour Tree组件
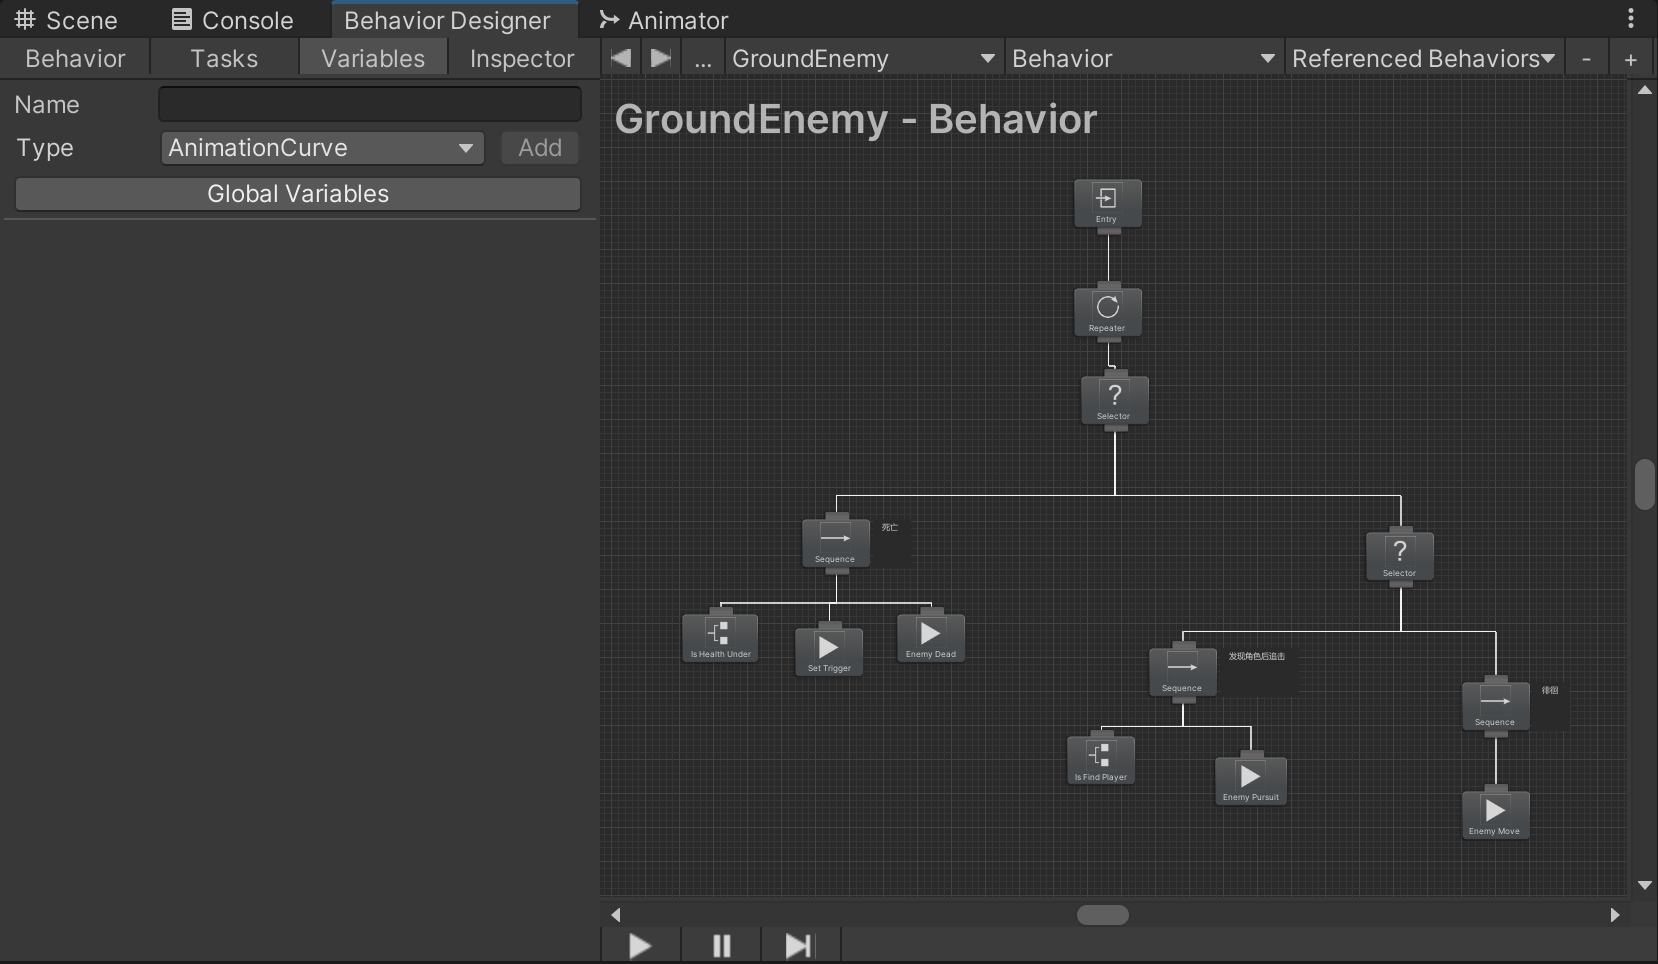
行为树是由一个个节点组成,当这些节点被执行时,会向其父节点返回执行成功、失败、正在执行等结果
我为怪物添加了三个行为:
- 血量小于0时
IsHealthUnder,播放死亡动画,并销毁GameObject
- 否则
- 若敌人周围有玩家
IsFindPlayer,则追逐玩家EnemyPursuit
- 否则在周围徘徊
EnemyMove
创建敌人行为和条件基类
创建脚本EnemyAction.cs
public class EnemyAction : Action
{
    protected Animator animator;
    protected EnemyInfo info;
    protected CharacterController controller;

    public override void OnAwake()
    {
        animator = GetComponent<Animator>();
        info = GetComponent<EnemyInfo>();
        controller = GetComponent<CharacterController>();
    }
}
|
创建脚本EnemyConditional.cs
public class EnemyConditional: Conditional
{
    protected EnemyInfo info;
    protected Animator animator;

    public override void OnAwake()
    {
        info = GetComponent<EnemyInfo>();
        animator = GetComponent<Animator>();
    }
}
|
创建角色移动、追击、死亡行为
创建脚本EnemyMove.cs,该脚本能使得敌人左右徘徊
public class EnemyMove : EnemyAction
{
    public SharedBool lookRight;
    public SharedFloat currentMoveTime;
    public float moveSpeed = 1.0f;
    public float moveUseTime = 2.0f;
    public float rotateUseTime = 0.5f;

    private Tween rotateTween;

    public override void OnStart()
    {
    }

    public override TaskStatus OnUpdate()
    {
        float direction = lookRight.Value ? 1 : -1;
        currentMoveTime.Value += Time.deltaTime;
        if (currentMoveTime.Value > moveUseTime)
        {
            lookRight.Value = !lookRight.Value;
            currentMoveTime.Value = 0;
            rotateTween = DOVirtual.DelayedCall(0, () => transform.DORotateQuaternion(Quaternion.LookRotation(Vector3.right * -direction), rotateUseTime), false);
        }

        controller.Move(Vector3.right * direction * moveSpeed * Time.deltaTime);
        return TaskStatus.Success;
    }
}
|
创建脚本EnemyPursuit.cs,该脚本能使得敌人向玩家追击
public class EnemyPursuit : EnemyAction
{
    public float moveSpeed = 1.0f;
    public float rotateUseTime = 0.5f;


    public override TaskStatus OnUpdate()
    {
        float direction = PlayerInfo.Instance.PlayerPosition.x > transform.position.x ? 1 : -1;
        DOVirtual.DelayedCall(0, () => transform.DORotateQuaternion(Quaternion.LookRotation(Vector3.right * direction), rotateUseTime), false);

        controller.Move(Vector3.right * direction * moveSpeed * Time.deltaTime);
        return TaskStatus.Success;
    }
}
|
创建脚本EnemyDead.cs,该脚本能使敌人死亡
public class EnemyDead : EnemyAction
{
    public float deadDelayTime = 1.0f;

    private bool isDeadFinish = false;

    public override void OnStart()
    {
        DOVirtual.DelayedCall(deadDelayTime, () =>
        {
            Object.Destroy(gameObject);
            isDeadFinish = true;
        });
    }

    public override TaskStatus OnUpdate()
    {
        return isDeadFinish ? TaskStatus.Success : TaskStatus.Running;
    }
}
|
创建敌人行为条件
创建脚本IsFindPlayer.cs,该脚本用于判断敌人周围是否有角色,如果是刚刚发现,会出发一段动画
public class IsFindPlayer : EnemyConditional
{
    public SharedBool firstFindPlayer = true;

    public override TaskStatus OnUpdate()
    {
        if ((transform.position - PlayerInfo.Instance.PlayerPosition).magnitude < info.findPlayerDistance)
        {
            if (firstFindPlayer.Value)
            {
                animator.SetTrigger("FindPlayer");
            }
            firstFindPlayer.Value = false;
            return TaskStatus.Success;
        }
        else
        {
            firstFindPlayer.Value = true;
            return TaskStatus.Failure;
        }
    }
}
|
创建脚本IsHealthUnder.cs,该脚本用于判断角色血量是否低于某个数值
public class IsHealthUnder : EnemyConditional
{
    public float underNumber = 0f;

    public override TaskStatus OnUpdate()
    {
        if (info.currentHealth <= underNumber)
        {
            return TaskStatus.Success;
        }
        else
        {
            return TaskStatus.Failure;
        }
    }
}
|
效果