Diffusion
扩散原理
生成模型的目标是:给定一组数据,构建一个分布,生成新的数据
在物理学中很多微观过程都是时间可逆的,如果能知道当前系统的状态,理论上可以求出上一时间的状态。受此启发,如果我们知道从一幅画上如何一步步加噪声,也许能学会如何从噪声出发一步步去噪声得到一幅画。
扩散模型是一类概率生成模型,定义了两个马尔可夫过程:
- 前向过程:一个固定的马尔可夫链,将数据分布逐步添加高斯噪声,转为一种已知的先验分布(通常为标准高斯分布)
- 反向过程:一个参数化的马尔可夫链,从先验分布开始逐步降噪,最终生成数据分布的样本
扩散模型将一个复杂的抽样转为一系列的简单抽样,简化了学习
扩散:物质或能量在空间中自发地从高浓度区域向低浓度区域的随机运动过程,是热力学第二定律的宏观表现
扩散模型中的扩散:在噪声的不断扰动下(在原数据不断加噪声的过程),数据逐渐接近标准高斯分布的过程
高斯扩散
$$
x_{t+1}=x_t + \eta_t ,\quad \eta_t \sim N(0, \sigma^2)
$$
一个假设:反向过程中,每一次去噪声的结果,仍是高斯分布。
于是这个分布可以用一组均值和方差表示,神经网络只需要预测这组参数,就能还原出$x_0$
生成策略与具体样本
为什么扩散模型不是“记住具体样本(instance)”,而是学会一种“生成策略(policy)”?
- 从训练目标来看:扩散模型优化的是分布,而非样本,不是学习某个具体的图像A,而是学习如果生成类似A的图像
- 从采样方式来看:扩散是一个多步决策序列
- 从泛化性角度,如果模型是instance base,那么采样时只会复现训练数据,对那些未训练的数据“不公平”(分布外泛化不公平)
最优传输理论
最优传输理论:一种研究如何以最小成本将一个概率分布转移为另一种概率分布
扩散模型架构
U-Net
《U-Net: Convolutional Networks for Biomedical Image Segmentation》2015.5
U-Net最初是一个医学图像分割模型,当时的需求是神经网络既要理解全局语义信息(这是什么器官),又要精确定位像素。传统的Encoder-Decoder架构当特征图被压缩到最小时,大量空间信息被丢失了,而U-Net通过引入跳跃连接(下图灰色箭头),让高分辨率的信息直接拷贝到后续部分。
U型的网络传递全局语义信息,跳跃连接传递局部高分辨像素信息
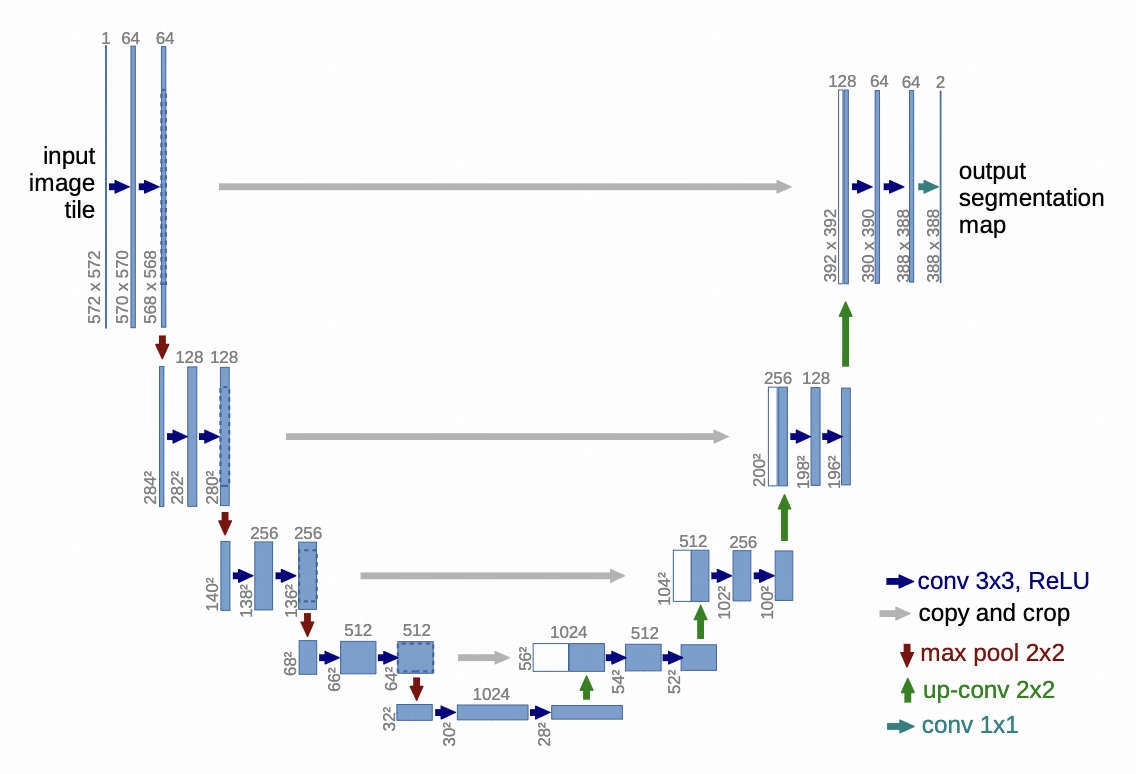
U-Net的优点:
- 对称性的架构,能保证输出和输入在空间上严格对齐
- 多尺度的处理能力,在扩散过程中,前期高噪声时主要进行全局结构和语义重建,后期需要进行精修细节和清晰度,U-Net可以兼顾全局和局部
- 高效,大部分复杂计算(如自注意力)在低分辨率的特征图中,在高分辨率下只做简单操作
DDPM
《Denoising Diffusion Probabilistic Model》2020.12
动机
- 当时扩散模型质量仍不够高,尽管生成样本质量高,但是对数似然不够好
- 作者认为扩散模型很有潜力
- 作者认为扩散模型和去噪分数匹配的理论有潜在联系
似然
如果我们掷骰子一直是六点,比较合理的解释是这个骰子被做了手脚,密度不均匀。
概率:模型给定后,这个数据出现的概率是多少
$$
P(x|\theta)
$$
似然(Likelihood):这个数据出现了,模型参数应该是多少才合适
$$
\mathcal{L}(\theta|x)
$$
对数似然:似然是非常小的数,取对数方便计算
对数似然下界(ELBO):用于求一个复杂概率分布的后验分布,由于直接计算后验分布十分困难,所以引入变分推断来近似
模型训练的常见目标,就是最大化似然估计(MLE),对于训练集中的数据,要如何调整模型参数,才能让模型最好地解释它
似然估计低,说明模型认为该数据不太可能在自己的分布中出现,意味着生成分布和真实分布差异较大,模型的采样结果不一定能覆盖真实数据空间。而扩散模型的训练目标,就是用已有的数据去构造一个分布,然后在分布中采样得到新数据
归纳偏差
归纳偏差=模型对世界“先验相信的规则”,是未经学习就内置的思维惯性
- 对CNN来说,图像有空间、时间一致性,这就是一种归纳偏差
- 对RNN来说,序列是按时间排序的,这也是一种归纳偏差
创新点
- 从预测图像改为预测噪声
- 简化训练方程,仅使用误差平方
- 将生成过程解释为渐进式有损解压缩方案
关键技术
预测噪声
DDPM(去噪扩散概率模型),一个常用的构建反向采样器的方法,将复杂的变分推断问题简化为一个简单的去噪任务
DDPM的简化:
- 固定前向过程,前向加噪时使用一个预先设定的固定方差的高斯噪声,无需学习,只需要专注学习反向过程
- 简化反向过程,反向去噪时每次都是用固定方差的高斯噪声,模型只需要学习预测高斯分布的均值
- 重参数化目标,从学习预测图像转为预测噪声,极大地稳定了训练过程
DDPM训练伪代码
-
从数据集中随机抽取一批原始图像 $x_0$
-
为该批次中的每个图像随机选择一个时间步 $t$ (从1到T)
-
从标准正态分布中采样一个噪声 $\epsilon$
-
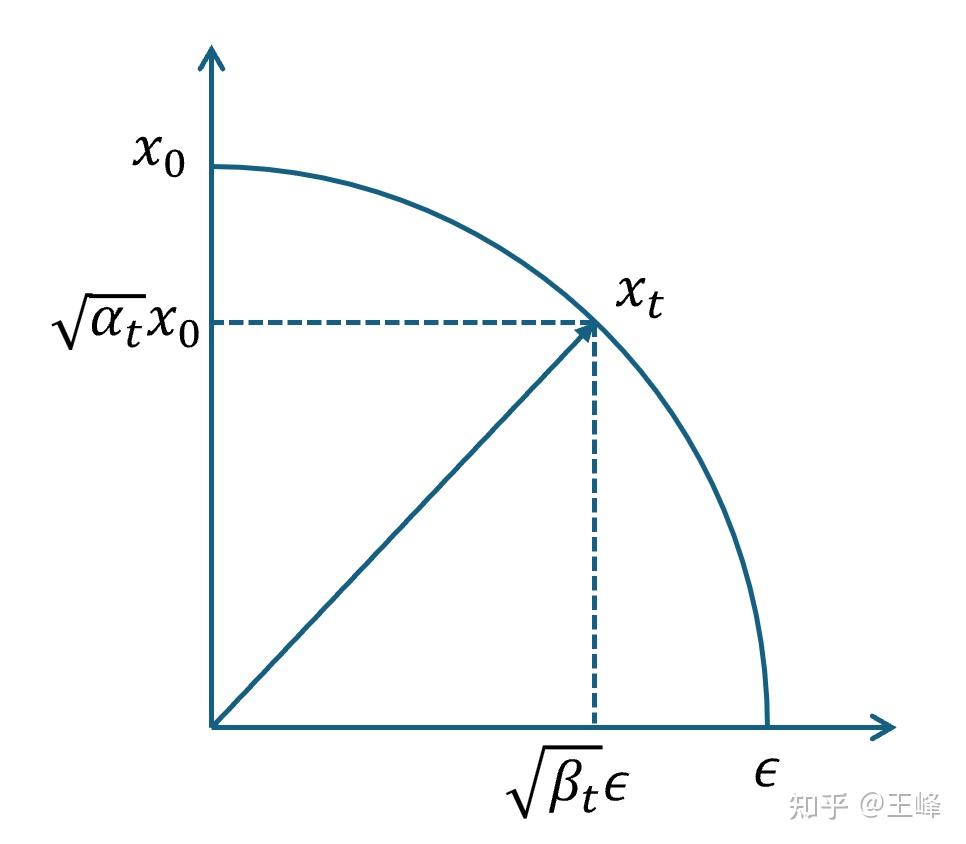
使用闭式解计算 $t$ 时刻的噪声图像 $x_t$
$$
x_t = \sqrt{\bar{\alpha}_t} x_0 + \sqrt{1 - \bar{\alpha}_t} \epsilon
$$
-
将 $x_t$ 和 $t$ 输入到神经网络 中,得到预测的噪声 $\epsilon_{pred}$
-
计算损失: $loss = \text{MSE}(\epsilon, \epsilon_{pred})$
-
使用梯度下降更新模型参数 $\theta$
重参数化
Reparameterization
对一个概率分布直接采样,是随机且不可导的。重参数化的核心是将采样分为两步:
-
从一个无参数的分布(如标准正态分布)中采样一个噪声变量 $\epsilon$
-
通过一个确定的可导的函数 $g_{\theta}(\epsilon)$ 将噪声转化为目标样本
于是采样过程变成了一个与参数 $\theta$ 有关的确定性函数
基于分数的生成模型
《Score-Based Generative Modeling through Stochastic Differential Equations》2021.2
从数学(Energy-Based)的角度,扩散模型本质上上学习数据的分数函数(score function)
动机
- DDPM受限于离散马尔可夫过程,不能无缝拓展到连续过程
- 希望通过SDE提供一个连续视角,将数据分布平滑转化为先验分布,并逆转此过程
创新点
- 统一的SDE框架,用SDE模拟噪声演化过程,将数据平滑扩散为噪声,再逆转生成
- 预测-矫正采样器
- 概率流ODE与神经ODE连接
- 无条件生成模型可以通过条件SDE实现条件生成,而无需重新训练
关键技术
分数函数
给定概率密度函数$p(x)$,分数函数为
$$
s(x) = \nabla_{x} \log p(x)
$$
含义为对数概率密度关于x的梯度
分数函数表示任意一点概率密度增长最快的方向,定义了数据流形上的向量场,这个局部信息可以指导我们如何在概率空间中“导航”
概率流ODE
Probability Flow ODE
前向过程SDE:
$$
dx = f(x,t) dt + g(t) dw_t
$$
- $x$ : 数据
- $f(x,t)$:漂移项
- $g(t)$: 扩散系数
- $dw_t$: 标准高斯噪声
尽管原始扩散是SDE,但是我们可以构造一个确定性 ODE,使其在统计意义上产生相同的边缘分布 $p_t(x)$
概率流ODE:
$$
\frac{dx}{dt} = f(x,t) - \frac{1}{2} g(t)^2 \nabla_x \log p_t(x)
$$
- $f(x,t)$:漂移项(和SDE相同)
- $\nabla_x \log p_t(x)$: 分数函数
LDM
《High-Resolution Image Synthesis with Latent Diffusion Models》2022.4
动机
过去的Diffusion直接在像素空间操作,带来了巨大的计算成本,训练门槛高、效率低下、且过度建模数据中难以察觉的细节
创新点
- 使用VAE将数据编码为latent,在latent空间中训练diffusion
- 可以轻松画大图
- VAE是单独的,可分离
DDIM
《Denoising Diffusion Implicit Models》2022.10
动机
- DDPM采样次数过多,效率低下
- DDPM采样具有随机性
DDPM的局限性
- 采样的随机性,每一次去噪都会注入随机性,即使初始条件相同,也会得到不同的图像,无法精确控制生成过程
- 步数依赖:DDPM需要1000步的去噪过程,减少步数会大幅降低生成质量
- 不可逆:给定一张图片,无法还原出初始噪声,限制了图像编辑等模型的开发
创新点
- 将DDPM的马尔可夫前向过程,泛化为非马尔可夫过程,并保持相同的边缘分布,保持变分训练目标不变
- 提出DDIM,生成过程可确定,采样次数大幅减少
- 短轨迹采样,加速生成过程
- 链接神经ODE
关键技术
DDIM
将DDPM的平滑过渡转为确定性映射
在DDPM中,我们采样
$$
x_{t-1} = \mu_\theta(x_t,t) + \sigma_t z,\quad z\sim\mathcal{N}(0,I)
$$
DDIM直接设定无噪声版:
$$
x_{t-1} = \mu_\theta(x_t,t)
$$
即
$$
x_{t-1} = \sqrt{\bar{\alpha}{t-1}}\hat{x}0 + \sqrt{1-\bar{\alpha}{t-1}}\epsilon\theta(x_t,t)
$$
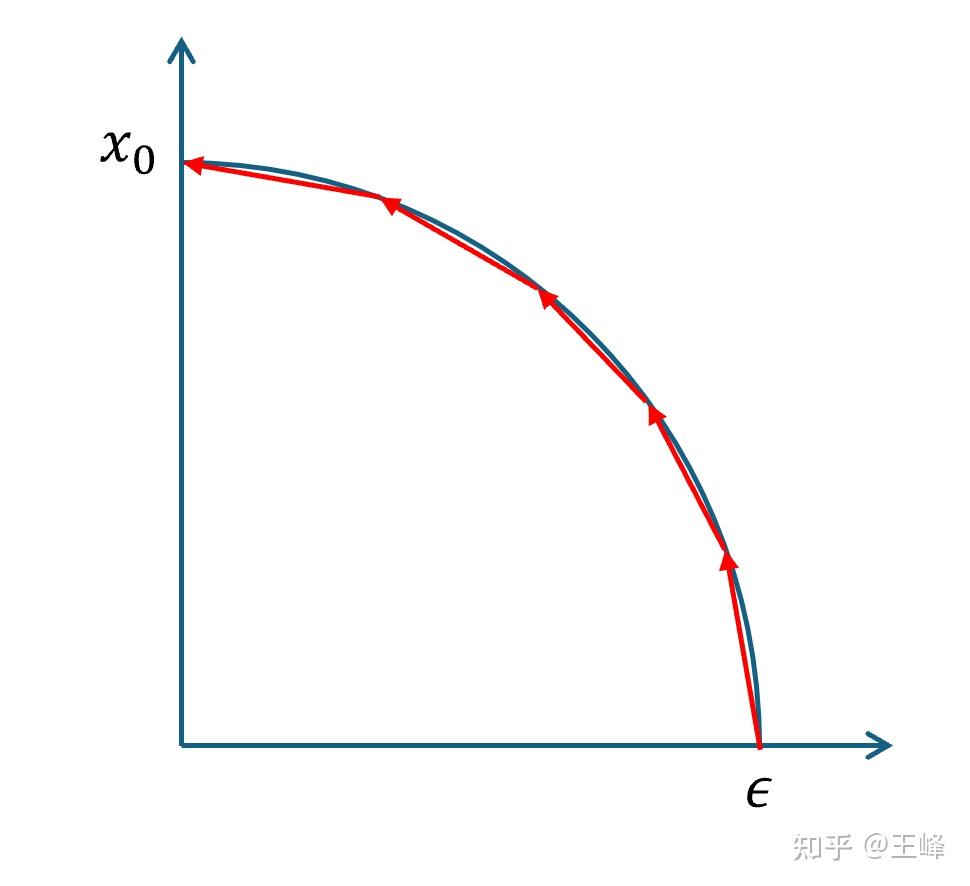
DDIM 是 DDPM SDE 的确定性 ODE 解路径
相关概念
边缘分布
边缘分布(Marginal Distribution):在一个多变量联合分布中,只关注其中某个变量自身分布时所得到的分布
假设我们有两个随机变量 (X) 和 (Y),它们有联合分布 (p(x, y))。
如果我们只关心 (X) 的概率分布,那么:
$$
p(x) = \sum_y p(x, y) \quad \text{(离散情况)}
$$
或
$$
p(x) = \int p(x, y), dy \quad \text{(连续情况)}
$$
这种对另一个变量(Y)进行求和(或积分)“压扁”出来的分布,就叫边缘分布
在DDIM将马尔可夫过程转为非马尔可夫过程时,需要保持(X的)边缘分布不变,以为着我们只是修改了描述方式,而没有改动系统本身。两个模型会生成同一份数据,只是内部机制不同
马尔可夫过程
Markov Process
马尔可夫过程,核心特征是无记忆性,系统的未来状态仅于当前状态有关,而与历史状态(先前的状态)无关
$$
P(X_{t+1} \mid X_t, X_{t-1}, \dots, X_0) = P(X_{t+1} \mid X_t)
$$
如果不满足这个条件,就是非马尔可夫过程,意味着系统有记忆
CFG
《Classifier-Free Diffsuion Guidance》2022.7
动机
CFG希望扩散模型既可以生成高质量图像,又可以遵循prompt条件
早期Diffusion在无条件生成领域取得非常好的成果,然而条件生成却很一般(没能超越GAN),通过直接在噪声预测网络中加条件,可以保证多样性,但生成的内容模糊、保真度低。朴素的条件生成无法实现低温度采样(不牺牲太多多样性,提高样本的锐度和符合条件的精确性)的原因,是噪声的随机性导致采样路径偏离条件生成的高密度区
创新点
- 分类器指导CFG(Classifier-Free Guidance)
- 在训练期间随机丢弃条件信息,来令模型同时掌握条件生成和非条件生成
关键技术
CFG
CFG让模型同时学习有条件和无条件生成,并用一个引导系数连接两者
$$
\epsilon_\text{CFG} = \epsilon_\text{uncond} + w \cdot (\epsilon_\text{cond} - \epsilon_\text{uncond})
$$
当 $w > 1$ ,模型会更强烈地遵循文本条件
当 $w =0$,模型只会无条件生成
有条件和无条件生成是同一个模型共享网络参数,但是在训练和推理上,每次都需要进行两次前向计算(无条件和有条件),再将两者合并
丢弃训练
额外训练一个分类器指导是十分麻烦的。CFG的作者认为分类器指导的本质,是通过隐式分类器实现的,而score的线性组合是可以等价于分类器的。使用一个单一的神经网络,同时训练条件生成和无条件生成。实现方式是在训练时随机丢弃一些条件信息(0.1~0.2的概率),模型会同时掌握条件和无条件生成。
条件生成
Flow Matching
《Flow Matching for Generative Modeling》2023.2
动机
- 连续归一化流(CNFs)极具潜力,可以建模任意概率路径,并支持精确似然估计和确定性采样,很适合扩散模型
- 但传统的CNFs训练难度大,难以扩展到大规模数据集
创新点
提出了Flow Matching训练方法,用于训练CNFs,允许使用更高阶的求解器
概率密度路径
概率密度函数:对于一个连续随机变量 $X$ ,概率密度函数 $p(x)$ 描述了随机变量在每个点附近出现的“相对可能性”。
概率密度函数满足:
$$
p(x) \ge 0
$$
$$
\int_{-\infty}^{+\infty} p(x)dx = 1
$$
概率密度路径:一族随时间(或某个过程参数 t)变化的概率密度函数
$$
p_t(x), \quad t \in [0,1]
$$
- 当 $t=0$, 是初始概率分布 $p_0(x)$
- 当 $t=1$, 是最终概率分布 $p_1(x)$
- 其他 $t$ 表示从初始分布到最终分布的演化流动过程
概率密度路径表示概率是如何移动、扩散、集中
连续归一化流
Continuous Normalizing Flow,CNF
流(Flow):对象随着时间持续变化的过程
归一化流(Normalizing Flow):我们想要找一个函数 $f$,可以将一个简单的概率分布(高斯分布)转化为复杂概率分布(真实图像分布),且这个过程保证变化后的分布仍是合法的概率分布(积分为1)
连续归一化流(Continuous Normalizing Flow):普通的归一化流中,变化往往是离散的
$$
z \xrightarrow{f_1} h_1 \xrightarrow{f_2} h_2 \xrightarrow{\cdots} x
$$
而CNF中不再使用离散变化,而是让数据在一个向量场中连续流动(从分几步走变成沿着轨迹连续走)
雅可比
Jacobian
如果用一个变化将向量 $z$ 映射到向量 $x$ ,将每个输出分量对每个输入分量求偏导,放在一起,就形成了雅可比矩阵
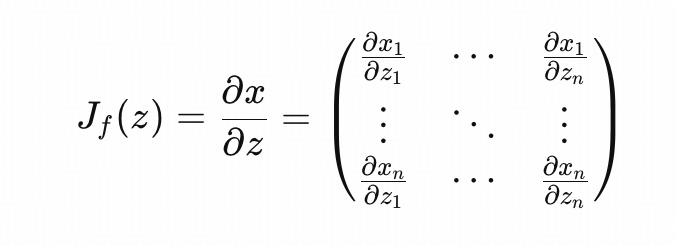
雅可比矩阵描述了这个变换在局部把空间「拉伸、压缩、翻转」的程度和方向。
雅可比矩阵补偿了体积变化,保证了概率密度变换后,仍是合法的概率密度函数
$$
\int p_X(x),dx = \int p_Z(z),dz = 1
$$
流匹配
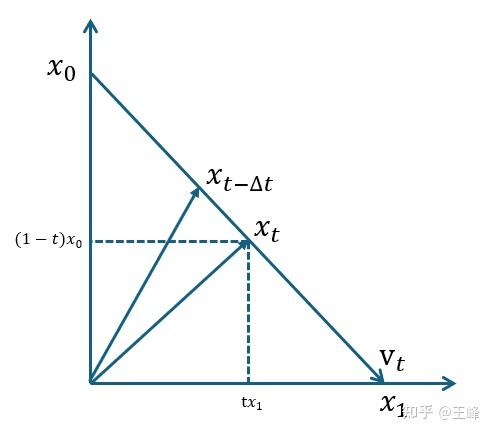
流匹配(Flow Matching)的目标是学习个从任意起点分布到终点分布的流动方向场(向量场)
$$
\frac{dx}{dt}=v_0(x,t)
$$
由于我们并不知道真实的概率分布路径,与其先设计一个真实的概率分布路径,再去跟随它,不如直接人为设定一条简单的插值路径
$$
x(t)=(1-t)x_{data}+tz_{noise}
$$
对这个路径求 $t$ 的导数得到速度:
$$
v_\theta(x(t), t) \approx \frac{dx(t)}{dt}=-x_{data} + z_{noise}
$$
只要求模型在每一个时间都能输出正确的速度方向,也能从起点到达终点,这个叫做速度场监督(velocity matching)
FM训练公式
$$
\min_\theta \ \mathbb{E}{x{\text{data}}, z, t}\left[ |v_\theta(x(t), t) - (z - x_{\text{data}})|^2 \right]
$$
生成时求解ODE:
$$
\frac{dx}{dt}=v_\theta(x,t)
$$
相较于DDPM和DDIM,Flow Matching更简洁、直观、可逆
ODE
DDPM描述的随机扩散过程SDE:
$$
dx=f(x,t)dt+g(t)dW_t
$$
- $f$:漂移项
- $g(t)$:噪声强度
- $dW_t$:随机噪声
训练过程训练的是噪声预测(或score function),使得模型反向过程能够还原前向加噪轨迹
$$
p_\theta(x_{t-1}|x_t) \approx q(x_{t-1}|x_t)
$$
由于存在随机噪声项,模拟的逆过程只能由随机SDE采样器(一阶欧拉法)近似实现,loss函数也绑定在这种一阶SDE采样器上
而FM彻底改写了生成过程的数据形式,不再依赖随机噪声,而是显式定义了一个确定性流动ODE
$$
\frac{dx}{dt}=v_0(x,t)
$$
FM的loss定义为
$$
\mathcal{L} = \mathbb{E}_{t, x_t, x_1, x_0} |v\theta(x_t, t) - v^*(x_t, t)|^2
$$
这个loss没有随机项,不依赖于任何一个特定的数值积分器(如果有随机项,那么loss的实际分布会与采样器有关),模型学习的是连续时间下的真实速度场,而非某种离散积分器的近似轨迹,于是在推理时可以使用比一阶欧拉更高阶的采样器,也不会破坏模型的一致性
DiT
《Scalable Diffusion Models with Transformers》2023.2
动机
- Transformer在NLP等领域、ViT在图像分类领域取得了巨大成绩,而生成模型还在使用UNet模型
- 作者质疑UNet的归纳偏执是否有必要
- 作者希望使用Transformer大幅提升生成模型的参数量
创新点
- 用纯Transformer替换UNet,在LDM下训练DiT
- 自适应层归一化 + 零初始化
- 探究模型参数量和FID的关系,发现参数量提升和FID下降呈强对数线形关系
关键技术
自适应层归一化
Adaptive Layer Normalization
DiT最核心的条件注入机制,是DiT能够超越传统U-Net的关键创新之一,以极低的计算开销(<1%额外Gflops)实现了高效、稳定的条件控制
MM-DiT
《Scaling Rectified Flow Transformers for High-Resolution Image Synthesis》2024.3,这是SD3的技术报告
动机
之前的模型使用Cross-Attention,将文本特征注入到图像生成网络中,图像和文本流是单向且独立的
创新点
- 双流处理,模型为图像块和文本embedding分别维护一套独立的权重,这意味着文本和图像在各自的空间内拥有不同的特征表达能力
- 双流信息交换,在注意力层,图像和文本特征会被拼接在一起进行全注意力计算。这使得文本特征能够根据图像内容进行更新,反之亦然
采样器革命
DPM-Solver
《DPM-Solver: A Fast ODE Solver for Diffusion Probabilistic Model Sampling in Around 10 Steps》2022.10
动机
更高效更高阶的ODE Solver,相较于普通求解器可以用更少的步骤且不偏离最终方向
创新点
- 推导扩散模型ODEs的精确解公式
- 提出DPM-Solver系列求解器
- 加速技巧:采样不受噪声类型影响、自适应步长
EDM
《Elucidating the Design Space of Diffusion-Based Generative Models》2022.10
EDM(Elucidated Diffusion Model)= 对扩散模型“从第一性原理重新推导 + 给出更优训练和采样策略”
第一性原理:从零开始从基础的不可再推导的基本原理出发,通过逻辑推演构建完整结论的方式,比如《几何原本》
动机
- 当时的扩散模型工作理论十分复杂,噪声设计随意、loss权重不平衡、采样器多且乱
- 希望从实际训练的角度,聚焦训练和采样中的“有形”对象
创新点
- 使用对数正态分布为噪声
- 统一采样器理论,均基于ODE/SDE一致理论
- 改进损害函数
DMD
《One-step Diffusion with Distribution Matching Distillation》2024.10
提出了一种新的蒸馏方法(Distribution Matching Distillation, DMD),成功将原本需要数十步甚至上百步迭代的扩散模型(Diffusion Models),压缩为一个仅需一步(One-step)的生成器,同时保持了极高的图像质量
DMD2
《Improved Distribution Matching Distillation for Fast Image Synthesis》2024.5
DMD虽然能实现一步生成,但是依赖回归损失,这带来了代价昂贵、限制上限和灵活性
- DMD2移除了回归损失,引入双时间尺度更新规则(Two Time-Scale Update Rule,TTUR)
- 引入GAN损失
- 从一步生成改为多步(2~4步)生成
可控生成
实现可控生成的方法有:
- 训练一个稳定的角色、画风LoRA
- 支持参考图
- 支持图像编辑
Textual Inversion
《An Image is Worth One Word: Personalizing Text-to-Image Generation using Textual Inversion》2022.8
动机
让更好的学习一个一个新概念
核心技术
文本反演
- 给定想要模型学习的新概念,以及对应的若干图片
- 冻结整个扩散模型,只训练概念token(如
<sks-dog>)在CLIP text encoder 的 embedding 空间 - 模型训练
在推理生成时,在prompt中写入带<sks-dog>的prompt
DreamBooth
《DreamBooth: Fine Tuning Text-to-Image Diffusion Models for Subject-Driven Generation》2023.3
目前huggingface diffusers库提供的Flux训练均基于DreamBooth,其核心机制是:
- 稀有标识符:在instance prompt中插入一些token,如
a dog变成a [V]dog,使得这个词会变得很稀有,训练效果会更好 - 保留先验损失:为了避免语义漂移,如将所有的
a dog都绑定为a [V]dog,会用训练前的模型用a dog生成出一些样本加入训练集中,这样模型能理解两者的差异
在使用huggingface 的DreamBooth训练脚本训练时,如果关闭了textencoder训练、关闭了稀有标识符替换、关闭了先验保留,就跟普通的sft没有区别了。感觉社区还是更喜欢普通sft,这种需要替换textencoder的模型还是太重了
T2I-Adapter
《T2I-Adapter: Learning Adapters to Dig out More Controllable Ability for Text-to-Image Diffusion Models》2023.3
动机
当时的SD模型的文本提示不足,对细节的控制能力弱,用户需要更细粒度的可控生成。希望在不修改原模型的情况下,将外部控制信号映射到扩散模型的特征空间
创新点
提出一个轻量级、即插即用的适配器框架,不修改原始模型,支持多种控制(如草图、深度图、关键pose、语意分割)、支持多适配器组合
IP-Adapter
《IP-Adapter: Text Compatible Image Prompt Adapter for Text-to-Image Diffusion Models》2023.8
让扩散模型理解“图像的语义”作为prompt,实现通过图像指导生成
- 使用CLIP提取图像特征
- 训练一个Adapter,将图像特征映射到text encoder的embedding空间
- 生成时输入文本和图像条件
ControlNet
《Adding Conditional Control to Text-to-Image Diffusion Models》2023.11
对扩散模型的UNet复制一份可训练的分支,用于接收结构性输入(Canny、Depth、Pose),实现精确控制
InstantID
《InstantID: Zero-shot Identity-Preserving Generation in Seconds》2024.2
动机
zero-shot图像生成保ID
- 基于角色LoRA等方法需要漫长训练、多参考图,且容易过拟合
- IP-Adapter等方法保真度低
- 目前的方法难以精确控制面部
创新点
- 模块化设计,即插即用
- 高保真ID嵌入提取,取代CLIP的粗粒度嵌入
- IdentityNet条件引导,不仅能保ID,还具有一定的文本编辑能力
关键技术
参考图处理
在生图过程中,从参考图中提取ID嵌入和粗landmark,输出UNet残差,作为条件注入扩散生成
数据预处理
从人类主体的图像-文本对出发(LAION-Face),检测面部,使用antelopev2(insightface)提取ID嵌入,生成粗关键点图(2眼、鼻、2嘴)
PuLID
《PuLID: Pure and Lightning ID Customization via Contrastive Alignment》2024.10
人脸保ID
Flux Kontext
《FLUX.1 Kontext: Flow Matching for In-Context Image Generation and Editing in Latent Space》2025.6
动机
训练一个同时输入文本和参考图的生成模型
创新点
将上下文图像的latent拼接在序列中,实现了基于参考图的编辑能力
[latent_x (t=0) ; latent_y (t=1)] + 文本tokens |
Qwen-Image
《Qwen-Image Technical Report》2025.8
应用
如何组织 prompt
T2I
from diffusers import DiffusionPipeline |
T2I LoRA
LoRA可以改变模型画风
from diffusers import DiffusionPipeline |
I2I LoRA
将图片转为LoRA画风
import torch |
I2I LoRA Controlnet
直接使用I2I LoRA效果并不好,对原图的控制能力比较弱,可以配合使用Controlnet使用
import os |
更长的prompt
SD画图经常遇到CLIP能力限制,Token数不够的问题,这限制了我们使用更多更长的prompt
可以使用sd_embed库,克服77 Token限制
from sd_embed.embedding_funcs import get_weighted_text_embeddings_sdxl |
检查VAE
只加载vae,将图片编码为latent,再解码回图像,这里使用Flux的VAE
import torch |
参考
《Step-by-Step Diffusion: An Elementary Tutorial》


