WPF中的C#
C#语法
字符串
字符串替换
string raw = "Hello world" ;string pre_str = "Hello" ;string new_str = "Hi" ;string pre_str2 = "hello" ;string ans = raw.Replace(pre_str, new_str); string ans2 = Regex.Replace(raw, pre_str, new_str, RegexOptions.IgnoreCase);
Console
Console可以设置输出的wei’zhi,在初始化等待时,在同一行反复输出等待的时间
DateTime startTime = DateTime.Now; Init(); Console.WriteLine("Init..." ); while (!InitSuccess()){ TimeSpan elapsedTime = DateTime.Now - startTime; Console.SetCursorPosition(0 , Console.CursorTop - 1 ); Console.Write(new string (' ' , Console.WindowWidth)); Console.SetCursorPosition(0 , Console.CursorTop - 1 ); Console.WriteLine($"Waiting {elapsedTime.TotalSeconds} s" ); Thread.Sleep(10 ); }
容器
C#容器和其他语言接近,这里只列出一些我感觉很有意思的写法
ConcurrentDictionary
线程安全地修改key所对应的List,若Key不存在,则新建一个
这是一种线程安全的哈希表,使用分段锁机制实现并发访问
private static readonly ConcurrentDictionary<string , List<object >> instanceDictionary = new ConcurrentDictionary<string , List<object >>();public void Add (string key ,object instance{ instanceDictionary.AddOrUpdate(key, k => new List<object > { instance }, (k, exitingList)=> { exitingList.Add(instance); return exitingList; }); }
ConcurrentBag
线程安全的集合类型,底层基于ConcurrentDictionary实现
string[] files = ...; var bag = new ConcurrentBag <CSVLine>(); Parallel.ForEach (Partitioner.Create (0 , files.Length), range => { for (int i = range.Item1; i < range.Item2; i++) { bag.Add (line); } }
正则表达式
string source = "building.lod0.mesh" string pattern = @"lod(\d).mesh" ;Match match = Regex.Match(source, pattern); if (match.Success){ string ans = match.Value; string level = match.Groups[1 ].Value; }
委托
C#的委托类似于C++的函数指针,C#中,将参数a,b委托给了对象adder的Add方法,委托本质上是一种支持()运算符的对象 。既然是对象,就可以有自己的成员和状态
delegate int Fun (int a, int bclass Adder { private int c = 0 ; public Adder (int cthis .c = c; } public int Add (int a, int breturn a+b+c; } } Adder adder = new Adder(1 ); Fun f = adder.Add; f(2 ,3 );
C#委托支持匿名委托和lambda表达式
delegate int Fun (int a, int bFun f = delegate (int a, int b){ cout << a+b << endl; }; Fun f2 = (int a, int b)=>{ cout << a+b << endl; };
C++的函数指针
C/C++的函数指针是一个指向函数入口的指针,不具有对象的性质,只能指向非成员函数
typedef int (*Func) (int a, int b) int Add (int a, int b) return a+b; } int main (int argc, char **argv) Func func = Add; std::cout << func (1 ,2 ); return 0 ; }
当然,如果加上类型限制符,还是可以指向成员函数的
class Multiple {public : int Mul (int a, int b) return a * b; } }; typedef int (Multiple::*Fm) (int a, int b) int main (int argc, char **argv) Multiple multiple; Fm f = &Multiple::Mul; std::cout << (multiple.*f)(3 ,4 ); return 0 ; }
如果想让C++对委托具有对象的性质,我们可以重载()操作符
class Adder {public : Adder (int c){ this ->c = c; } int operator () (int a, int b) return a+b+c; } private : int c; }; int main (int argc, char **argv) Adder adder (1 ) ; std::cout << adder (2 , 3 ); return 0 ; }
Action泛型委托
C#一种无返回值的泛型委托
public delegate void Action <in T >(T obj )
无参数Action xxx = 函数
public class Name { public string InstanceName{ private set ; get ; } public Name (string name { InstanceName = name; } public void DisplayName () { Console.WriteLine($"I'm {InstanceName} " ); } } public static void Main (string [] args{ Name testName = new Name("Tim" ); Action showName = testName.DisplayName; showName(); }
有参数Action<参数类型> xxx = 函数
public class Name { public string InstanceName{ private set ; get ; } public Name (string name { InstanceName = name; } public void DisplayName (string str { Console.WriteLine($"I'm {InstanceName} , {str} " ); } } public static void Main (string [] args{ Name testName = new Name("Tim" ); Action<string > showName = testName.DisplayName; showName("HHH" ); }
Func泛型委托
C#一种有返回值的泛型委托
public delegate TResult Func <out TResult >()
public class Adder { private int c; public Adder (int cthis .c = c; } public int Add (int a, int b { return a + b + c; } } public static void Main (string [] args{ Adder adder = new Adder(1 ); Func<int , int , int > method = adder.Add; Console.WriteLine(method(2 , 3 )); }
事件
这里的事件指CLR事件模型,详细内容见下文
委托:把工作委托给了某个函数,可以直接调用
事件:订阅者侦听发行者,发行者可以通过回调函数间接让订阅者干事(而且订阅者具体干什么,要看订阅者心情,发行者无权过问)
public class MyEventArgs : EventArgs { public string Args { private set ; get ; } public MyEventArgs (string args { Args = args; } } public class EventSource { MyEventArgs eventArgs; public string Name; public EventSource (string args { eventArgs = new MyEventArgs(args); } public delegate void handlerEvent (Object sender, MyEventArgs args ) public event handlerEvent m_handler_event; public void Handler () { m_handler_event?.Invoke(this , eventArgs); } }
class MainClass { public static void Main (string [] args { EventSource source = new EventSource("Event had been raised!" ); source.Name = "Tim" ; source.m_handler_event += new EventSource.handlerEvent(writeHello); source.Handler(); } static void writeHello (Object sender, MyEventArgs args ) { EventSource source = sender as EventSource; Console.WriteLine($"Hello {source.Name} , {args.Args} " ); } }
最初我很好奇,我们注册了一个处理函数,source.m_handler_event += writeHello,但是好像没看到怎么传参进去。
其实是因为C#的委托本质是一个支持()运算符的对象,所有处理函数形式上跟委托一致,参数是委托对象的成员变量
一个事件可以注册多个处理函数,于是事件也称为多重委托
模式匹配
一种更好的if else
using System;public abstract class Shape { public abstract void Draw () } public class Circle : Shape { public double Radius { get ; set ; } public override void Draw () { Console.WriteLine($"Drawing a circle with radius {Radius} " ); } } public class Rectangle : Shape { public double Width { get ; set ; } public double Height { get ; set ; } public override void Draw () { Console.WriteLine($"Drawing a rectangle with width {Width} and height {Height} " ); } } class Program { static void Main () { Shape[] shapes = { new Circle { Radius = 5.0 }, new Rectangle { Width = 4.0 , Height = 6.0 }, null }; foreach (var shape in shapes) { if (shape is Circle circle) { Console.WriteLine($"Found a circle with radius {circle.Radius} " ); } else if (shape is Rectangle rectangle) { Console.WriteLine($"Found a rectangle with width {rectangle.Width} and height {rectangle.Height} " ); } else if (shape is null ) { Console.WriteLine("Found a null shape" ); } else { Console.WriteLine("Unknown shape" ); } string description = shape switch { Circle c => $"A circle with radius {c.Radius} " , Rectangle r => $"A rectangle with width {r.Width} and height {r.Height} " , null => "A null shape" , _ => "An unknown shape" }; Console.WriteLine(description); } } }
WPF客户端
WPF客户端的入口是一个继承了Application的类,通常是App.xaml和App.xaml.cs
App.xaml
<Application x:Class ="WpfApp1.App" xmlns ="http://schemas.microsoft.com/winfx/2006/xaml/presentation" xmlns:x ="http://schemas.microsoft.com/winfx/2006/xaml" xmlns:local ="clr-namespace:WpfApp1" StartupUri ="MainWindow.xaml" > <Application.Resources > </Application.Resources > </Application >
若App.xaml中配置了StartupUri="MainWindow.xaml",程序开始时打开窗口MainWindow.xaml
App.xaml.cs
App.xaml.cs内定义了一个类App,这个类继承自Application
可以重载函数,以控制程序开始、结束时的行为
namespace WpfApp1 { public partial class App : Application { protected override void OnStartup (StartupEventArgs e ) protected virtual void OnExit (ExitEventArgs e ) } }
如App.xaml中不配置StartupUri,也可以在此手动创建窗口
public partial class App : Application { protected override void OnStartup (StartupEventArgs e ) { base .OnStartup(e); string [] commandLineArgs = e.Args; MainWindow mainWindow = new MainWindow(); mainWindow.Show(); } }
运行WPF项目
string exePath = "WpfApp1.exe" ;string arguments = "/param1 value1 /param2 value2" ;ProcessStartInfo startInfo = new ProcessStartInfo { FileName = exePath, Arguments = arguments, UseShellExecute = true }; Process.Start(startInfo);
Binding
逻辑层与UI层
程序 = 数据 + 算法
三层结构:存储、逻辑、展示(UI)
逻辑层可以访问UI层的数据,但展示层不能访问逻辑层,UI层能显示信息,靠的是绑定逻辑层数据
this .textBoxName.SetBinding(TextBox.TextProperty, new Binding("Name" ) { Source = stu = new Student() });
UI层不仅可以绑定逻辑层数据,也可以绑定UI层数据
<TextBox x:Name="textBox2" Text="{Binding Value, ElementName=slider1}" BorderBrush="Black" Margin="5" />
在XAML中加入
xmlns:local="clr-namespace:BindingStudy"
即可在XAML中使用BindingStudy命名空间里C#定义的类
绑定的实现
绑定实现的机制:源对象的属性(Property)发生改变时,会Invoke一个事件,Binding负责侦听这个事件
class Student : INotifyPropertyChanged { public event PropertyChangedEventHandler PropertyChanged; private string name; public string Name { get { return name; } set { name = value ; if (this .PropertyChanged != null ) { this .PropertyChanged.Invoke(this , new PropertyChangedEventArgs("Name" )); } } } }
Path
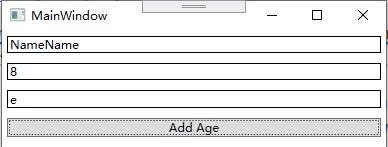
源对象往往会有多个属性,我们可以使用Path,设置绑定那些属性,而且Path支持多级路径(简单说就是一直点下去)和索引器(Indexer)
<TextBox x:Name="textBoxName" BorderBrush="Black" Margin="5" /> <TextBox x:Name="textBox1" Text="{Binding Path=Text.Length, ElementName=textBoxName, Mode=OneWay}" BorderBrush="Black" Margin="5" /> <TextBox x:Name="textBox2" Text="{Binding Path=Text.[3], ElementName=textBoxName, Mode=OneWay}" BorderBrush="Black" Margin="5" />
此外Path也支持多级斜线(也是可以一直斜线下去,其中"/"就是自身)
this .textBoxName.SetBinding(TextBox.TextProperty, new Binding("/Length" ) { Source = stringList });
当源数据本身就是数据(比如int、string类型),我们可以不写Path,或者将Path省略为"."
this .textBlock1.SetBinding(TextBlock.TextProperty, new Binding("." ) { Source = str });
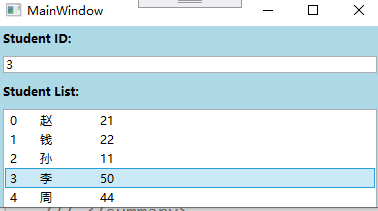
集合
<StackPanel x:Name ="stackPanel" Background ="LightBlue" > <TextBlock Text ="Student ID:" FontWeight ="Bold" Margin ="5" /> <TextBox x:Name ="textBoxId" Margin ="5" /> <TextBlock Text ="Student List:" FontWeight ="Bold" Margin ="5" /> <ListBox x:Name ="listBoxStudents" Height ="110" Margin ="5" > <ListBox.ItemTemplate > <DataTemplate > <StackPanel Orientation ="Horizontal" > <TextBlock Text ="{Binding Path=Id}" Width ="30" /> <TextBlock Text ="{Binding Path=Name}" Width ="60" /> <TextBlock Text ="{Binding Path=Age}" Width ="30" /> </StackPanel > </DataTemplate > </ListBox.ItemTemplate > </ListBox > </StackPanel > public MainWindow() { InitializeComponent(); List<Student > stuList = new List<Student > () { new Student(){Id=0, Name="赵", Age=21}, new Student(){Id=1, Name="钱", Age=22}, new Student(){Id=2, Name="孙", Age=11}, new Student(){Id=3, Name="李", Age=50}, new Student(){Id=4, Name="周", Age=44}, }; this.listBoxStudents.ItemsSource = stuList; //this.listBoxStudents.DisplayMemberPath = "Name"; Binding binding = new Binding("SelectedItem.Id") { Source = this.listBoxStudents }; this.textBoxId.SetBinding(TextBox.TextProperty, binding); }
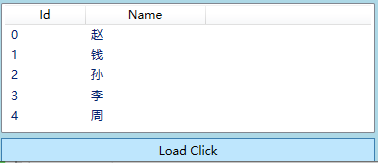
XML
SOAP(Simple Object Access Protocel,简单对象访问协议):一种基于XML的数据交换协议
<?xml version="1.0" encoding="utf-8" ?> <StudentList > <Student Id ="0" > <Name > 赵</Name > </Student > <Student Id ="1" > <Name > 钱</Name > </Student > <Student Id ="2" > <Name > 孙</Name > </Student > <Student Id ="3" > <Name > 李</Name > </Student > <Student Id ="4" > <Name > 周</Name > </Student > </StudentList > <ListView x:Name ="listViewStudents" Height ="130" Margin ="5" > <ListView.View > <GridView > <GridViewColumn Header ="Id" Width ="80" DisplayMemberBinding ="{Binding XPath=@Id}" /> <GridViewColumn Header ="Name" Width ="120" DisplayMemberBinding ="{Binding XPath=Name}" /> </GridView > </ListView.View > </ListView > <Button Content ="Load Click" Click ="Button_Click" Height ="25" Margin ="5,0" /> private void Button_Click(object sender, RoutedEventArgs e) { XmlDataProvider xdp = new XmlDataProvider(); xdp.Source = new Uri(@"D:\code\BindingStudy\BindingStudy\RawData.xml"); xdp.XPath = @"/StudentList/Student"; this.listViewStudents.DataContext = xdp; this.listViewStudents.SetBinding(ListView.ItemsSourceProperty, new Binding()); }
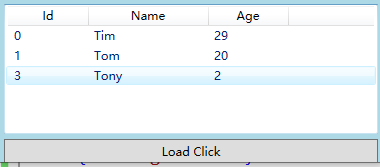
LINQ
LINQ(Language-Integrated Query,语言集成查询):一种对象查询机制,查询的结果为IEnumerable类型
<?xml version="1.0" encoding="utf-8" ?> <StudentList > <Class > <Student Id ="0" Name ="Tim" Age ="29" /> <Student Id ="1" Name ="Tom" Age ="20" /> <Student Id ="2" Name ="Mess" Age ="9" /> </Class > <Class > <Student Id ="3" Name ="Tony" Age ="2" /> <Student Id ="4" Name ="Viv" Age ="23" /> <Student Id ="5" Name ="Oio" Age ="88" /> </Class > </StudentList > <ListView x:Name ="listViewStudents" Height ="130" Margin ="5" > <ListView.View > <GridView > <GridViewColumn Header ="Id" Width ="80" DisplayMemberBinding ="{Binding Id}" /> <GridViewColumn Header ="Name" Width ="120" DisplayMemberBinding ="{Binding Name}" /> <GridViewColumn Header ="Age" Width ="80" DisplayMemberBinding ="{Binding Age}" /> </GridView > </ListView.View > </ListView > private void Button_Click(object sender, RoutedEventArgs e) { XDocument doc = XDocument.Load(@"D:\code\BindingStudy\BindingStudy\RawData.xml"); this.listViewStudents.ItemsSource = from element in doc.Descendants("Student") where element.Attribute("Name").Value.StartsWith("T") select new Student() { Id = int.Parse(element.Attribute("Id").Value), Name = element.Attribute("Name").Value, Age = int.Parse(element.Attribute("Age").Value) }; } class Student { public int Id { get; set; } public string Name { get; set; } public int Age { get; set; } }
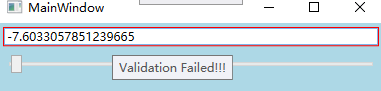
校验
“你永远不能相信来自前端的数据”
我们认为Source的数据一定是正确的,但Target的数据是有可能出现问题的
public partial class MainWindow : Window { public MainWindow () { InitializeComponent(); Binding binding = new Binding("Value" ) { Source = this .slider1 }; binding.UpdateSourceTrigger = UpdateSourceTrigger.PropertyChanged; RangeValidationRule rvr = new RangeValidationRule(); rvr.ValidatesOnTargetUpdated = true ; binding.ValidationRules.Add(rvr); binding.NotifyOnValidationError = true ; this .textBox1.SetBinding(TextBox.TextProperty, binding); this .textBox1.AddHandler(Validation.ErrorEvent, new RoutedEventHandler(this .ValidationError)); } void ValidationError (object sender, RoutedEventArgs e { if (Validation.GetErrors(this .textBox1).Count > 0 ) { this .textBox1.ToolTip = Validation.GetErrors(this .textBox1)[0 ].ErrorContent.ToString(); } else { this .textBox1.ToolTip = null ; } } } <StackPanel x:Name="stackPanel" Background="LightBlue" > <TextBox x:Name="textBox1" Margin="5" /> <Slider x:Name="slider1" Minimum="-10" Maximum="110" Margin="5" /> </StackPanel> class RangeValidationRule : ValidationRule { public override ValidationResult Validate (object value , CultureInfo cultureInfo { double d = 0 ; if (double .TryParse(value .ToString(), out d)) { if (d >= 0 && d <= 100 ) { return new ValidationResult(true , null ); } } return new ValidationResult(false , "Validation Failed!!!" ); } }
数据转换
Slider的Value是double类型,TextBox的Text是string类型,但是Binding后数据往来自如,是因为数据转化机制
class ClassAToClassBConverter : IValueConverter { public object Convert (object value , Type targetType, object parameter, CultureInfo culture { ... } public object ConvertBack (object value , Type targetType, object parameter, CultureInfo culture { ... } } <Window x:Class="BindingStudy.MainWindow" ... <Window.Resources> <local:ClassAToClassBConverter x:Key="atb" /> </Window.Resources> <StackPanel x:Name="stackPanel" Background="LightBlue" > ... <../../images Width="20" Height="20" Source="{Binding Path=A, Converter={StaticResource atb}}" /> </StackPanel> </Window>
属性
英语中的属性
Property是物体自带的属性
Attribute是物体的描述属性
张三是中国人,身上有一百块钱。中国人是张三的Attribute, 100块钱是张三的property
C#中的属性
将字段设为private,使用一对非private的方法来包装它,以实现高内聚
C#中提供语法糖,将Get和Set合并为了属性(Property),这种属性也被称为CLR(Common Language Runtime)属性
class Student { private string name; public string Name { get ; set ; } }
此外反编译后发现,属性的本质是两个函数,并不会增加字段数量(不额外占内存)
依赖属性
(WPF属性加强版)
依赖属性(Dependency Property)可以自己没有值,通过Binding从数据源获得值
拥有依赖属性的对象被称为依赖对象
传统开发中,对象所占用的内存在进行实例化时就确定(分配)了,而依赖属性可以允许对象不分配部分空间
class Student : DependencyObject { public string Name { get { return (string )GetValue(NameProperty); } set { SetValue(NameProperty, value ); } } public static readonly DependencyProperty NameProperty = DependencyProperty.Register("Name" , typeof (string ), typeof (Student)); public BindingExpressionBase SetBinding (DependencyProperty dp, BindingBase binding ) { return BindingOperations.SetBinding(this , dp, binding); } }
“Name”:指明使用哪一个 CLR属性作为这个依赖属性的包装器 (Wrapper)
typeof(string):指明此依赖属性用来储存什么类型的值
typeof(Student)):指明此依赖属性要注册关联到谁身上
<StackPanel x:Name ="stackPanel" Background ="LightBlue" > <TextBox x:Name ="textBox1" BorderBrush ="Black" Margin ="5" /> <TextBox x:Name ="textBox2" BorderBrush ="Black" Margin ="5" /> </StackPanel > public partial class MainWindow : Window { Student stu; public MainWindow() { InitializeComponent(); stu = new Student(); stu.SetBinding(Student.NameProperty, new Binding("Text") { Source = textBox1 }); textBox2.SetBinding(TextBox.TextProperty, new Binding("Name") { Source = stu }); } }
我们还发现,依赖对象并没有实现INotifyPropertyChanged接口,但是当期值发生改变时,与之相关的Binding对象依然可以得到通知,于是依赖对象是天生的合格源数据
在VS中,输入propdp并按两次tab,就能得到一个依赖属性模板
依赖属性的注册
前文我们获得依赖对象的实例时,是通过DependencyProperty.Register注册得到:
创建DependencyProperty实例,并使用其CLR属性名的哈希异或宿主类型的哈希,得到key(通过其他算法,保证唯一)
将key和实例存储到一张全局的HashTable上
GlobalIndex = CLR属性名的HaseCode XOR 宿主类型HashCode
于是运行时只要知道CLR属性名和宿主,就能找到依赖对象实例
依赖属性的读写
依赖属性对象的作用是检索真正的属性值,而非存储属性值
每个DependencyObject实例都自带一个数组,当某个依赖属性的值要被读取时,算法会在这个数组中检索。而用于检索的键值,实际上就是依赖属性的GlobalIndex
也就是说,这个被static readonly修饰的属性,它的作用是一个“标记”,当你需要找某个东西时,就来这里拼一个id,用id查数组
附加属性
附加属性(Attached Properties):一个属性本不属于某个对象,但由于某种需求后来附加上。换句话说,将对象放入一个特定环境后,才会具有出来的属性
举个例子,比如Human这个类,它可以有很多很多种属性,现在我们想在里面加入一个新的需求,如果我们直接改动这个类,过于繁琐。而如果提前留好空,那么有时候又会空间浪费
附加属性的作用就是让宿主和属性解耦,让宿主的设计更为灵活
事件
消息
事件的前身是消息(Message),Windows系统就是一个消息驱动的操作系统,后来微软为了降低开发难度,将消息系统封装为了事件模型
CLR事件模型
CLR事件模型由三部分组成
事件的拥有者:即消息的发送者
事件的响应者:即消息的接收者,它可以使用事件处理器(Event Handler)对事件做相应
事件的订阅关系:事件的拥有者可以随时激发事件,但只有关注(订阅)了这个事件的响应者会对此产生反应
事件本质上就是一个使用event关键字修饰的委托(Delegate)类型成员变量,事件处理器是一个函数
A订阅了B,实际上就是让B.Event和A.EventHandler关联起来
事件激发就是B.Event被调用
举例
Windows Form按按钮
事件的拥有者
button
事件
button.Click
事件的响应者
窗体
事件处理器
this.button_Click()
订阅关系
this.button.Click += new System.EventHandler(this.button_Click)
路由事件
(WPF事件加强版)
路由事件没有显示订阅关系
事件拥有者只负责激发事件,至于谁会倾听,他并不知道
事件响应者装有事件倾听器,若有事件传递于此,可以决定事件是否可以继续传递
如果事件不归他管,那就踢给下一个人,继续传播
若事件归他管,那就进行处理,并判断是否还需要传给下一个人
public abstract class ButtonBase : ContentControl , ICommandSource { public static readonly RoutedEvent ClickEvent = EventManager.RegisterRoutedEvent("Click" , RoutingStrategy.Bubble, typeof (RoutedEventHandler), typeof (ButtonBase)); public event RoutedEventHandler Click { add { this .AddHandler(ClickEvent, value ); } remove { this .RemoveHandler(ClickEvent, value ); } } protected virtual void OnClick () { RoutedEventArgs newEvent = new RoutedEventArgs(ButtonBase.ClickEvent, this ); this .RaiseEvent(newEvent); } }
WPF路由事件有三种策略
Bubble:冒泡式,激发者向其上级一层一层路由,直到到根,路径是确定且唯一
Tunnel:隧道式,激发者向其下级一层一层路由,路径有很多,但朝向响应者移动,就像形成一个隧道
Direct:直达式,类似CLR事件,直接向响应者发送事件
命令
事件不具有约束力,事件接收者使用自己的行为响应事件
命令具有约束力,当命令到达某个组件时,会主动调用组件的某个方法
命令系统
命令(Command):实现ICommand接口
命令源(Command Source):实现ICommandSource接口
命令目标(Command Target):实现IInputElement接口
命令关联(Command Binding)
其他功能
获取当前应用程序域的基础目录
获得.exe文件所在的文件夹目录
string path = System.AppDomain.CurrentDomain.BaseDirectory;
动态加载程序集
加载一个C# DLL文件,然后就可以使用反射来调用API
namespace MathUtils { public class MathUtils { public static int Add (int a, int b { return a + b; } } }
string dllPath = "MathUtils.dll" ;byte [] buffer = File.ReadAllBytes(dllPath);Assembly assembly = Assembly.Load(buffer); Type mathType = assembly.GetType("MathUtils.MathUtils" ); if (mathType != null ){ MethodInfo method = mathType.GetMethod("Add" ); if (method != null ) { object [] parameters = new object [] { 1 , 2 }; object result = method.Invoke(null , parameters); Console.WriteLine(result); } }
Activator
这是一个动态创建对象实例的类型,可以实现泛型
public class Person { public string FirstName { get ; set ; } public string LastName { get ; set ; } public Person (string firstName, string lastName { FirstName = firstName; LastName = lastName; } public void DisplayInfo () { Console.WriteLine($"Name: {FirstName} {LastName} " ); } }
public class ObjectFactory <T >{ public T CreateInstance (params object [] constructorArgs { try { return (T)Activator.CreateInstance(typeof (T), constructorArgs); } catch (Exception ex) { Console.WriteLine($"Failed to create instance: {ex.Message} " ); return default (T); } } }
ObjectFactory<Person> personFactory = new ObjectFactory<Person>(); Person person = personFactory.CreateInstance("John" , "Doe" ); person.DisplayInfo();
值得注意的时,C#的泛型类型也是在编译期确定的(与C++相同),这样可以提供编译检查等功能